We use minimal analytics to improve the site. Is that okay?

Alik Griffin
San Clemente Sunset
Subscription Form
  • Reviews
    • Accessory Reviews
    • Calculators
      • Video Data Rate Calculator | Record Time Calculator
      • Diffraction Calculator
      • DoF Calculator | Lens Equivalent
      • Shutter Speed to Shutter Angle Calculator
    • Camera Reviews
    • Lens Reviews
    • Memory Cards Recommendations
      • Fastests SD Memory Cards
      • Fastest MicroSD Cards
      • Fastest CFExpress Type-B Card
      • Fastest CFExpress Type-A Cards
      • Best CFast Memory Card
    • List of Mics
      • Best Streaming & Podcast Mics
  • Camera Guides
    • List of all Blackmagic Cameras
    • List Of all Canon RF Cameras
    • List of all Fujifilm Cameras
    • List of all Nikon Z Cameras
    • List of all Panasonic Cameras
    • List Of all Sony E Cameras
  • List of Lenses
    • Canon RF Lenses
    • Fujifilm GFX Lenses
    • Fujifilm XF Lenses
    • L-Mount Lenses
    • Leica M Lenses
    • Micro Four Thirds Lenses
    • Nikon Z Lenses
    • PL Mount Cine Lenses
    • Sony E Lenses (FE and APS-C)
  • Store
  • My account
Alik Griffin
Alik Griffin
  • Reviews
    • Accessory Reviews
    • Calculators
      • Video Data Rate Calculator | Record Time Calculator
      • Diffraction Calculator
      • DoF Calculator | Lens Equivalent
      • Shutter Speed to Shutter Angle Calculator
    • Camera Reviews
    • Lens Reviews
    • Memory Cards Recommendations
      • Fastests SD Memory Cards
      • Fastest MicroSD Cards
      • Fastest CFExpress Type-B Card
      • Fastest CFExpress Type-A Cards
      • Best CFast Memory Card
    • List of Mics
      • Best Streaming & Podcast Mics
  • Camera Guides
    • List of all Blackmagic Cameras
    • List Of all Canon RF Cameras
    • List of all Fujifilm Cameras
    • List of all Nikon Z Cameras
    • List of all Panasonic Cameras
    • List Of all Sony E Cameras
  • List of Lenses
    • Canon RF Lenses
    • Fujifilm GFX Lenses
    • Fujifilm XF Lenses
    • L-Mount Lenses
    • Leica M Lenses
    • Micro Four Thirds Lenses
    • Nikon Z Lenses
    • PL Mount Cine Lenses
    • Sony E Lenses (FE and APS-C)
  • Store
  • My account
  • Pure Cinema
    Viltrox TCL-X100VI Review | A Budget-Friendly 50mm Upgrade
    • February 21, 2026
  • Thypoch Simera 75mm f1.4 Review
    Thypoch Simera 75mm f1.4 Review & Sample Photos
    • February 18, 2026
  • Kakurajima View
    Viltrox WCL-X100VI Review | A Budget-Friendly 28mm Upgrade
    • February 17, 2026
  • Viltrox 9mm f2.8 Air Review
    Viltrox 9mm f2.8 AIR Review & Sample Photos
    • February 18, 2026
  • Biker Bro
    Viltrox Spark Z3 Flash – Review & Sample Photos
    • February 16, 2026
  • Pure Cinema

    Viltrox TCL-X100VI Review | A Budget-Friendly 50mm Upgrade

    View Post
  • Thypoch Simera 75mm f1.4 Review

    Thypoch Simera 75mm f1.4 Review & Sample Photos

    View Post
  • Kakurajima View

    Viltrox WCL-X100VI Review | A Budget-Friendly 28mm Upgrade

    View Post
Trending Posts
  • Nikon Zf Official Announcement 1
    Nikon Zf – The Fujifilm Killer?
    • February 18, 2026
  • Nikon Z 50mm f1.8 S Lens Review 2
    Nikon Z 50mm f1.8 S Lens Review & Sample Photos
    • February 18, 2026
  • Kamlan 50mm f1.1 II Product Shot 3
    Kamlan 50mm f1.1 II Review & Sample Photos
    • January 18, 2025
0
  • Blog
  • Photo Tips

How I Got The Shot – Above Tokyo

  • Alik Griffin
  • December 11, 2024
  • No comments

This website contains affiliate links. We will earn a small commission on purchases made through these links. Some of the links used in these articles will direct you to Amazon. As an Amazon Associate, I earn from qualifying purchases.

My most popular posts often include a breakdown of how I get some of these shots and my different photography techniques. So, with this night-building shot in Tokyo, I’ve decided to do a detailed write-up sharing a few basic techniques because shots like this are a little more complicated than your normal landscape.

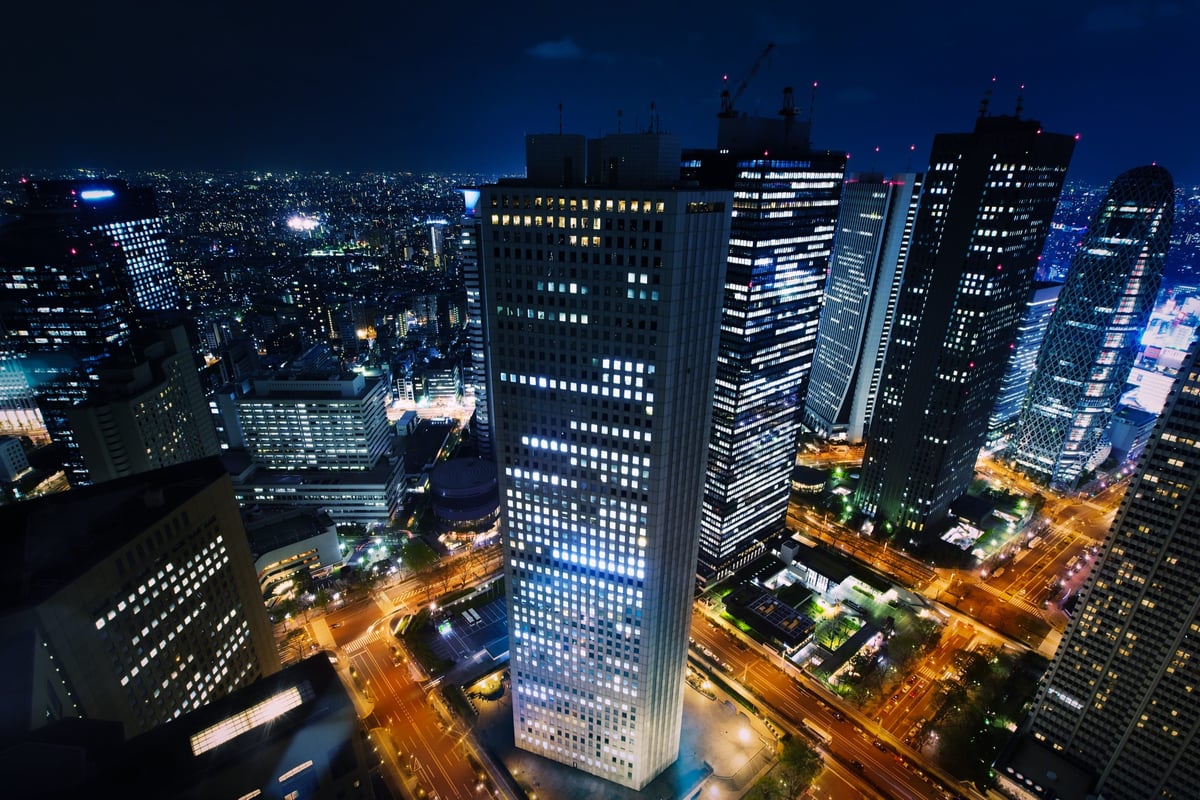
Above Tokyo – Shot Breakdown

This shot was taken at the top of the Tokyo Metropolitan Government Building.

The camera I used was the Sony A7r, with the Canon 16-35mm lens. And the Metabones adapter.

The shutter was 4 seconds, ISO 400 at f/10.

Above Tokyo

At some point in your career as a tourist, you’ll find yourself at some viewpoint at the top of a building or tower. There are a few in Tokyo, New York, Las Vegas, and Toronto. The one thing they always have in common is that they block you in with tinted glass and rarely let you use a tripod.

Stabilizing The Shot

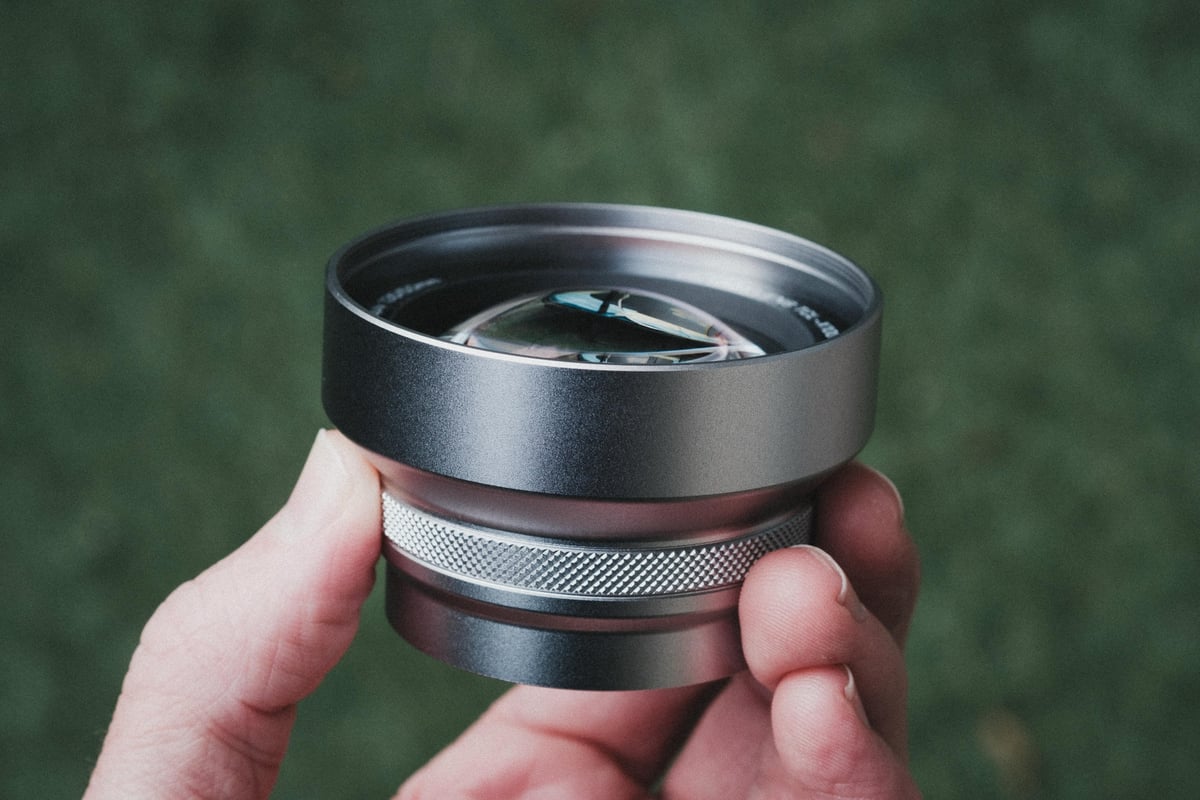
The first thing you have to do is figure out a way to stabilize your camera. For this shot, I ended up using my lens case. Then, I was able to press the lens against the glass window. That helped eliminate any vertical and horizontal movement as well as any vibrations since the lens case was by no means sturdy.

If I hadn’t been in Japan and already had two pounds overweight in my luggage, I probably would have brought a steady bag or something similar.

Eliminating Reflections

Next, I had to eliminate as much reflection from the glass as possible.

There are times when it’s nice to have an extra set of hands. But I didn’t. So, I ended up using a combination of my scarf and hat wrapped around the lens to block out any light.

Even though the lens was against the glass, the glass is thick, so you still have to deal with reflections. I clearly failed to remove all of them.

Next – Processing and getting the crazy colors out of the tinted glass.

The camera Raw. . . Disgusting. . .

Unedited Photo

My Post Processing Techniques Using Photoshop, Lightroom & Nik Collection

In Lightroom: I start in Lightroom and load my lens profile to eliminate any chromatic aberrations, lens distortion, and vignetting. Then, export to Photoshop.

I’m still using CS5 in Photoshop, but once in Photoshop, I’ve been loading the Nik Collection plugins. The first one I ran was Dfine 2 to eliminate noise. It works well enough for me.

Next, I ran Color Efex Pro. (See my review here) It has great tools for removing the color cast and cross-balancing a shot.

Cross Balance is one of Color Efex Pro’s tools. It has a few different presets to quickly adjust the balance of colors in your shot: Tungsten to Daylight and Daylight to Tungsten. It eliminates the guesswork and is a cool technique for getting various looks out of your night photography.

Color Efex Pro Cross Balance

In this case, the glass was tinted, so my results had a greenish tint. To Remove that, I used the setting Remove Color Cast. The coolest thing about these tools is that you can stack them and use them more than once.

Color Cast Adjustments

The Results Looked Something Like This

First Round

Could I have done this same thing in Lightroom and achieved close to the same results in less than 3 seconds? Absolutely! 

However, using the Nik Collection was easy because it made this adjustment onto its layer in Photoshop. I could then adjust the opacity and create layer masks for tuning, all with the original image underneath.

In Photoshop, it cannot be easy to adjust your color temperature without returning to the camera raw or fiddling with the curves or channel mixer until the end of time. And I wouldn’t have had that original layer had I done it in Lightroom.

Layer Masks

I used a layer mask to restore those original amber streetlights and brushed the streets from the original layer. The results looked like this.

Layer Mask Results

Fine Tuning

For the Fine Tuning, I just used Viveza 2, which is a terrible, horrible name for a product, by the way. I’ve been using it for two weeks and still have to refer back to Photoshop to see what it’s called whenever I want to write about it.

You could have used Viveza 2 instead of Photoshop or Lightroom. The advantages of Viveza 2 aren’t huge compared to doing things by hand with a moderate to advanced Photoshop skills level. I like using Viveza because I’m still trying it out.

At this point, I also painted out as much reflection as possible with the clone stamp because the spot heal tool wasn’t working well.

Final Sharpening

For the final sharpening, I usually use this pretty basic technique: the High Pass filter. It’s in Photoshop under Filters->Others->High Pass.

To do this, create a duplicate layer or a stamp visible layer, then apply the filter with about a .5 to 1.5-pixel setting. Then, set the blending mode to Overlay, Soft Light, or Linear Light—whichever looks best to you. I usually set Linear Light, which is often too strong, and then pull it back with opacity if need be.

Back in Lightroom, I did my final crop, made a few more color tweaks, and exported it.

For copyright purposes, it’s usually a good idea to input all your photo metadata in Lightroom – keywords, copyright, photo name, description, etc.- before exporting.

That’s It! This is my basic photography technique for shooting from buildings high up in the air through tinted glass where tripods are not allowed. Easy, right?

The Final Shot – Above Tokyo

Above Tokyo

0
0
0
0
0
Alik Griffin

A professional video editor, and photographer with a Bachelors in Film studies from UCSD. Based in Los Angeles, I have created commercials, trailers, and other video content for various clients and platforms since 2005. I also love to write about my passions and share my insights on my blog.

Related Topics
  • Behind The Shot
  • Canon 16-35mm
  • Japan Pictures
  • Photography Tips
  • Sony A7r
Previous Article
Tokyo Sakrua Explosion
  • Blog
  • Photo Stories

Sakura Explosion – Tokyo Japan

  • Alik Griffin
  • December 11, 2024
View Post
Next Article
Golden Terrace
  • Blog
  • Photo Stories

The Golden Rice Terraces

  • Alik Griffin
  • December 11, 2024
View Post

Subscribe

Subscribe now to our newsletter

You May Also Like
Pure Cinema
View Post
  • Blog
  • Featured
  • Lens Reviews
  • Reviews

Viltrox TCL-X100VI Review | A Budget-Friendly 50mm Upgrade

  • Alik Griffin
  • February 21, 2026
  • No comments
Thypoch Simera 75mm f1.4 Review
View Post
  • Blog
  • Featured
  • Lens Reviews

Thypoch Simera 75mm f1.4 Review & Sample Photos

  • Alik Griffin
  • February 18, 2026
  • No comments
Kakurajima View
View Post
  • Blog
  • Featured
  • Lens Reviews

Viltrox WCL-X100VI Review | A Budget-Friendly 28mm Upgrade

  • Alik Griffin
  • February 17, 2026
  • 2 comments
Sony A7V Announcement
View Post
  • Blog
  • What's New

Sony A7V – They’re Back In The Game

  • Alik Griffin
  • December 30, 2025
  • 4 comments

Leave a Reply Cancel reply

Your email address will not be published. Required fields are marked *

San Clemente Sunset

Join The Newsletter

Featured
  • Mud Face
    Nikon Z 35mm f1.4 vs Nikon Z 35mm f1.8 S – Sample Images
    • 28 comments
  • Nikon Z 28mm f2.8 Review & Sample Photos
    • 18 comments
  • Kalina Flower FIeld
    Nikon Z 50mm f1.4 Review & Sample Photos
    • 26 comments
  • San Clemente Sunkiss
    Viltrox 15mm f1.7 Air Lens Review & Sample Photos
    • 6 comments
  • Nikon Z 26mm f2.8 Review – A Little Miracle
    • 24 comments
  • TTArtisan 23mm f1.8 Product Shots
    TTArtisan AF 23mm f1.8 Lens Review & Sample Photos
    • 3 comments
  • Kalina Picking Sakura
    Nikon Z 85mm f1.8 S Review & Sample Photos
    • 20 comments
  • Thypoch Simera 75mm f1.4 Review
    Thypoch Simera 75mm f1.4 Review & Sample Photos
    • No comments

Subscribe

Subscribe now to our newsletter

Privacy Policy | Licensing | About Me | Contact

Copyright © Alik Griffin Inc. 2025

Input your search keywords and press Enter.