In the last few years, I’ve started shooting many more landscapes, long exposures, cityscapes, and HDR photos. Using a Tripod has taught me a great deal about why and how to use a tripod and other photography techniques.
Why You Need A Tripod For Landscape Photography
Lenses have a sweet spot. Most do not perform well at f2.8 but are designed to perform best optically around an aperture of f5.6 to f8 or even f16. Shooting at these high f-stops will give you a very nice, sharp image, which is very important with landscapes. However, it is very difficult to do it on your own since you’re significantly cutting down your light.
So, to accomplish this preferred aperture, I needed a tripod, which has its drawbacks. Taking photos now takes twice as long. You must adjust the head, move the legs, and expand or contract them when needed.
You should also shoot at an ISO of 100 or 200 for sharpness and your preferred F stop. For me, shooting landscapes is somewhere around an f8 to an f16.
Techniques for Photographers Shooting with a Tripod
HDR Photography. You can shoot three different shots at different shutter speeds to get different exposures then combine them with programs like Photomatix and get a really amazing high dynamic range.
Long Exposure Photography. You can shoot exposures up to 30 seconds long making waves and water look like smooth clouds.
Night Photography. You can shoot amazing sharp photos at night by combining a low ISO with a high aperture and long exposure.
Time-lapse photography. If you have an Intervalometer, you can shoot several shots a minute or second for hours and combine them to make a time-lapse video.
Masking. If you’re shooting a family or group, some people smile in one photo, but not everyone. You can take several photos and replace just the faces from their good photo to have everyone smiling in one shot.
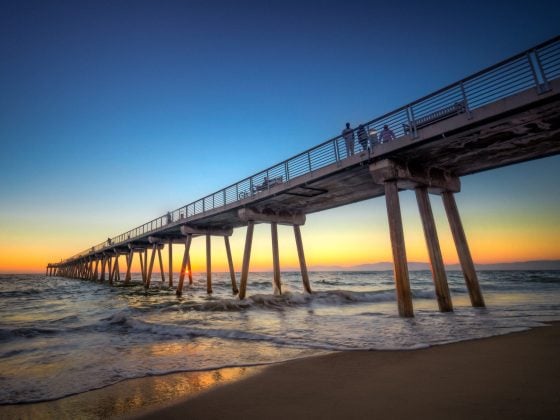
Here are some samples of some of my HDR Photography, Night Photography and Long Exposure Photography. I combined all three of these photos.


Notice everything is sharp, but the water is silky smooth. This shot was a High-Dynamic-Range capture with a long exposure of about 30 seconds.
Tips For Photographers Using a Tripod
- Using the built-in Count-Down Timer. I find this useful when shooting on my lightweight tripod when I do not want the camera to move at all when pressing and depressing the button. Same with shots between HDR. This way I know the camera will not move and create any motion blur resulting in sharper images.
- Position the legs of the tripod to support the weight of the lens. If you’re using a heavier lens, be sure to place one leg facing forward so the camera won’t fall forward in a strong wind or a slight bump.
- Keep the Tripod Level. If you’re on a hill, adjust the legs so that the leg higher up is a bit shorter. You always want to maintain balance and stability.
- Shoot a Low ISO. No reason to shoot any higher than an ISO of 200. Having a low ISO number will help you stay relatively free of grain which can cause softness.
- Know how to carry your tripod. If you carry your tripod over your shoulder with the camera attached. Make sure the lens hangs to the right. Gravity will pull the lens down twisting the tripod tighter onto its plate vs looser if it was hanging the other way. You don’t want your camera loosening and falling off while you’re carrying it.
- Be aware of where you set your tripod. If your tripod is set up on soft grass, it may not give you very good results, as any movement you make might shift the ground the tripod is on, which will blur your image.
Using a Tripod or Shooting Handheld
I’ve learned now that there is a balance. When I want a shallow depth of field and am running and gunning, I stay handheld. Or when I’m in an environment where anything can happen, and you need to be quick, or else you’ll miss the shot, I do not use a tripod. For example, if you’re shooting children, especially two-year-olds who can’t hold still for more than three seconds, I do not use a tripod.
I’ll now use a Tripod when I’m hunkered down at an epic sight like the Grand Canyon or some Temple, or even when doing night photography. I’ve regretted many moments in my traveling when I didn’t have one with me, which would have given me much cooler shots. For example, when I went to Niagra Falls, I could have set my camera on a tripod, used an ND filter, and shot at a slow shutter speed to give the waterfall that glowing, smooth water effect. Hopefully, I can go back to Niagra Falls one day and do it right.
Lightweight Tripods
Personally, I use a Lightweight tripod. It’s very nice for running around and traveling, and I can expand the legs and brace them against my arms to stabilize the camera when shooting video. The drawback to lightweight designs is that they are usually not as sturdy. So if you’re doing long exposures and it’s windy out, then the camera could move. Or if you’re doing HDR photography, the camera could move between shots. The heavier tripods don’t have this problem.
I use an older version of one of these, except with the old Aluminum Legs. I’d get this one if mine ever breaks. It won’t. I take it to the ocean and in the water. It’s a tank.
SLIK PRO 700DX Professional Tripod with Panhead: Amazon
It’s also good to have a head that allows you to adjust to different angles, and it’s even nicer when it has a bubble level. I love the handles on the head. They allow me to quickly and easily hang it from my backpack for short periods of time.
Heavier Tripods
A heavier tripod really helps with Long Exposure and HDR Photography. If it’s windy outside, lightweight tripods can move slightly when fully expanded at their maximum height.
Of course, you shouldn’t buy a tripod unless you test it out with your camera. I usually buy stuff like this from actual camera stores.
Cool Toys
These Gorilla pods also allow you to mount the camera in some interesting places. I just got one and love playing around with it. It’s more of a toy than anything, but you can store it in your car or backpack just in case you ever need to shoot some emergency long exposures or HDR photos.
Joby GP3 GorillaPod SLR-Zoom Flexible Tripod + BH1 Ball Head with Bubble Level: Amazon
That covers all my experience with using a tripod and how to use one. If you have any questions, you can leave them in the comments. And be sure to check back, as I am always posting great tips for photographers as I continue to grow and learn more techniques for my photography. Good luck!
| **This website contains affiliate links. We will earn a small commission on purchases made through these links. Some of the links used in these articles will direct you to Amazon. As an Amazon Associate, I earn from qualifying purchases. |


