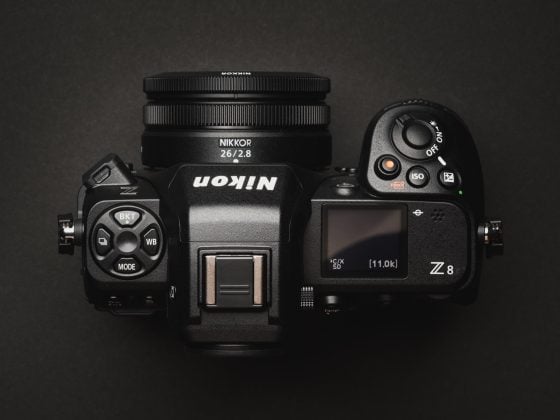
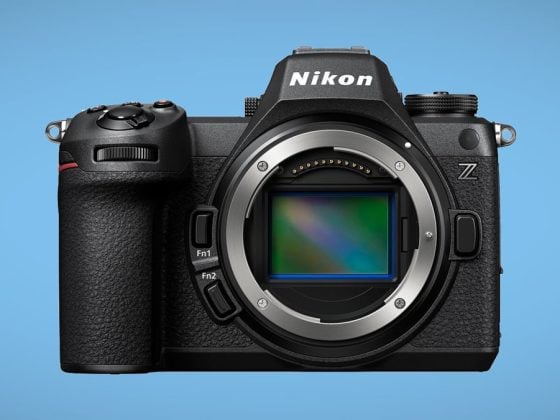
The Nikon Z8 features the same full-frame 45mm stacked CMOS sensor found in the Nikon Z9. There have already been several dynamic range comparisons and color comparisons, and basically, the results are that the Nikon Z9 was still in the top 10 best sensors ever made, with some compromises. Some cameras like the Sony A1 or Canon R3 beat it just slightly in some areas like Dynamic Range and sometimes color with lower ISO values.
Nikon however chose the path to optimize their sensor for speed. Not just “speed stacked sensor speed” but “let’s get rid of the mechanical shutter type of speed.” No other camera has pushed it this far, and by the looks of it, it cost some DR performance.
Nikon Z8 – Amazon / Adorama / B&H
Also, check out the new Nikon Z8 Color Science.
While all the graphs various testers post are great, I wanted to actually look at real-world samples. Looking at little dots on a chart doesn’t tell me anything, nor do I even trust half the people who do these tests to do it correctly and it’s very difficult when comparing different brands.
How does the Nikon Z8 perform in low light?
Before we get into the details, I did not prep these samples to be super scientific with an exact exposure point using histograms or a neutral gray point for each reading. I wanted to see how the camera performs under different conditions and what sort of variance we can see in the different exposures by letting the camera do its thing based on how it sees exposure. Basically real-world behavior, except I have all the settings that affect image quality turned off – Vignetting control, IBIS, diffraction compensation, etc.
Nikon Z8 ISO Test
To perform the high ISO test, I shot the resolution chart at a little closer distance than I would do a resolution test to see more detail. This is shot in very low light to simulate low light with the first shot at ISO 64 using a 25-second shutter. Sometimes high ISO can look a little nicer in a bright scene because of improved photon coherency so a dark scene was chosen for this test, it allows us to see performance at lower ISO with the sensor exposed for a long time with the ISO 64 being at around 30 seconds.
I didn’t really see a meaningful difference between ISO 64 -200, so I left 100 and 200 ISO off the chart for better visibility of the other values.
What was interesting was how the Nikon Z8 read the image and exposed it with a full matrix set. It was a very dark scene and perhaps it thought the white was grey.
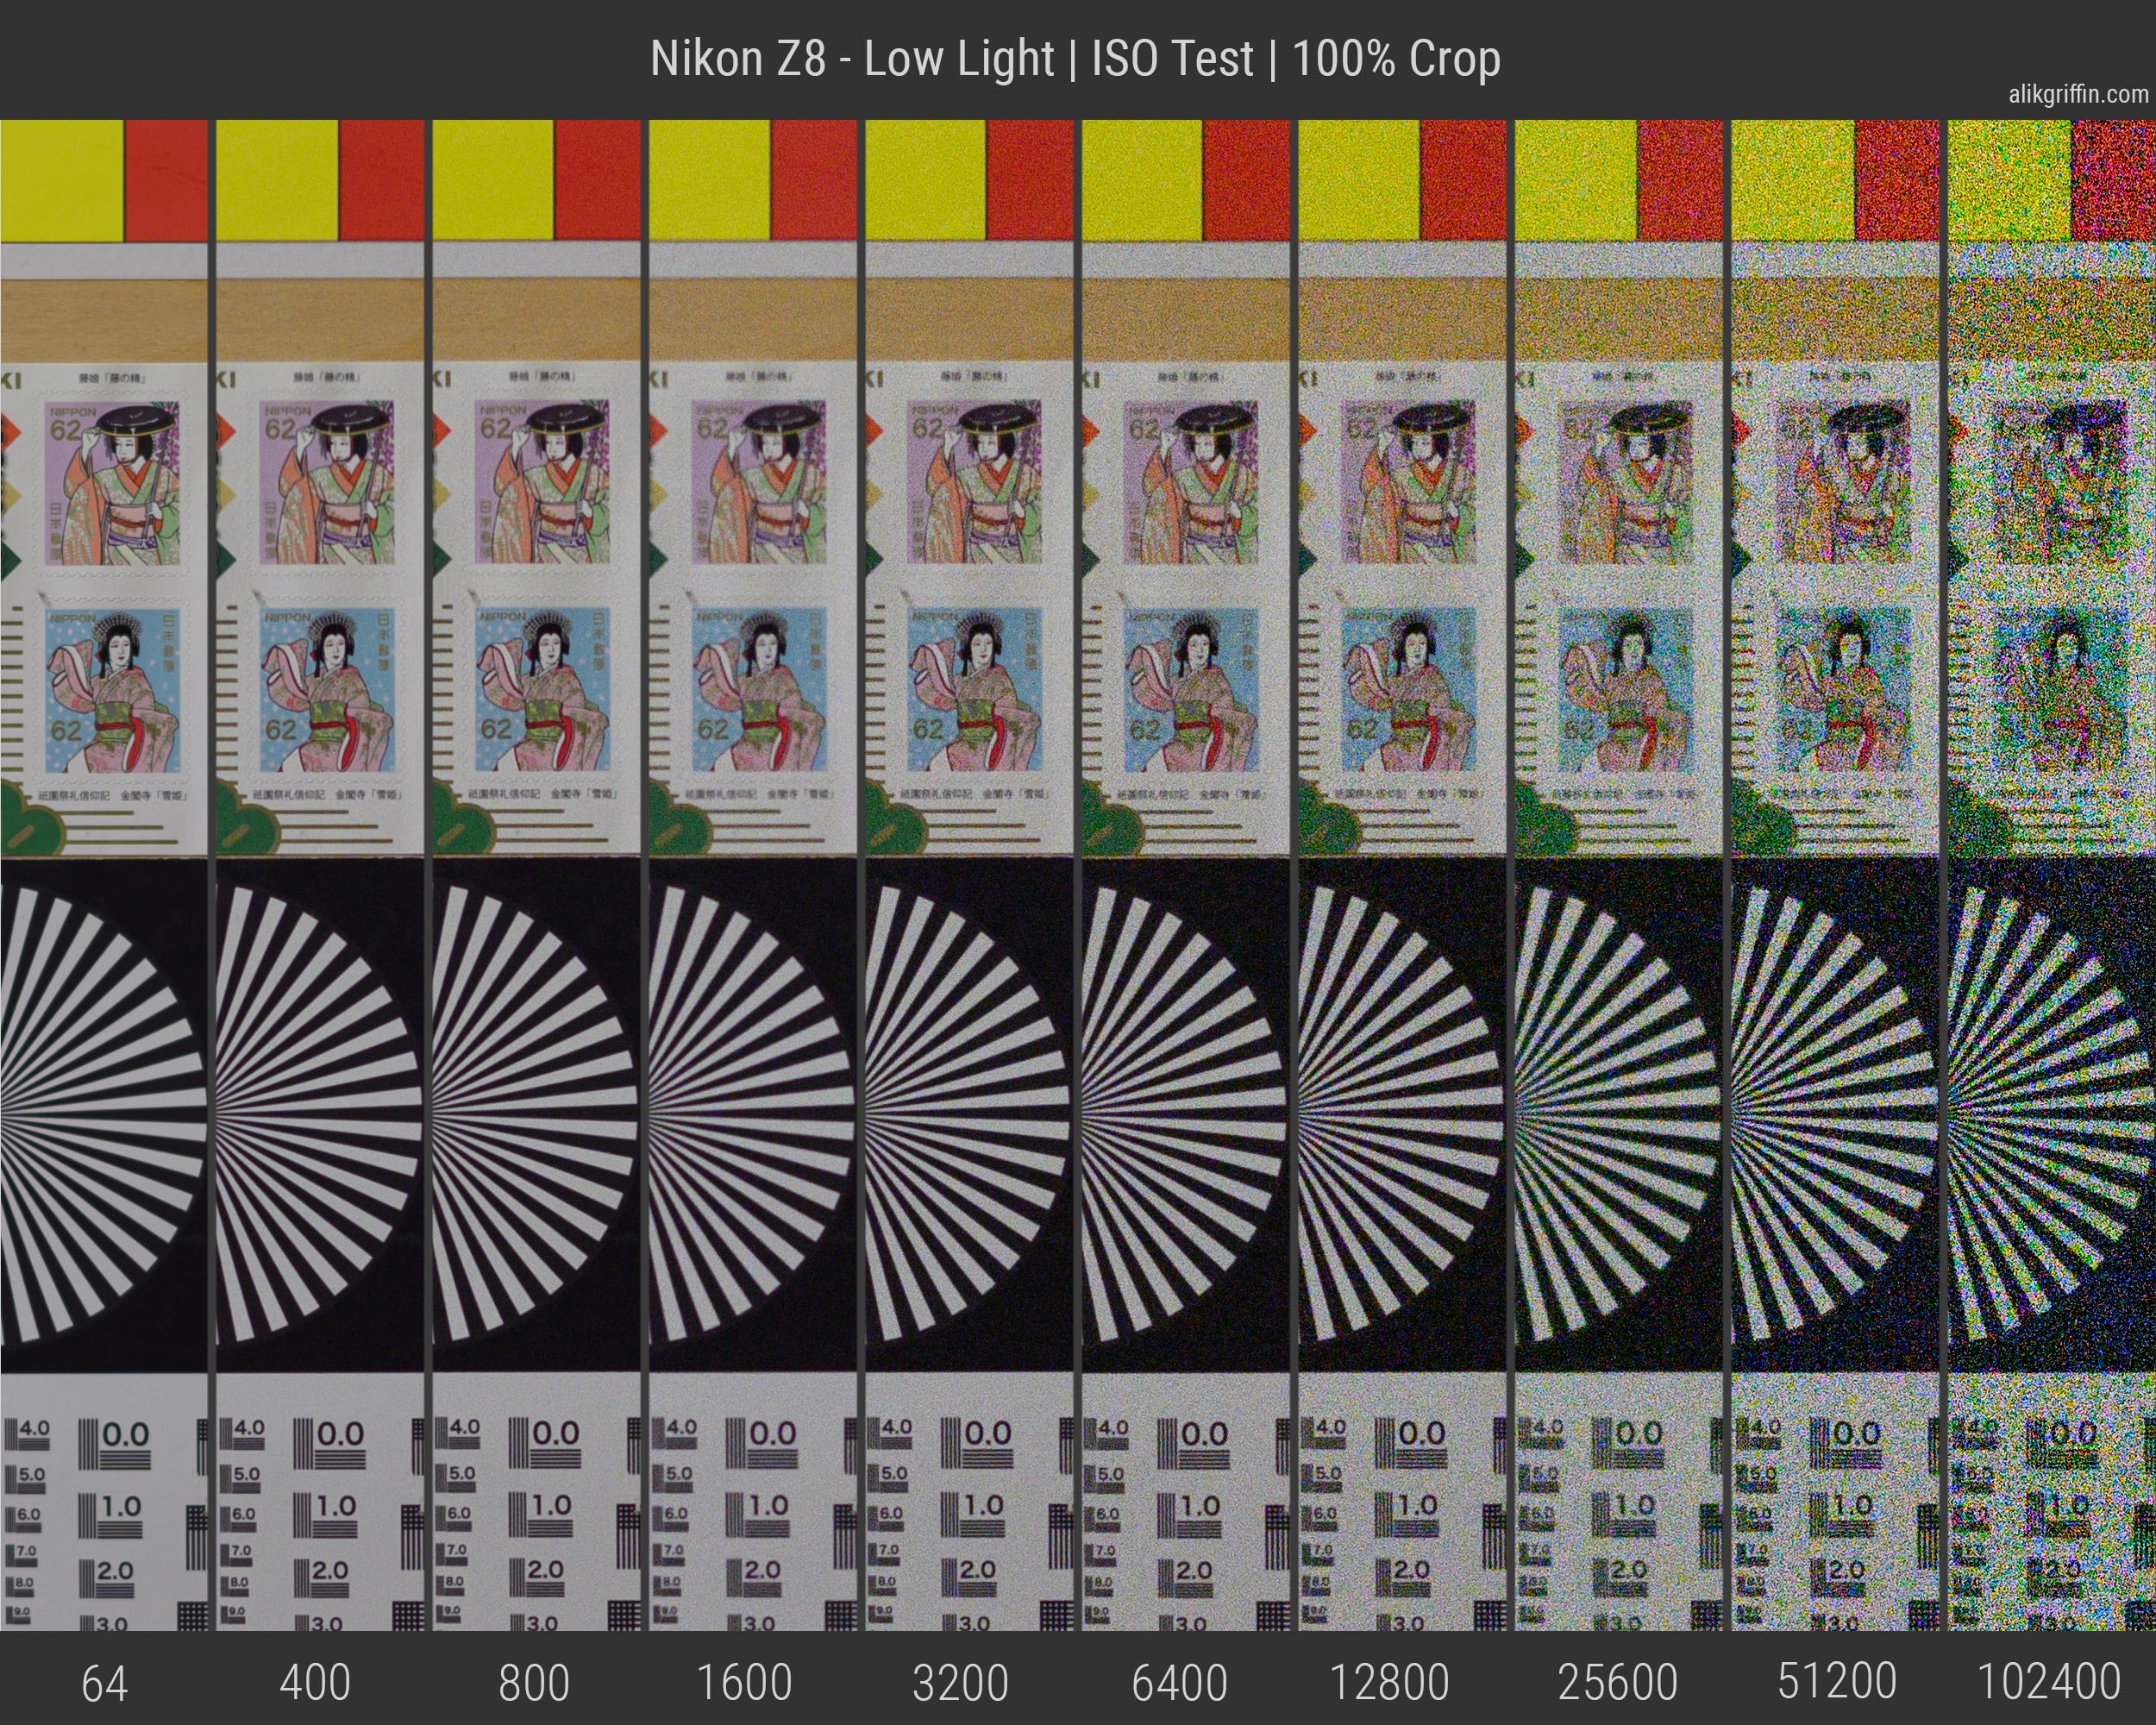
Ignore the slight miss of focus at 1600. That’s because I was using autofocus.
The image is very usable up to ISO 12800, although there is a bit more Chroma Noise than what I would typically see from my Z6 files, but fine considering how good modern AI noise reduction tools are.
ISO Variance – As mentioned there was no meaningful difference between ISO 64 and 200, but between ISO 400 and ISO 800 you can see a shift in performance. The Nikon Z8’s high gain conversion kicks in at ISO 500 working with a different signal processing.
To clarify, this camera has just two ISO settings with gain applied. It’s tuned for ISO 64 with a low gain conversion, and it’s tuned for ISO 500 with a higher gain conversion. Between ISO 64 and ISO 400, it’s invariant, meaning that underexposing ISO 64 three stops and pushing it in the post will yield identical results letting the camera expose at ISO 400. Same with ISO 500 and anything below. ISO 500 should have slightly better DR than ISO 400 because of this extra signal converter, so it might actually be better to go straight to ISO 500 and skip ISO 400. However, ISO 64 to ISO 200 will still have superior dynamic range, color, and noise control, so don’t go thinking ISO 500 is optimal. It’s always better to just give your sensor more light when possible.
Nikon Z8 Dual Gain – The technicality here is often loosely called dual gain, but it’s actually a dual gain conversion, not a dual gain output. A cinema camera or even the Panasonic GH6 will take two different readings from the sensor at the same time – the high gain output, and low gain output and this is often processed in a 16-bit space before being compressed down to the camera’s output codec. This gives you better highlight retention for an overall better dynamic range, at the cost of some slightly crunchier shadows. However, you can expose with an extra stop of light and get some really nice results, meaning while you would typically have less Dynamic range at ISO 800, this allows you to still maintain the coveted 13-14 or sometimes even 15 stops of dynamic range (if you’re an ARRI) because it also pulls that low gain output keeping those highlights from clipping.
Dual gain output lives behind a patent, but it would be lovely to see that come to NRAW video someday. Nikon is clearly saving some secret sauce for a Z9 II and Z8 II. Or possibly they have a more cinema-focused camera in the works.
Nikon Z8 Dynamic Range Test
There are a few performance metrics to look at with the Nikon Z8. We’ll want to look at shadow recovery at ISO 64, as well as highlight recovery.
Nikon Z8 Highlight Recovery
In this chart, the images are overexposed by up to 3 stops in 1-stop intervals at ISO 64. I also lit the board with a decent amount of light.
Some interesting things happen here. When 2 stops are overexposed you can see some colors shift as well as an increase in saturation. Once we hit 3 stops overexposed colors begin to clip and we lose the green as well as the blues in the white areas.
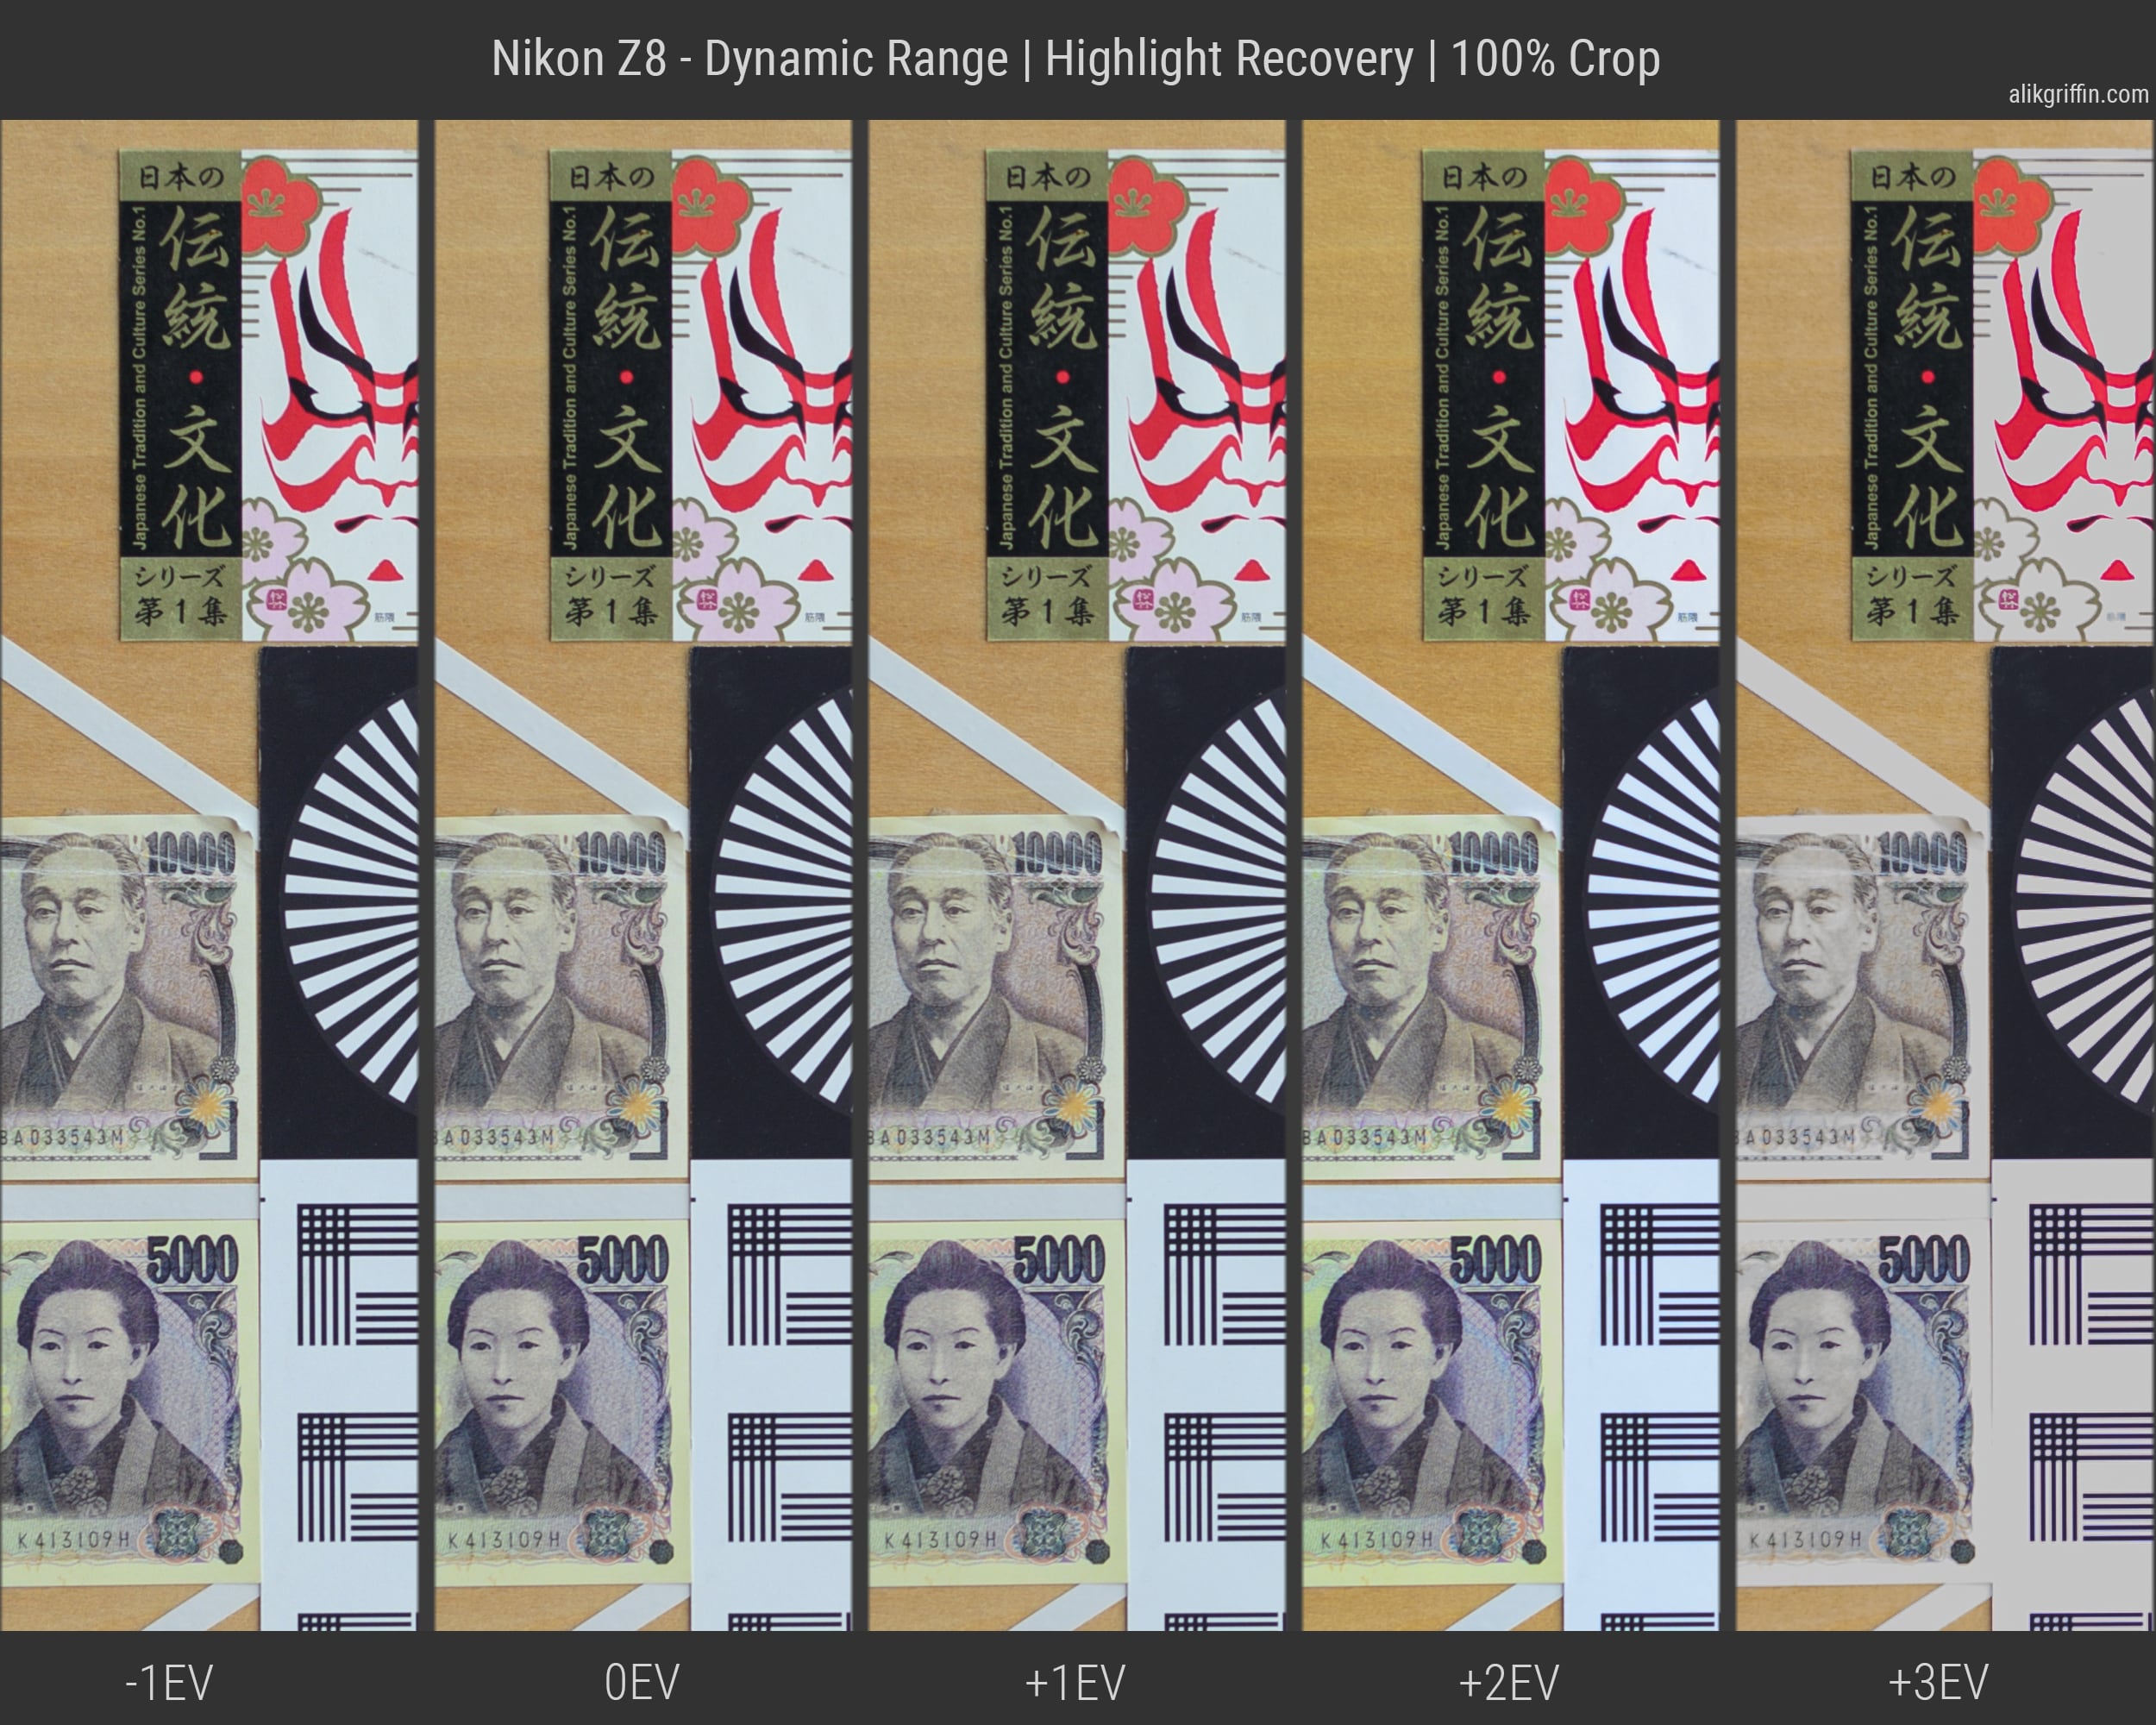
Judging from this test, you wouldn’t really want to overexpose the Nikon Z8 by somewhere between 2 to 3 stops when shooting at ISO 64.
Nikon Z8 Shadow Recovery
In this test, the resolution chart was under-exposed by up to 5 stops, actually more but Lightroom’s exposure dial is limited to 5 stops.
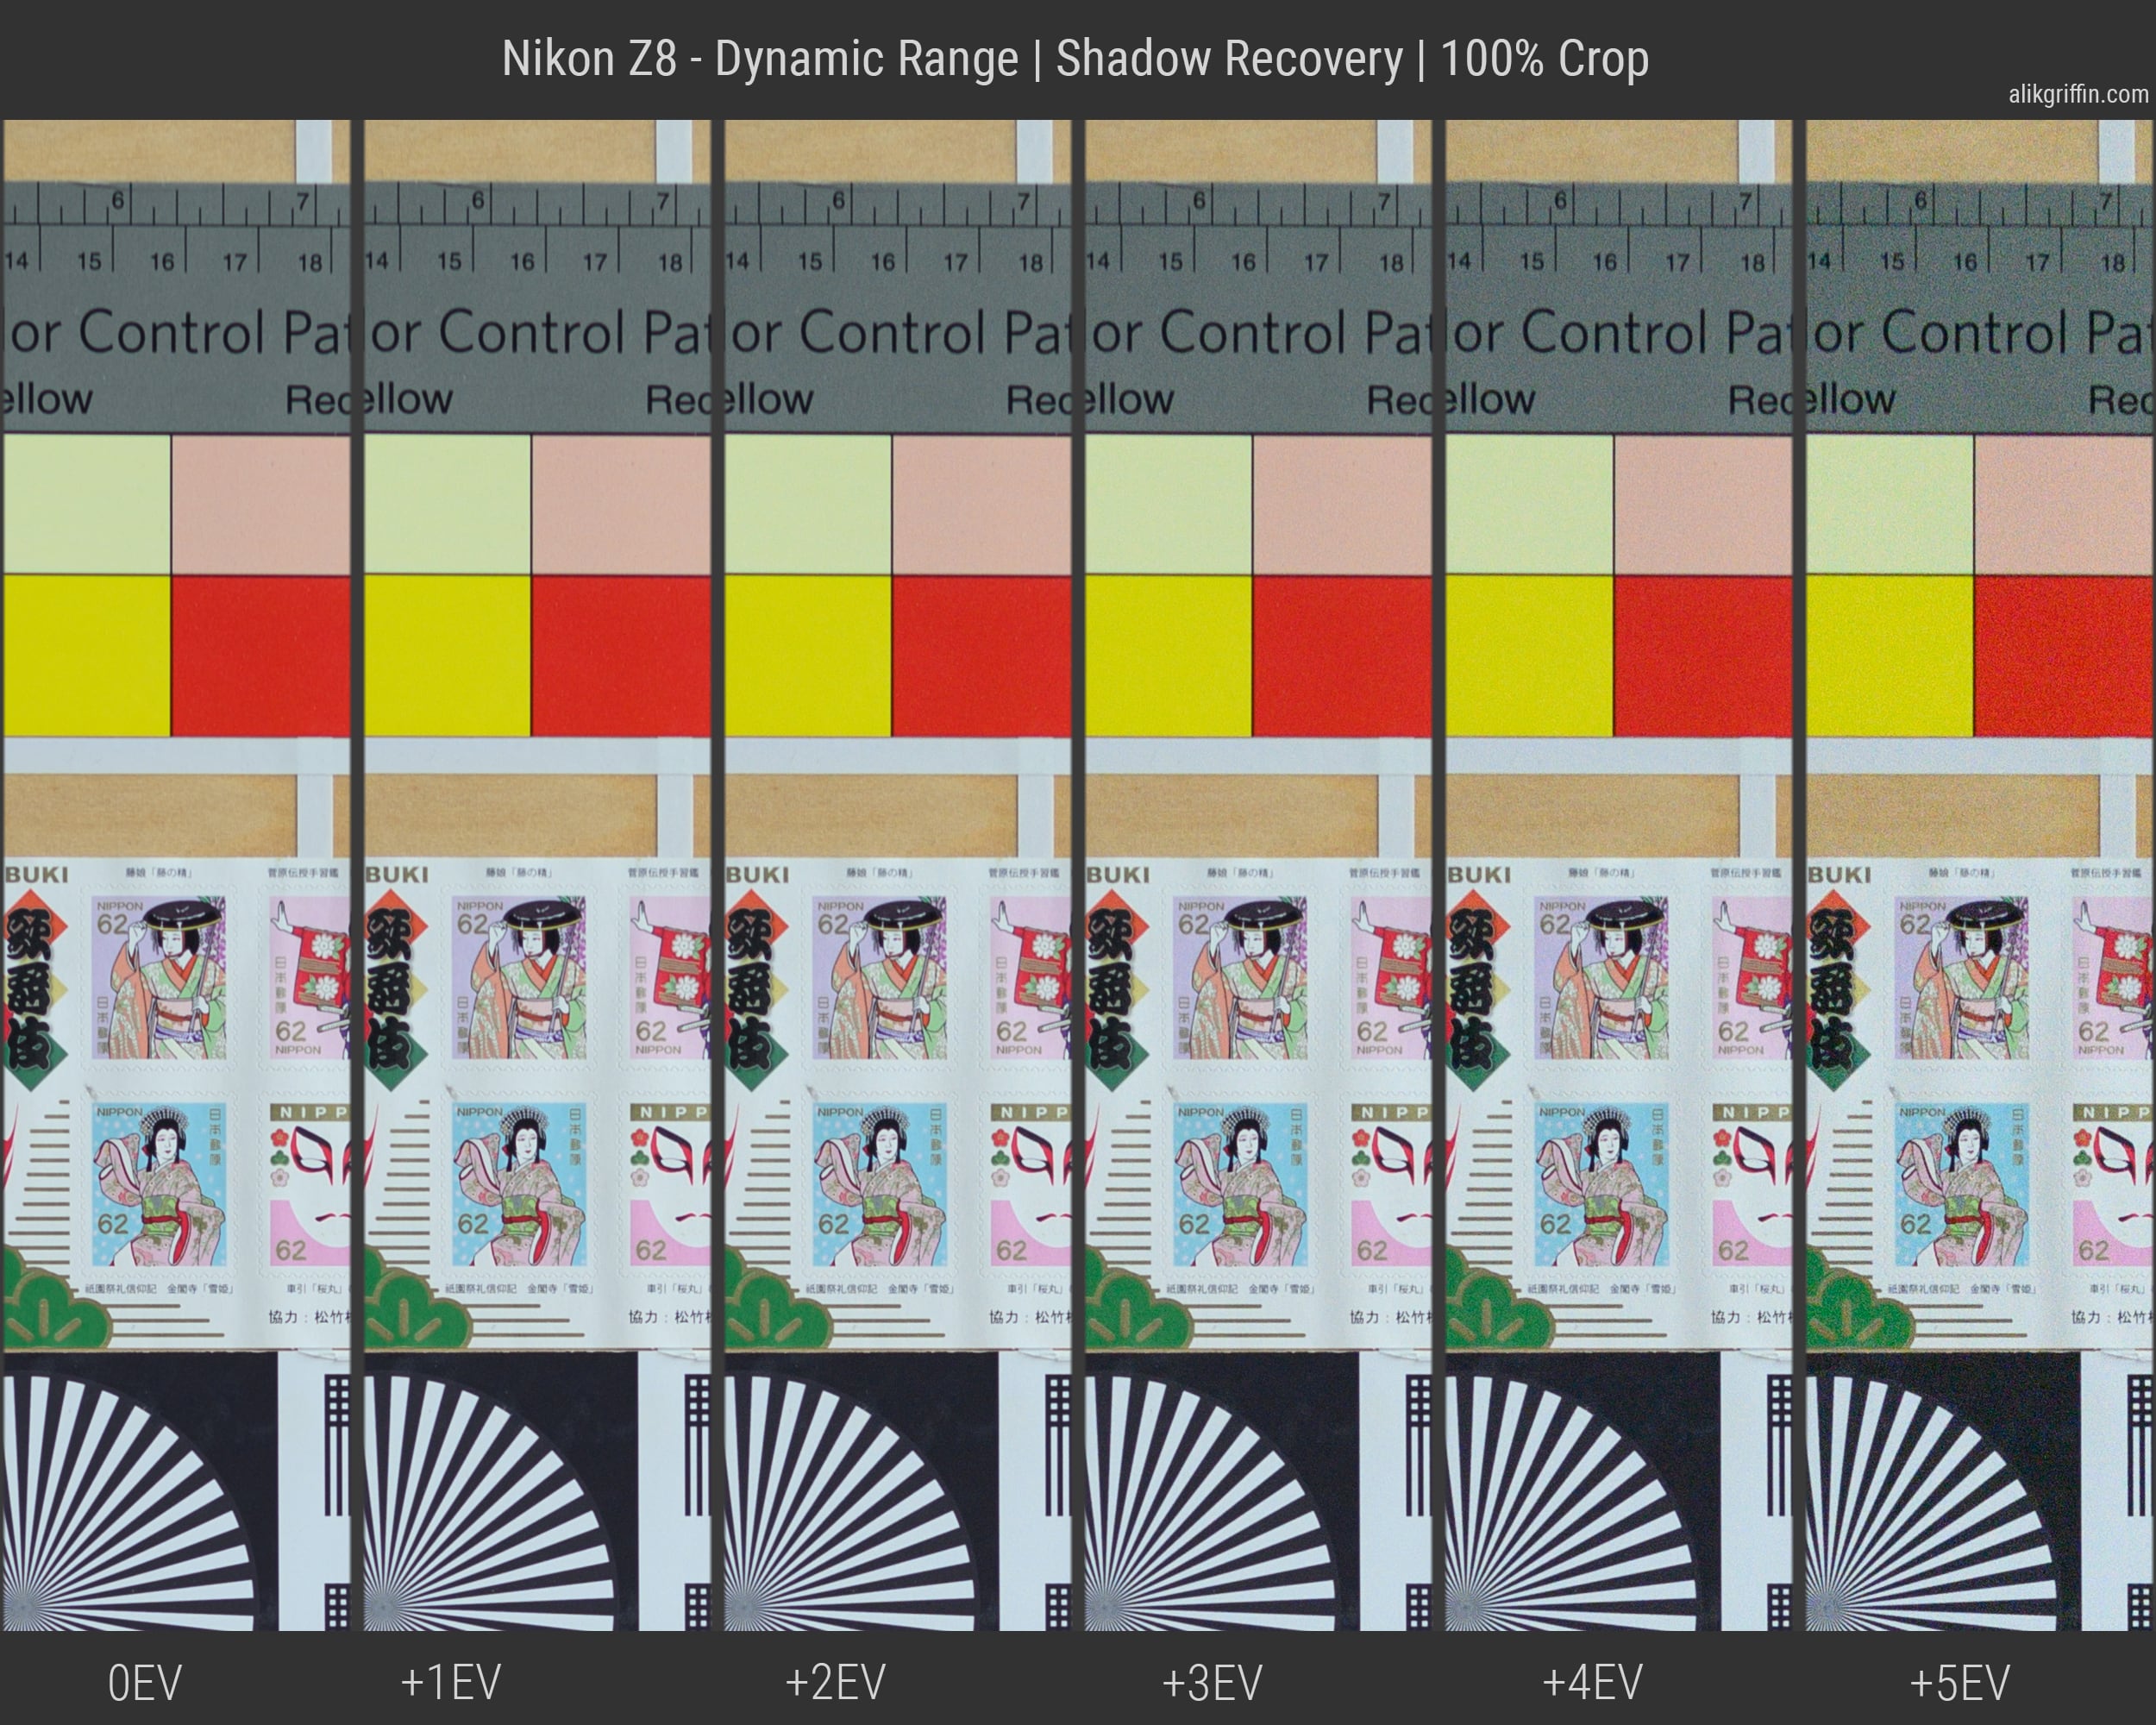
You can see that 0ev +1ev and +2ev are basically identical. Technically there is slightly more noise at +2ev to but you wouldn’t notice it in the real world. This would essentially be ISO 100 and ISO 200 except we’re pushing it in post instead of telling the camera to do it. By +3ev (ISO 400) we start to see some grain then by +4ev (ISO 800) things really change.
Since Lightroom is limited to 5 stops of exposure correction in a RAW file, this test is sort of meaningless, I know I could also push shadows but without anything to compare it to there is no point and this next test is a little more meaningful.
An interesting question I see popping up a lot is: “is it better to skip ISO 400 and shoot ISO 500 instead?” I wanted to look at ISO 64, ISO 400, and ISO 500 where the high gain conversion switches on, to get a nice visual of what could be happening here.
ISO 64 vs 400 vs 500
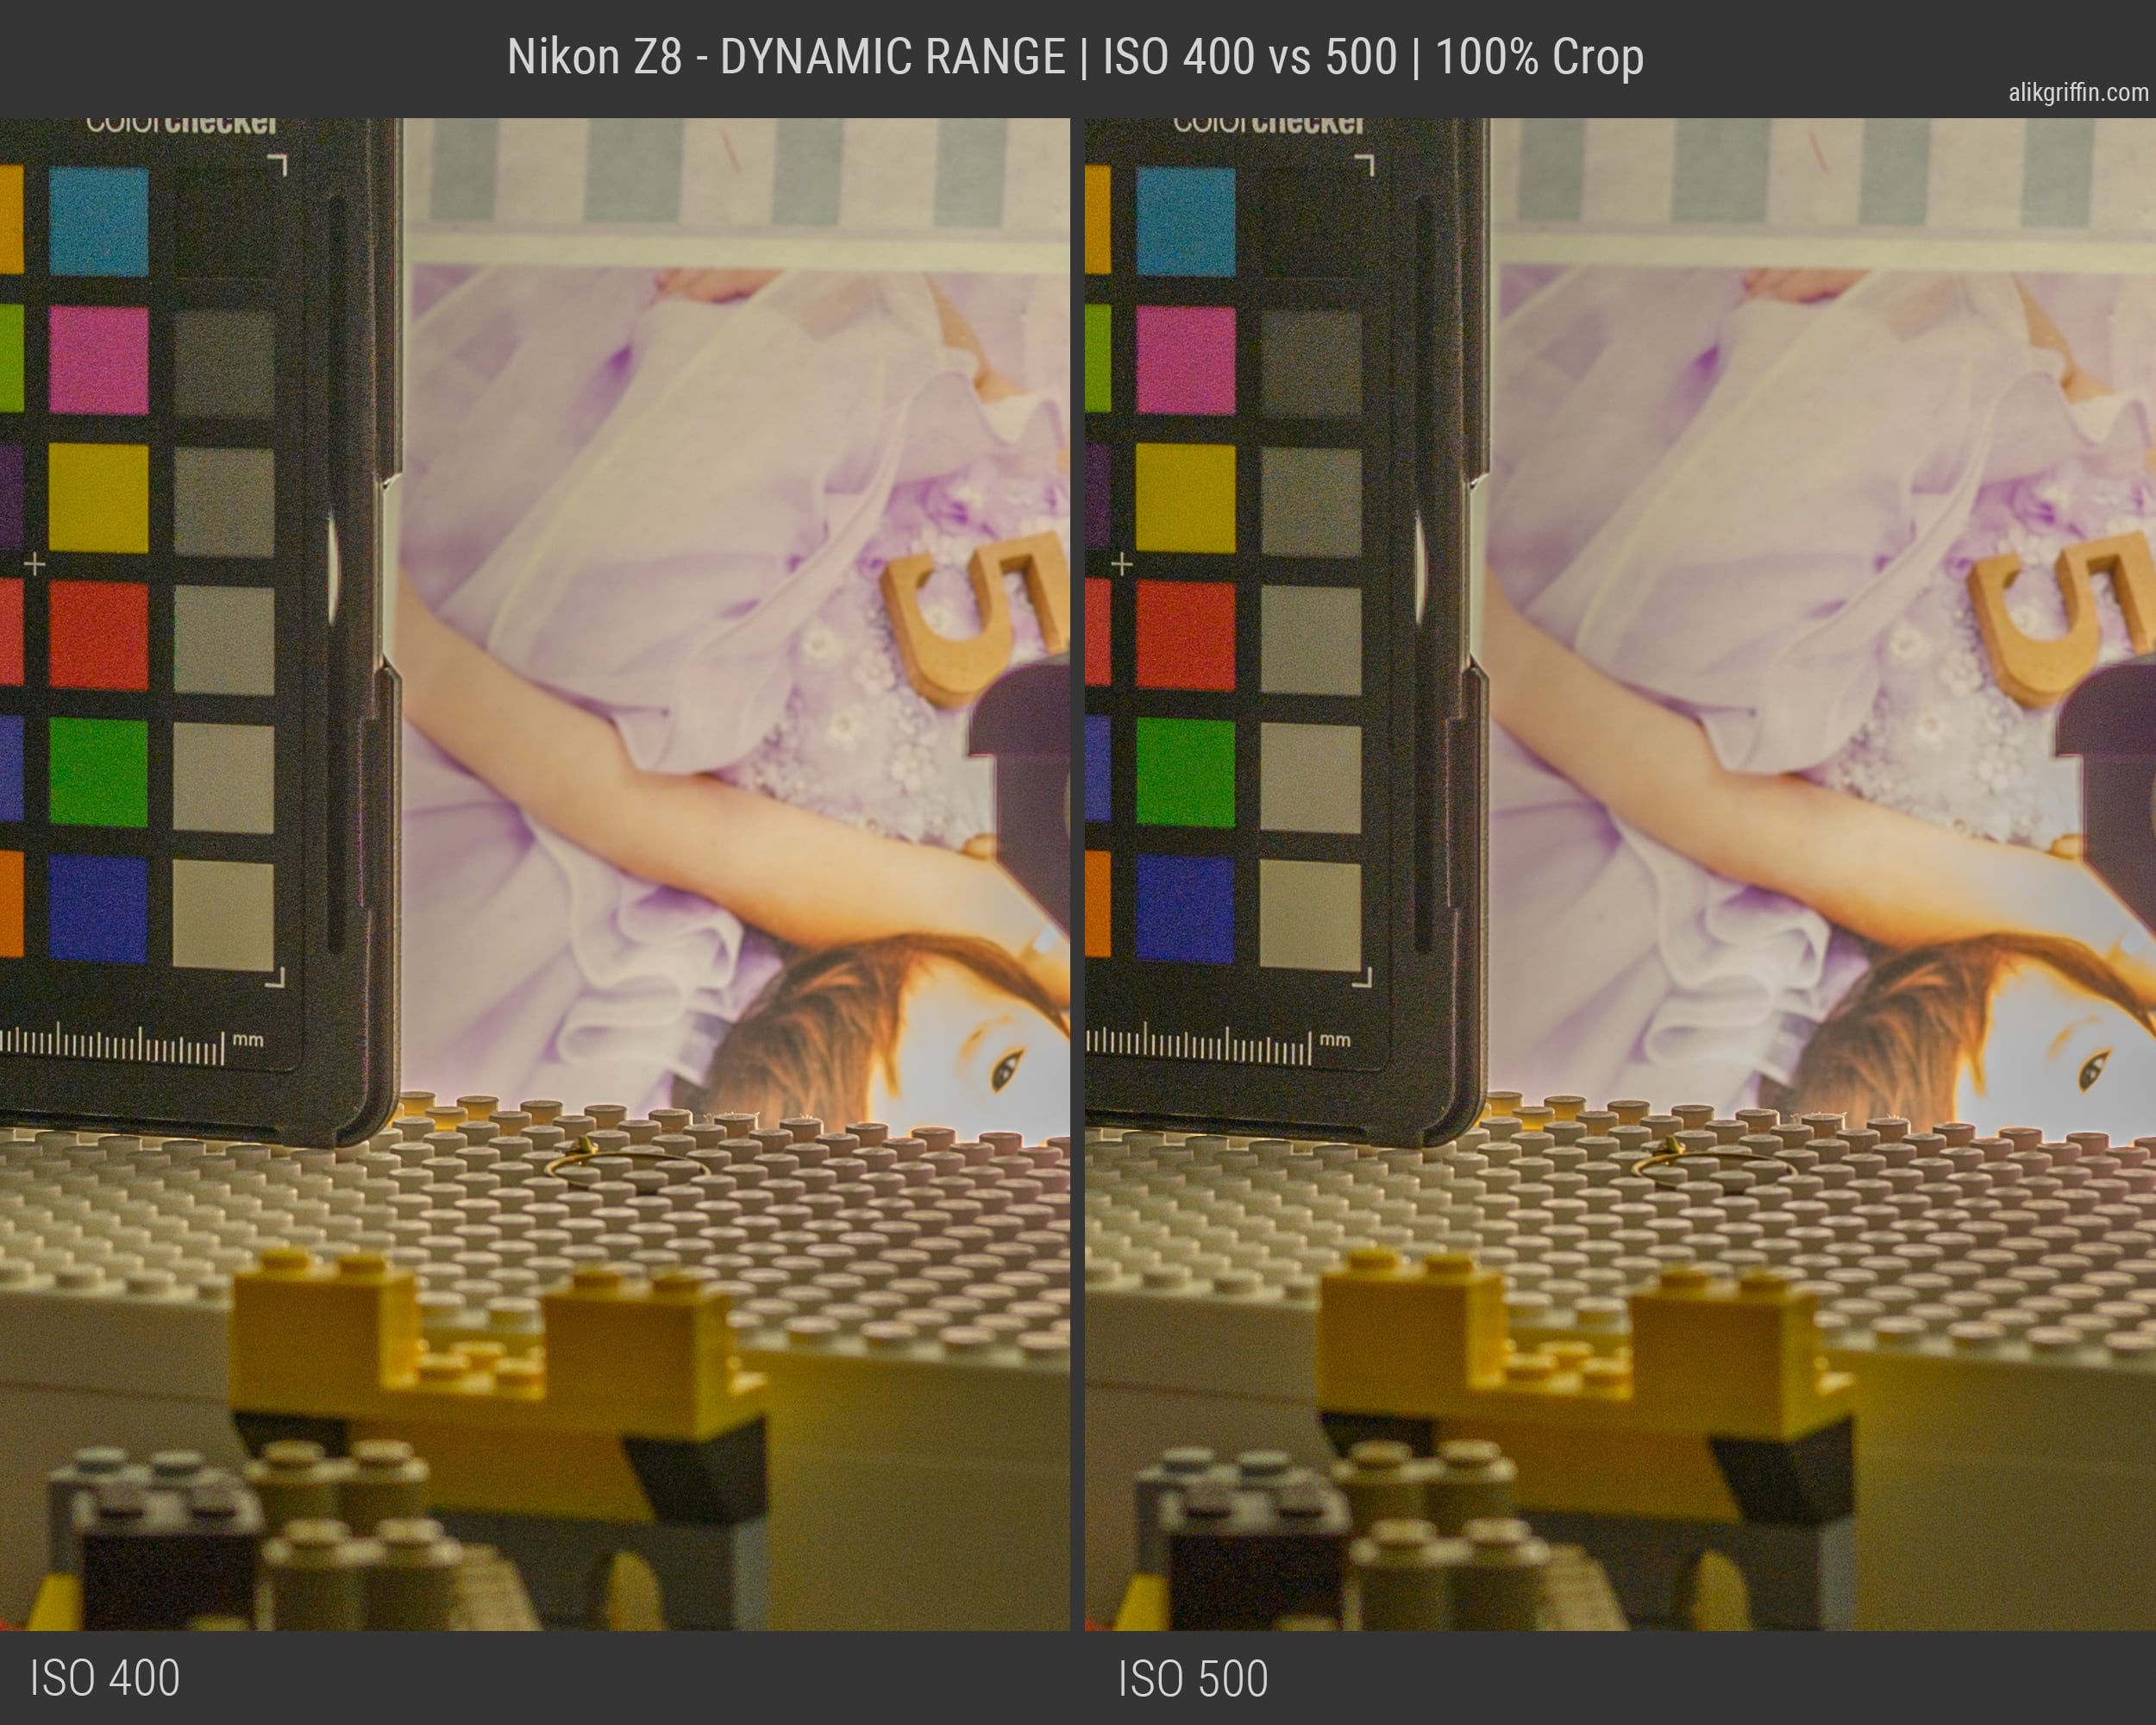
On the chart below we have ISO 400 on the left, and ISO 500 on the right. I set the shutter and aperture to be the same so that the exact same amount of light is hitting the sensor to really see how ISO 400 and 500 behave and if is it better to shoot IS0 500 instead of 400. However, I had to adjust the exposure in Lightroom to get the scenes to match.
First, we looked at highlight clipping – I was unable to build a scene that had enough dynamic range to break things on both ends, so I set two shots 2 stops apart which did the trick. Here I have the exposure turned down a little, the highlights turned all the way down, and the shadows turned all the way up.
Here you can see the ISO 400 value is slightly better at highlight recovery, with both images set with the same shutter and aperture.
I had to take a darker exposure still to get the shadows to really break. This is now two full stops darker. Exposure is turned down a little, highlights set all the way down and shadows set all the way up.
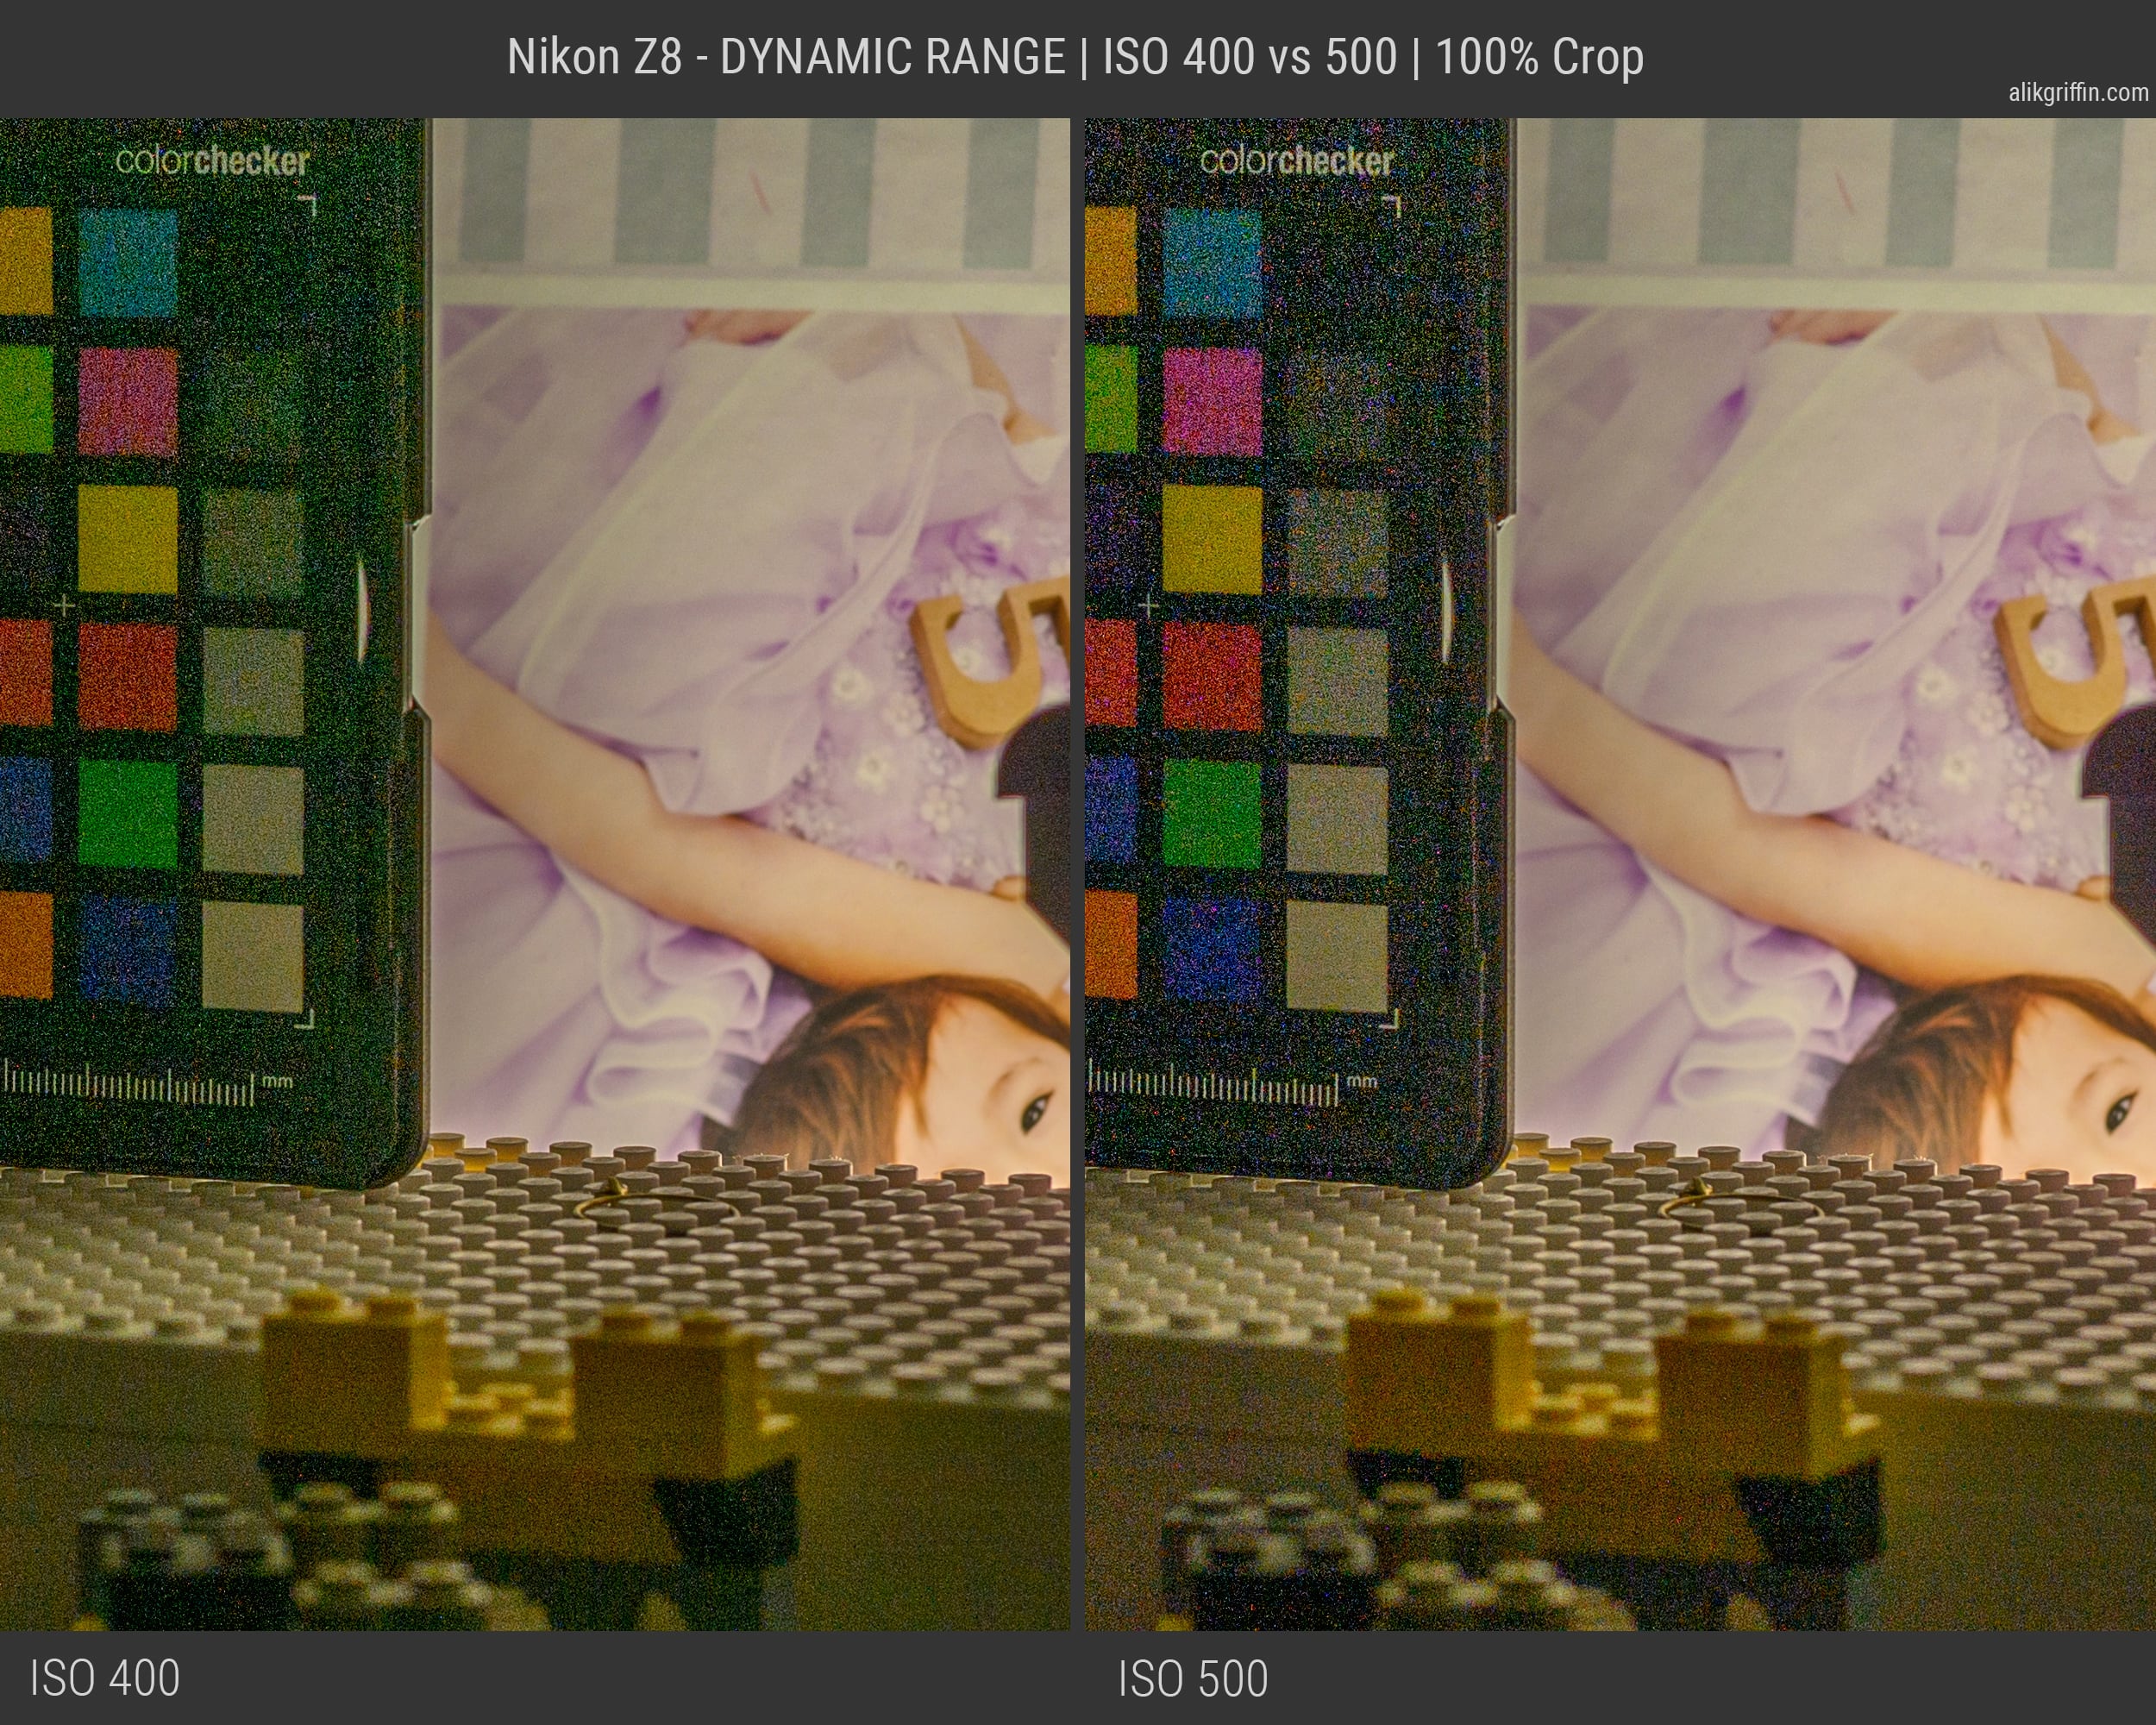
Here you can see the ISO 500 has significantly superior shadows. Meaning, shoot at ISO 500 instead of 400 if you want significantly better shadow recovery with only slightly inferior highlight recovery.
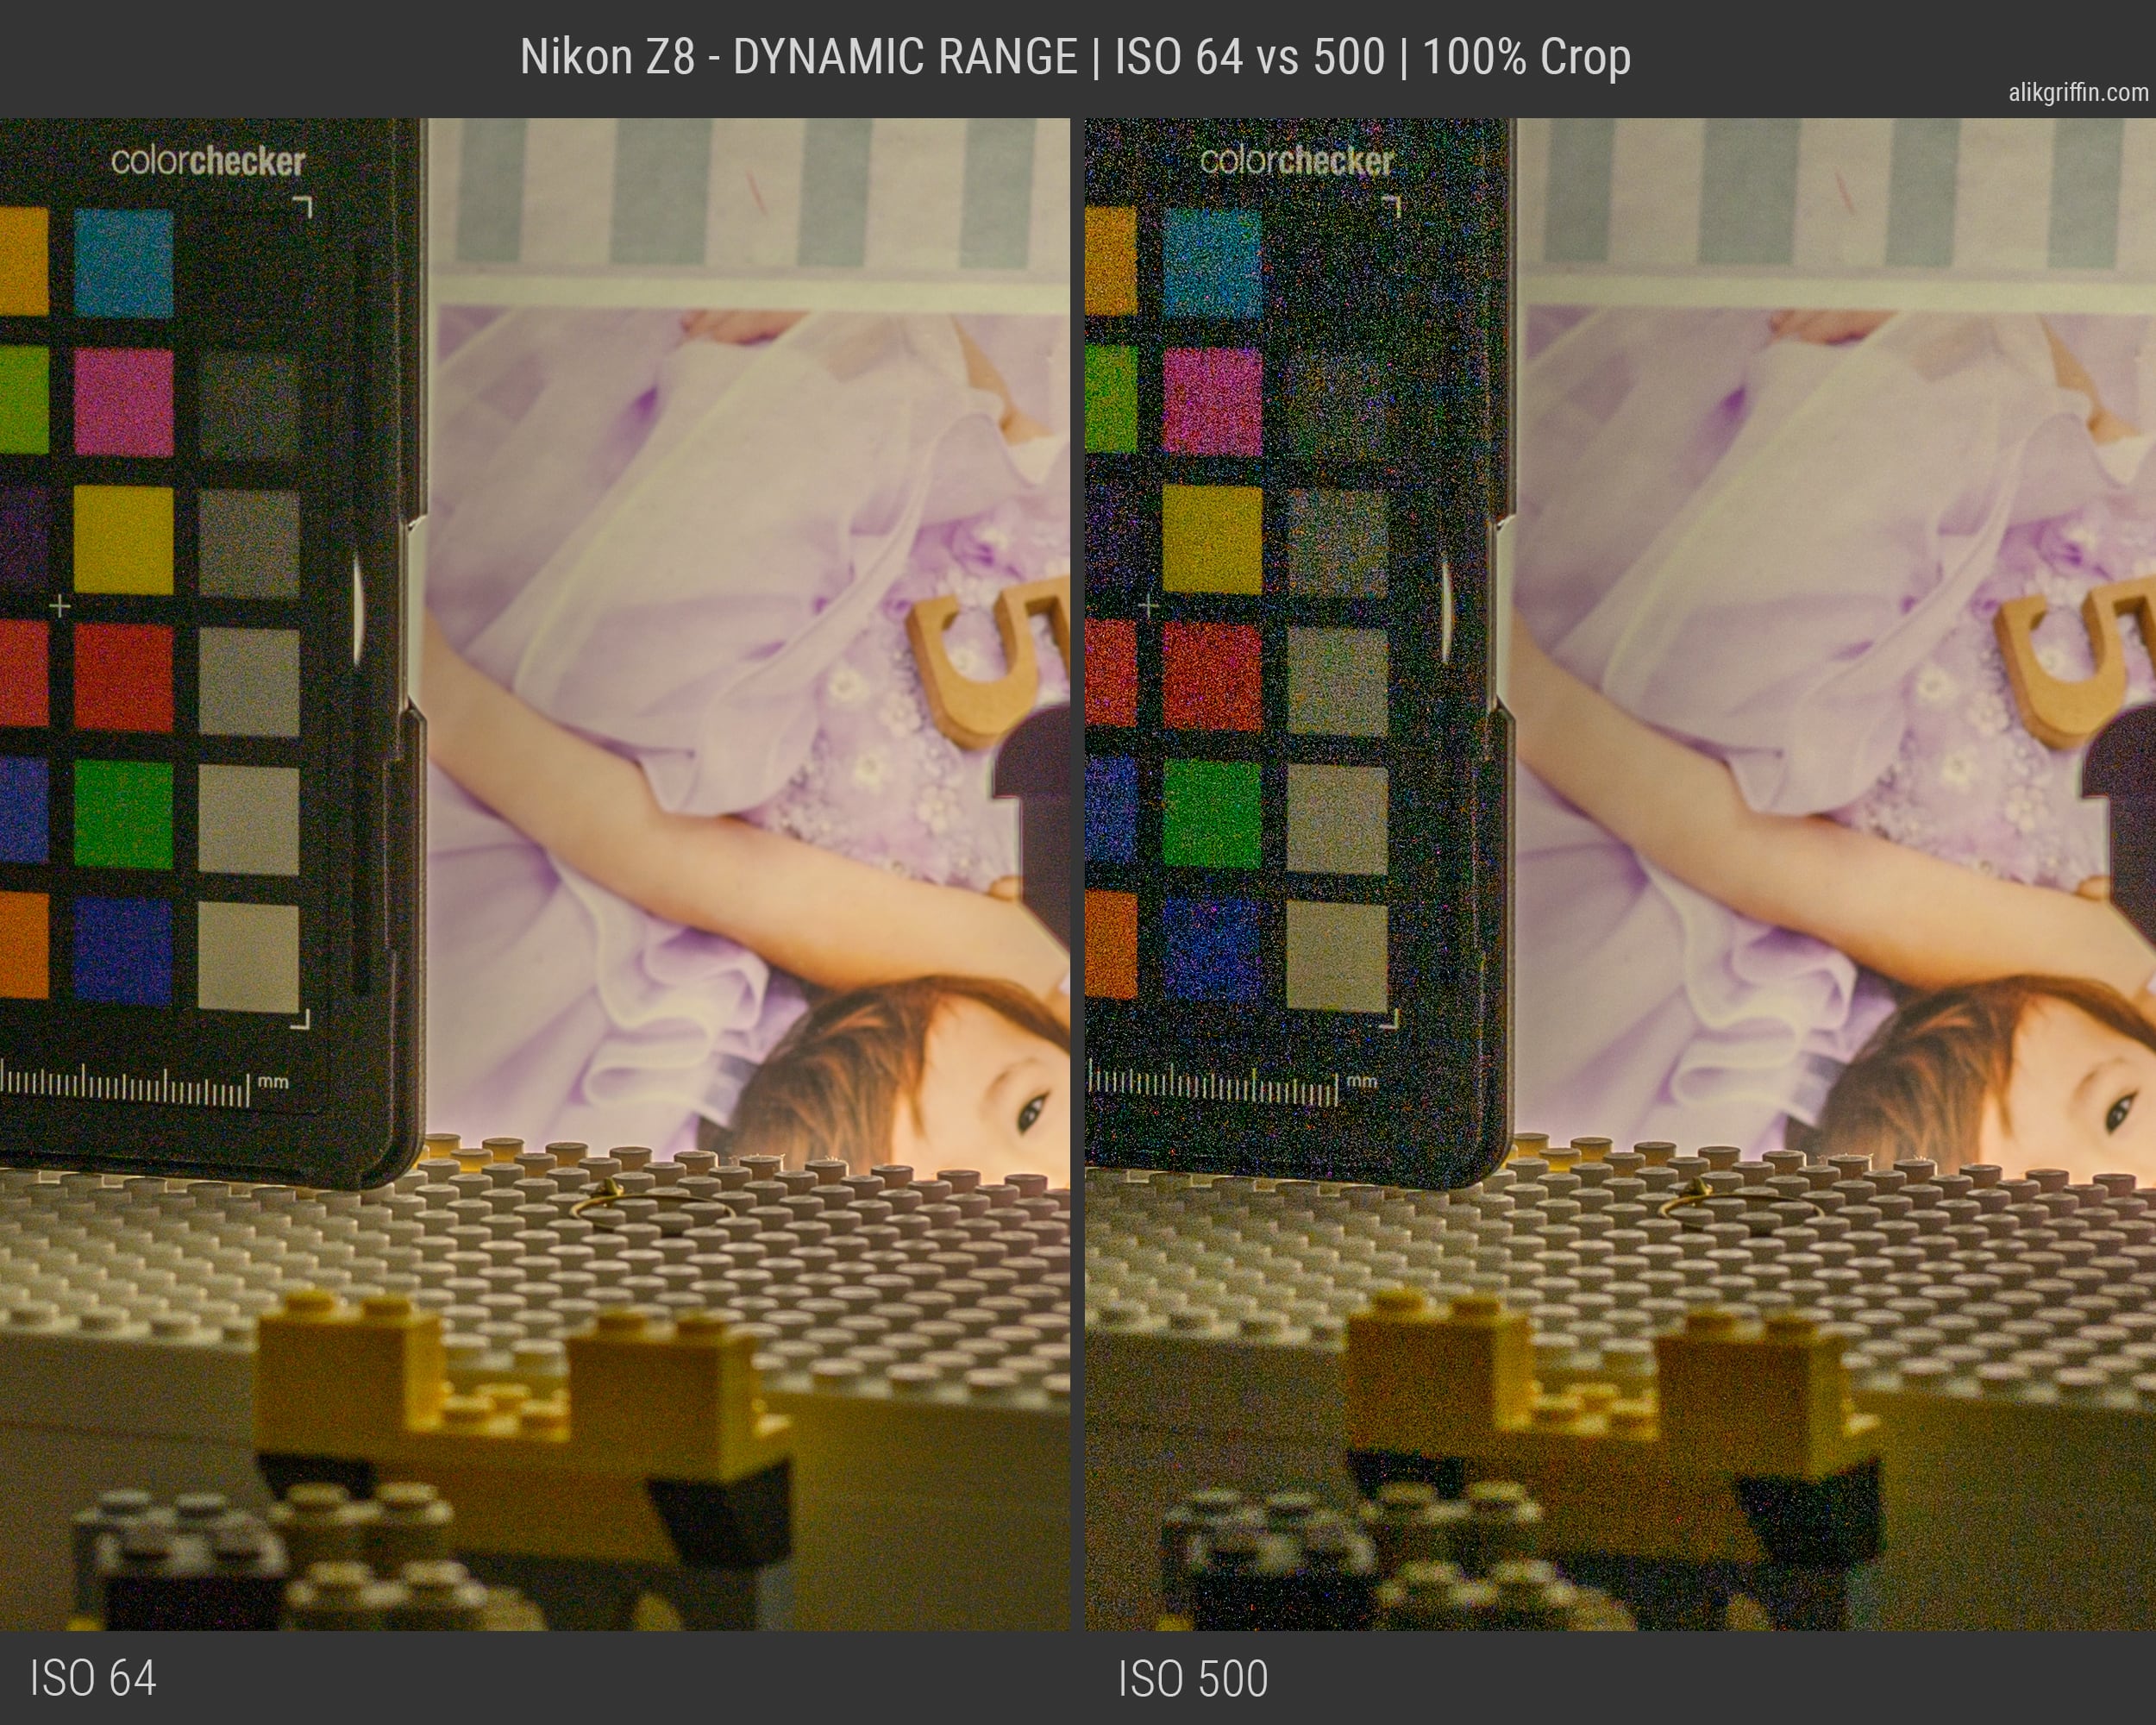
I also took a reference of ISO 64 from -2 stops below where the highlights clip (same range as above) is to get an idea of how much better shadow recovery is at ISO 64 compared to ISO 500.
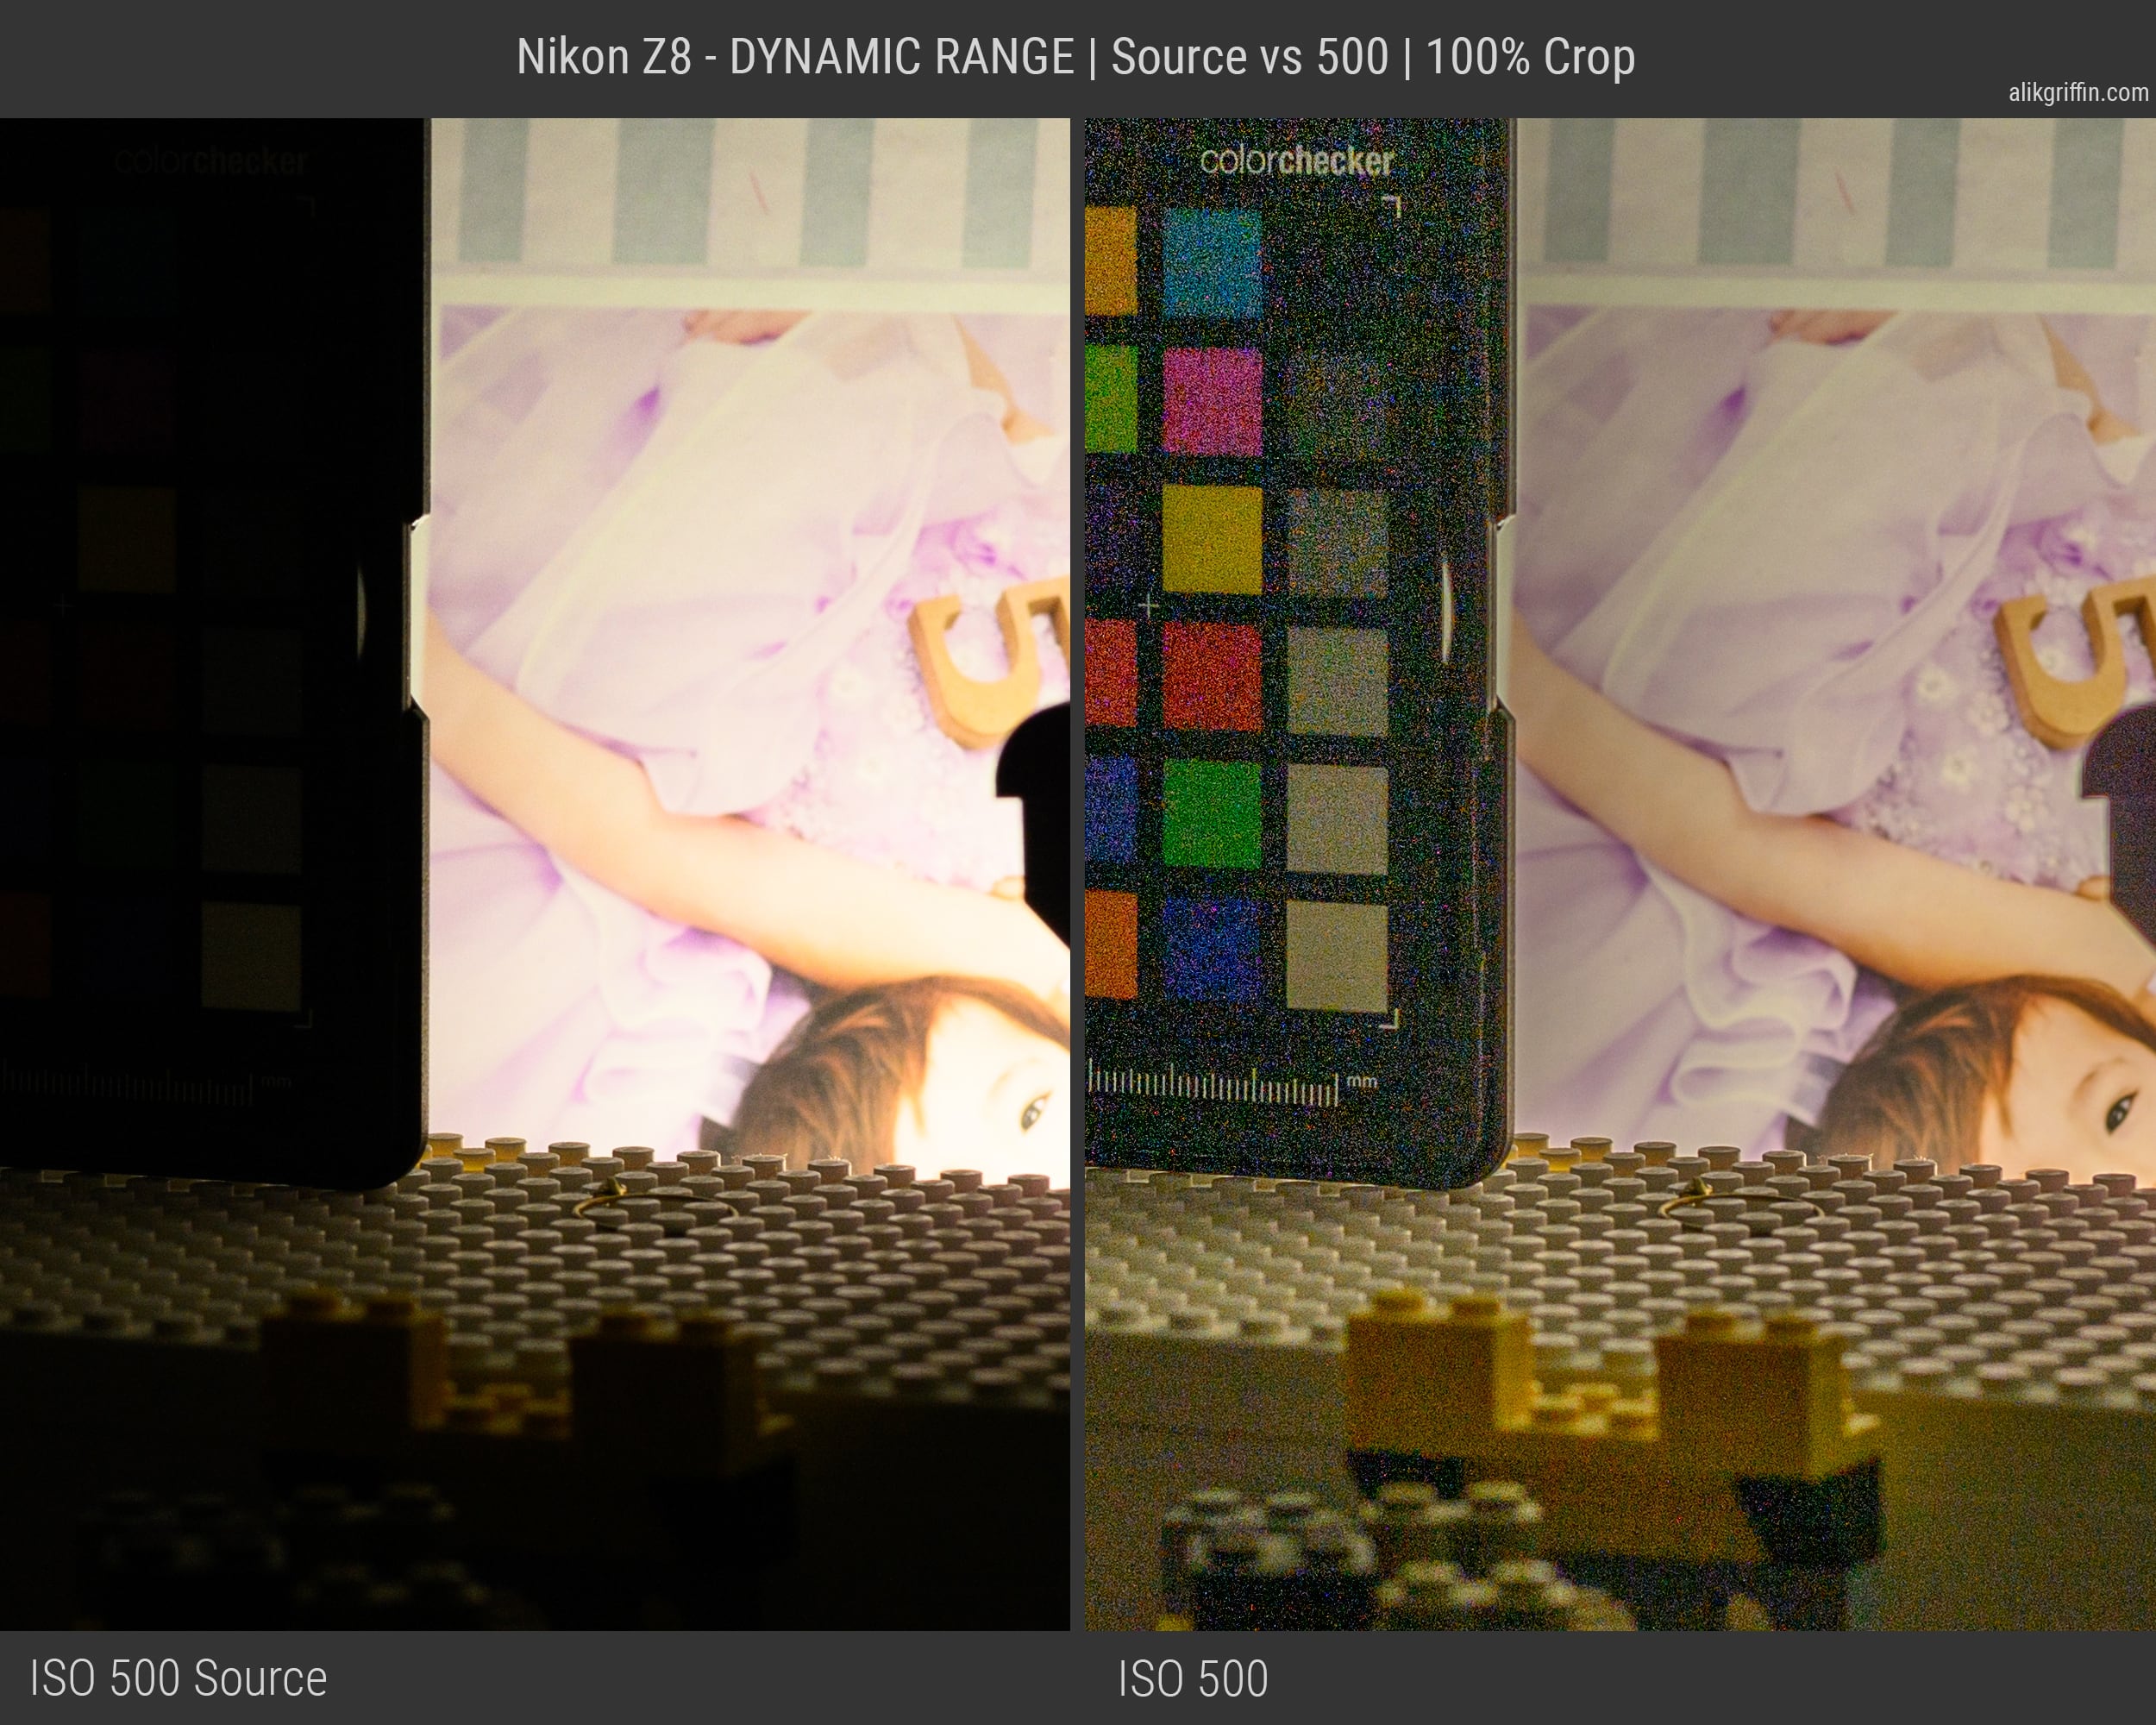
Here is the unedited source file on the left to get an idea of what the camera is actually doing.
Conclusions
The Nikon Z8 or Z9 is not the best camera when it comes to high ISO performance and high Dynamic range, but it’s not terrible either. I’ve noticed it has a much better color than the Nikon Z6, although it does tend to show more noise starting at around ISO 800 compared to the Z6 which would still be buttery smooth.
I personally think ISO 12800 is usable for casual photography, especially if you have good noise-reduction software and that’s where I set my limit on my ISO controls.
You also may want to limit your camera’s ISO to 500 instead of 400 in low-light situations as ISO 500 will produce superior shadow recovery. So in low-light situations, you might want to just set your Auto ISO Sensitivity Settings to 500, with your Max sensitivity at 12800.
ISO 64 is significantly better with dynamic range so landscape photographers will still want ISO 64, and bracketing is still going to be your best friend.
The ISO Sensitivity Settings will carry into your Shooting menu banks, so you could always build a bank for ISO 64-320 shooting and a bank for ISO 500 to 12800.
Let me know if you would like to see any other samples.
| **This website contains affiliate links. We will earn a small commission on purchases made through these links. Some of the links used in these articles will direct you to Amazon. As an Amazon Associate, I earn from qualifying purchases. |

