If you’re a photographer, you’ve probably heard of Smugmug and know how great of a service it is. It’s pricey but pays for itself quickly. Mine did after only a few months. So here are some cool SEO (search engine optimization) tricks you can do with Smugmug to help enhance your blog and increase photography print sales.
1. Use Can Use Smugmug To Embed Your Photos Directly Into Your Blog
This is great because it takes the load off your web server and increases your page load time, which Google likes. The photo is distributed from Smugmug’s global content delivery network, making your photos load super quickly.
Here’s a cool trick on how you can embed
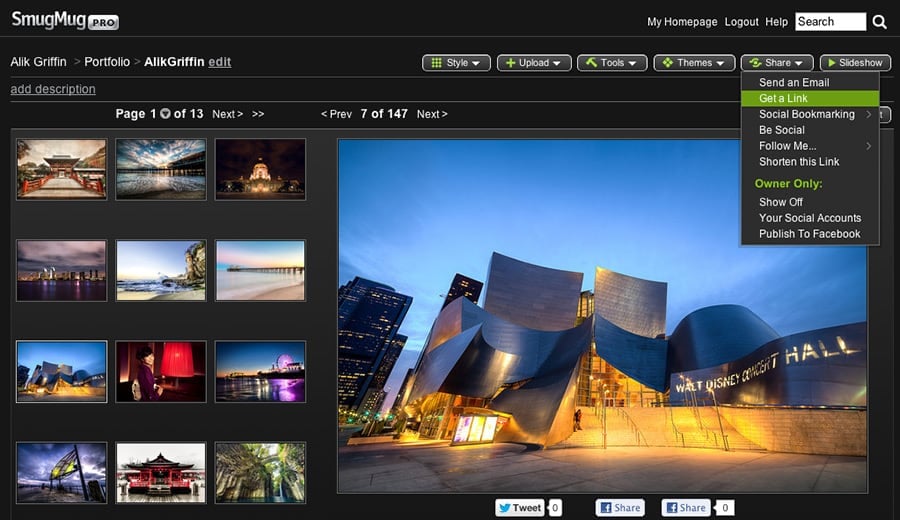
With Smugmug’s share feature, you can get a link that gives you access to embed links for your blog.
Then, you have several options to allow you to use your photo for Forums, Embeds, Feeds, etc. I will cover the ’embeddable links’ tab for now since this topic is about using Smugmug to distribute your photos on your blog.
Now, you have three default sizes to choose from. Small, Medium, and Large.
You simply click the copy button, and then you can paste the code into your blog. You’ll need to use either HTML edit mode or plain text editor mode on your blog to get it displayed correctly.
How to Change the Embed Size with Smugmug Pro
If these sizes aren’t the droids you’re looking for, there is a very simple technique to customize the size of your photo. After you paste the code, look for your image source line. It looks something like this
This is an example using the Large Setting, so we’re going to replace where you see the “L” with the appropriate dimensions we want for our site. For my blog, I like to use 900×600, so I replace the ‘L’ with ‘900×600’ so now it looks something like this:
This will now fetch this photo size from Smugmug at this dimension.
You can also now use the photo sizes by Smugmug, Ti, Th, S, M, L, XL, X2, X3, O instead of the dimensions (900×600). Then, resize your WYSIWYG when posting your photos on your blog. You can also set your width and height manually in HTML, which would look something like this:
I’ve found for the sharpest, clearest images I’ll now post on my blog bigger photos than I need, something like XL, or X2, then resize in my wysiwyg to be 900×600 or the desired dimensions. This way you’re loading a larger image and scaling down which helps with sharpness.
2. Using the Buy Link
In the same ‘Get A Link’ window there is a ‘Photo Links’ Tab and down at the very bottom there is a ‘Buy Link.’
You can use this URL as a hyperlink on your photo or in text next to your photo to drive people directly to the buy page on your Smugmug account. The benefits of this are pretty obvious. Fewer clicks to get someone to your sales page is always a plus. Otherwise, on the default Smugmug layout, the ‘Buy’ button isn’t the most obvious feature on the page and can be easily missed.
3. Use Smugmug for Backlinks
One really cool thing about Smugmug is that its page description is editable HTML. It’s basically a Web 2.0 Blog built around pictures. So you can throw in all that good stuff, like h1 and bold tags, as well as links back to your site using Anchor Text, which all help SEO (search engine optimization). It also allows you to sculpt your site’s authority by building your keywords into your descriptions and then linking back to your main site. This means that if your anchor text is correct, Google will now read this link back to my site and associate it with HDR Photography.
So, you can build some of your backlinks to your Smugmug account instead of your main site, and both sites will benefit from being well-indexed in Google’s system.
Smugmug + Your Blog + Pintrest
One other cool thing about this ability to edit caption on Smugmug is when you embed your photo on your blog, this caption will show up as the photo’s ‘alt text’ and ‘title.’ So when someone is on your blog and pins the image to Pintrest, the Pintrest description defaults to the Smugmug’s photo caption that you built to have all your great keywords. So, all those keywords related to your photo will be pinned, repinned, and indexed by Google. Now you might be saying, “But Pintrest links are all nofollow, so they won’t pass that magical link juice stuff.” This is true; they may not pass link juice, but they will tell Google what your site and your photos are about.
The Important One-Way Linking and the Nofollow Tag
If you’re going to take complete advantage of this, make sure that any link on your blog that links back to Smugmug includes a rel=”nofollow.” That way, your site will not pass link juice back to Smugmug. Link juice, as I mentioned earlier, is a magical Google substance that gets passed from one site to another to help a site get page rank. If you link two sites together, this effect can be canceled.
You can add a nofollow by editing this text on a link on your blog:
This is obviously just one very small step in marketing your site and driving up those photo sales. But every little thing is important, and every detail makes a difference over time. As a photographer trying to make a living with fine art photography, it’s important to understand how Google works and ensure your site is properly built to maximize search results.
Hopefully, this tip will help those of you using Smugmug Pro and I will continue to post new tips and techniques on SEO for you photographers as I go. My site is still young and I will try to post all the great successes and failures I make as I go.


Leave a Reply