Are you looking for ways to improve your HDR photography? Are you wondering where in your HDR workflow you are making mistakes?
Chances are there are a few steps you’re completely overlooking, and they happen before you even start.
I’ve compiled a list of four techniques you need to use for every HDR photo before tone mapping.
Here they are.

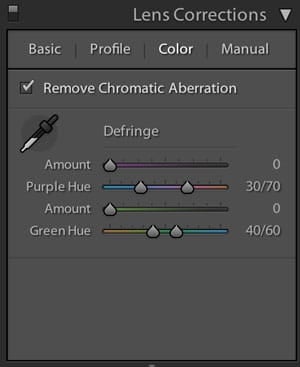
1. Correct Chromatic Aberrations
This can easily be done in Lightroom. Select the Remove Chromatic Aberrations in the Lens Correction module.
If you don’t do this here, you’ll have chromatic aberrations in your merged HDR image that will be much more difficult to remove.
2. Turn Sharpness Down
If you’re working in Lightroom, you’ll notice that every photo has sharpness already set to 25. This will slightly enhance the grain, causing the tone mapping processes to bring out even more unwanted HDR noise.
Sharpening your Landscape and HDR photos is a crucial step, but it should be done last. One of the best techniques for sharpening your HDR photos at the end of your process is with the High Pass filter in Photoshop.
3. Noise Reduction
To help keep HDR noise to a minimum, you should reduce noise before tone-mapping your images together.
If you use Photomatix, you’ll notice it can remove noise on underexposed images, but you cannot control what it does. Instead, reduce the noise in your darker images in Lightroom a little. There are also a few programs that do it even better. My favorite is Dfine 2 by Nik. I’ve also used Topaz Denoise with great results.
Adding a little noise reduction first will remove some color noise and eliminate any unwanted artifacts that tone mapping will only enhance.
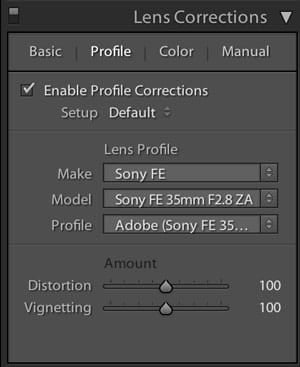
4. Load Your Lens Profile
If you’re shooting HDR photography on ultra-wide lenses, chances are you have some crazy barrel distortion. The best time to remove this lens distortion is when you’re still working with your RAW files.
In Lightroom this can easily be done by loading your lens profile in the Lens Correction module in Lightroom.
Keep in mind that after you have combined your images and are working in a TIF file, you will lose most of your lens profiles since you no longer have access to Camera Raw information.
Conclusion
I know these results may seem small, but they will give you that extra little bit of quality that may have been missing in your HDR photos.
If you find doing these four steps on every photo in your bracketed sequence tedious, remember you can always copy and paste settings or even build a preprocessing HDR preset in Lightroom for every lens you might shoot on.







Leave a Reply