This is the ultimate guide to camera cleaning, including the best cleaning accessories and tips and tricks for keeping your camera, sensor, and lenses clean.
Best Cleaning Accessories | Essentials
Every photographer should own basic camera cleaning gear. I’ll list all the products I have and use regularly, starting with the most important: a rocket air blaster. Of course, other brands work just as well, but I like the rockets because I can set them upright, and they don’t roll around.
Air Blasters

Air blasters should be your first line of defense regarding keeping cameras clean. Always bring one with you if you ever plan on going anywhere where you may change your lens. This is the best and fastest way to get the dust off your lens, and you should use these for cleaning before you try anything else.
They also work great for removing dust and lint from UV filters and lenses. Remember to keep your lens caps and body caps super clean.
Rocket Air BlasterRocket Air Small: Amazon Rocket Air Medium: Amazon Rocket Air makes a few sizes of these. I have had them all and I’ve found the Medium works fine and provides enough air pressure to clean the dust off sensors. |
Micro-Fiber Cleaning Cloths
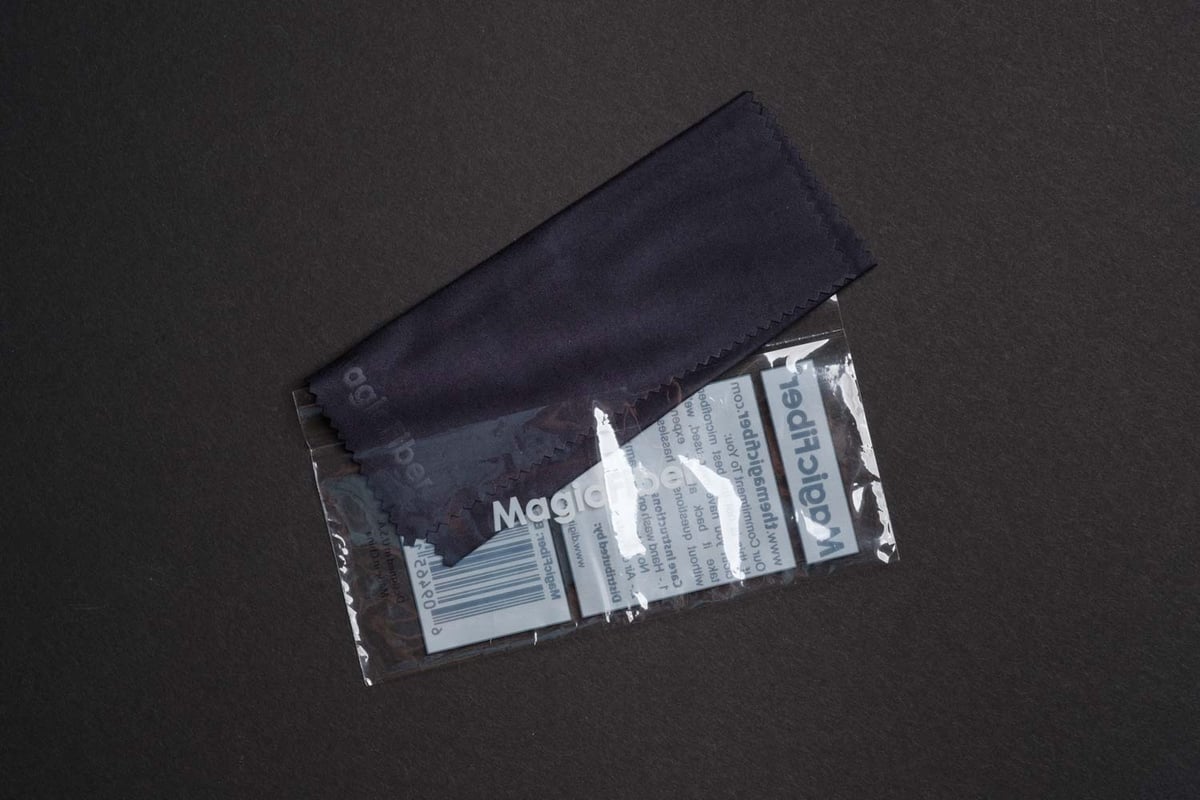
These are must-have items. I’ve purchased this same pack a few times since they get dirty over time and stop working. I also keep a few in all my different bags.
Micro-Fiber Cleaning Cloths 6-PackAvailable At: Amazon I’ve found that when I’m out, my T-shirt is usually totally fine for cleaning UV filters or LCD screens. However, before I go out and shootmicrofiber cloths are the best way to clean your gear. Usually, I clean my ND filters and my UV filters well with microfiber before I go. Here is a great 6-pack I’ve bought several times. It’s nice to replace your micro-fiber cleaning cloths now and then since they do eventually get oil buildup. |
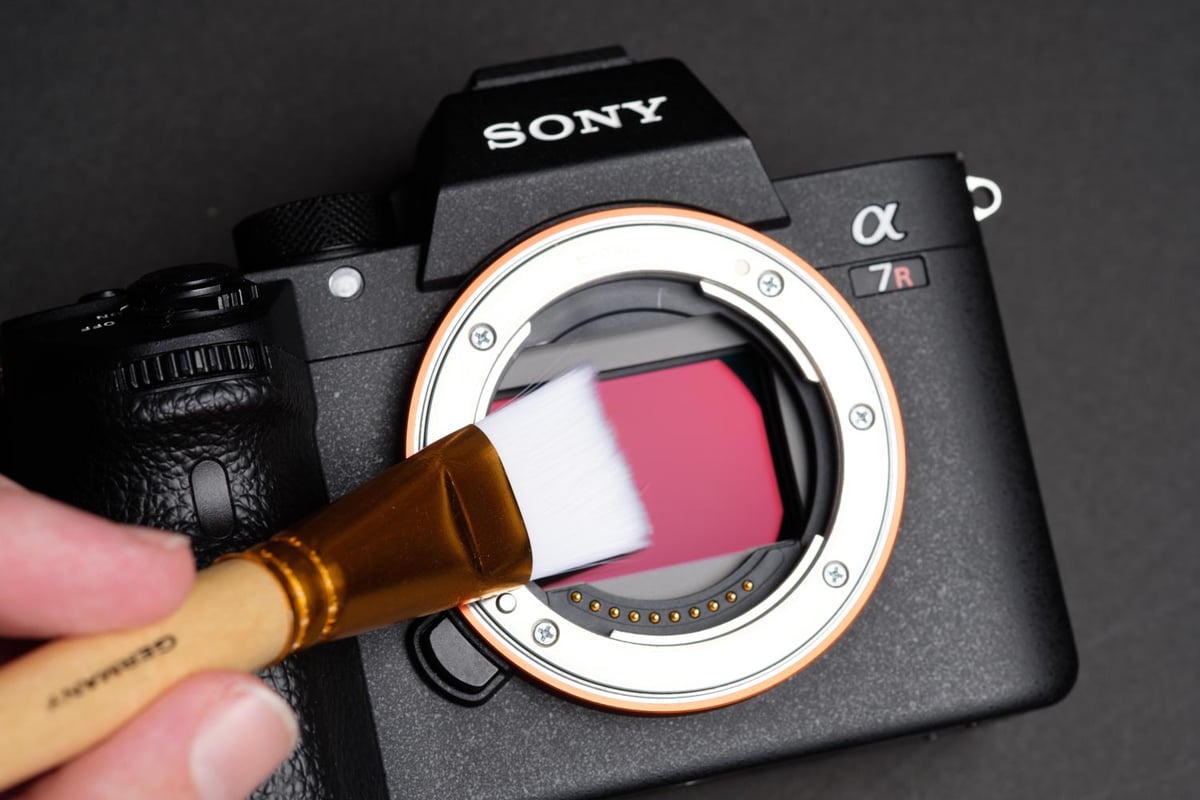
Sensor Brushes
Using a sensor brush is the second-best way to clean the dust off your sensor. Every so often, you’ll see a few pieces of statically charged dust that won’t come off your sensor with the air blaster. That’s when the sensor brush comes in. Since I’ve started using the sensor brush, I haven’t had to use the “wet method” once.
Here are a few tips on how to use a sensor brush.
First – never touch the bristles with your fingers since your body oil will ruin the brush, causing it to leave behind the oil on your sensor.
Second – use your Rocket Air Blower and blow some air on the bristles of your brush. This does two things; removes old debris, and creates a static charge on the bristles which will help it collect dust off your sensor.
Third, brush across the sensor very gently a few times. When doing this, think about how you would brush your eyeball with the brush while causing as little pain as possible. Now, brush your sensor like that. Does that make sense? Good.
I love my brush. It’s a must-have, and I always keep one in my travel bag. This one here is German-made, it’s the best.
The Sensor Cleaning Brush Sensor Cleaning Brush Full Frame – Amazon Sensor Cleaning Brush APS-C / All Sizes – Amazon Every so often you’ll get little particles stuck to the sensor that just don’t want to come off. This is when the sensor brush comes in. |
Camera Cleaning Brush
Nikon Lens PensAvailable At: Amazon You’ve probably heard of lens pens before to clean the front element of your lens. I’ve had these before, I never loved them, but they do work. The only reason I’m listing is for the brush that comes on the back. The brush is incredibly useful for cleaning around all the crevasses on your lens or in between the ribs on the focus ring. The lens side with the carbon has a cleaning system that helps remove oil. As with the sensor brush, keep it meticulously clean. Never touch the bristles, as your finger oil will rub off on them and cause them to lose their ability to repel dust and dirt. |
Matin Lipstick BrushAvailable At: Amazon If you don’t want to mess with the Nikon carbon lens pen and just want a simple brush, this Matin brush will do the trick and is decent quality. These are also nice to clean items for product photography since it’s a constant battle against dust. |
Cleaning Accessories Essentials | Wet Method
When the dry method doesn’t work, you’re left with the only option, which is the wet method.
This is for when you get oil, water particles, or spit on your sensor. Something more than dust that’s just nasty. Maybe you sneezed while changing the lens. These things happen and you need the wet method to clean up the mess.
Before using the Wet Method always make sure you’ve used the dry method to get any large particles off your sensor or you’ll risk rubbing those into your sensor and scratching it.
Photographic Solution Swab KitsFull Frame Kit – Amazon APS-C Kit – Amazon Pec-Pad Lint Free Wipes – Amazon The Photographic Solution Swab Kit has a little bit of everything you need. If you have nothing, I actually recommend starting with this and you can see what you like and don’t like, then you can buy replacement parts from there. This includes the sensor cleaning wipes, the sensor swabs, and eclipses. I’ll go into each of those individually and how they work below. |
Sensor Swabs With EclipseSensor Swab – Full Frame – Amazon Sensor Swab – APS-C –Amazon Eclipse Cleaning Solution (You need this) – Amazon Using sensor swabs is a bit more difficult but sometimes necessary. How to use the Sensor Swab – You take your microfiber that comes in the kit, secure it to the spatula with the band, put two drops of Eclipse or (methanol) on the spatula, wait a few seconds for it to spread, then wipe it once across the sensor. Or flip it over and do it a second time if you think it needs it, but don’t wipe twice on the same side. You need to buy an Eclipse cleaning solution to go with this, which I’ve listed. |
Sensor Cleaning ewipesAvailable At: Amazon / BHphoto These are great for just general-purpose electronic cleaning, but they do work on sensors, especially for larger sensors like full-frame and especially medium format. Take out an E Wipe and brush it once across your sensor as even as possible. Done. I recommend not using this on IBIS sensors since their mechanics are a bit more fragile – unless you just bush it lightly with the tip or the corner of the wipe. These will also work great for medium format cameras from Fujifilm, Hasselblad, or PhaseOne. |
How To Cleaning Your Sensor
Before You Begin – Create A Dust Free Environment
Preparing a dust-free environment is the first step before cleaning your camera sensor.
I have a few Air filters I turn on full blast in a small area like a bathroom that can work, but you don’t need one to clean your sensor.
One trick I like to use is to turn your shower on and steam out your bathroom for a bit. This will cause dust particles to stick together and fall. Ensure all the steam is out of the air before you start cleaning your sensor, as you don’t want excess moisture inside your camera.
Then, depending on how dirty your sensor is and what is required, you can use one of the above techniques to clean it.
Start with the air blaster – if that doesn’t work, use the sensor brush.
If you have oil or something other than dust, go straight to the sensor swabs. If it’s saliva or something else, you could end up ruining your sensor brush.
How Not To Clean Your Sensor
First, as far as I know, you shouldn’t use a cleaner with Alcohol on Sony cameras, as it can mess with the coatings on the sensor. That’s what I’ve heard, at least. I’ve also heard Sony say they use Alcohol products. Maybe it doesn’t matter, but I stick with Eclipse, and it’s been fine.
Second, don’t ever use a microfiber cloth on your sensor. Also, there are these gel sticks that have sticky material. Never use those. It’s just about equivalent to using one of those sticky hands we grew up with that you can get from a quarter machine, and they can damage your sensor by pulling it apart.
Third, never use canned air. It’s just too risky. You don’t want the little tube to fly out and hit your sensor, and you don’t want it to spray that nasty cold mist onto it, either.
Good luck. These are the methods I use to clean my DSLR and Mirrorless Cameras. They’ve been effective for me both on my old Canon 5Dmkii and my new Sony A7r cameras. They will work on most DSLR and mirrorless camera sensors, but they are not the only methods; they are just some of the methods I like out there.
Please comment if you’ve found other methods or techniques you would like to use to clean your mirrorless sensor.
What To Do If You Scratched Your Sensor
If you’ve scratched your sensor, it’s not the end of the world. Don’t panic, and don’t get depressed. A lot of times, scratches won’t show up or affect your image quality. If it’s scratched badly and is affecting your image quality, then there is a fix. But it is expensive—often around 300.00 USD.
You’ve only scratched the High Pass filter, UV filter, or glass in front of the sensor. You haven’t scratched the actual sensor. So you can take your camera in to be serviced and often get that piece of glass replaced. No big deal, call your camera service center associated with the camera brand.


Leave a Reply