
With a huge bump in megapixels, processing power, and build quality, the X-Pro 2 is not just better than the original X-Pro 1 but is one of the best cameras Fujifilm has built.
It’s extremely difficult to do a camera review and be completely objective. Some reviewers will focus on some aspects of a camera while ignoring others. It’s fine when smaller independent bloggers like Steve Huff do this since it’s fun seeing their opinions. However, large sites, like DPreview or even TheCameraStore, will often cast a negative light on a camera and influence customer buying decisions while not giving credit to or maybe not even understanding the design philosophy of a camera.
The problem is that many of these reviewers use DSLRs to set the standard and then rate everything else down, ignoring other important features like size, weight, and flexibility.

In this review, I want to isolate what’s important for actual photographers and highlight the pros and cons of these features so that you can get a little idea of what it might be like to use this camera regularly. I believe the Fujifilm X-Pro 2 is one of the greatest mirrorless cameras yet, not because of its specs but because I have so much fun using it! Of course, if you like the rangefinder and aren’t afraid to fork out some cash.
I’ll be updating this review regularly since there are new things I learn about it regularly.
What’s I Love
-Some of the best image quality for APS-C
-Amazing color profiles
-Menu system
-Camera controls on the body
-OVF/EVF is a lot of fun
-Very sharp and high-resolution LCD screen
-Extremely fast memory card write speeds 108MB/s with 1GB buffer
What I Don’t Love
-It’s a little big for an APS-C camera
-Battery life (although average for mirrorless) could always be better
-It doesn’t come in silver
Featured Specs
Sensor: 24.3 MP X-Trans CMOS III
Processor: X-Processor Pro
Image: RAW 14bit uncompressed/lossless compression / JPEG
Continuous Shooting: 8fps
Mechanical Shutter: 1/8000
Memory Card: Slot 1: UHS-II / Slot 2: UHS-I

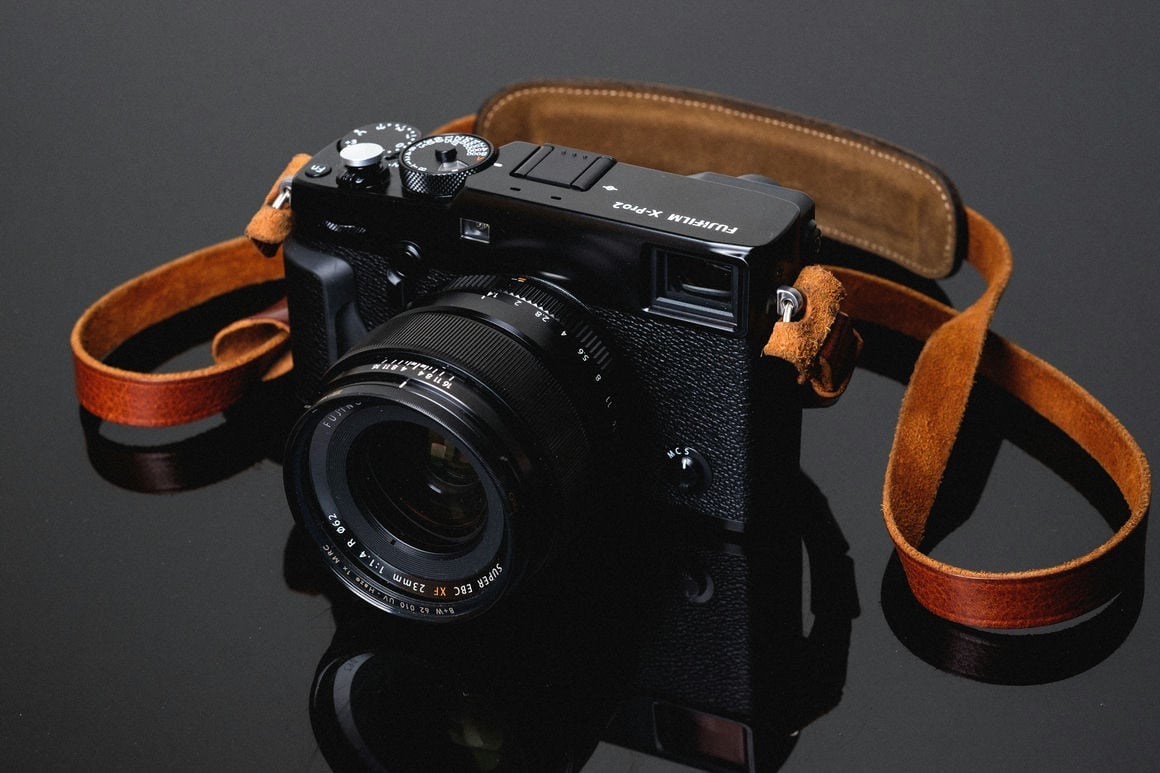
First Impressions / Use And Feel
At first, I didn’t know what to expect with the X-Pro 2. I’ve been shooting on the XT1, X100T, and A7rII for a while and wasn’t sure if I would like the X-Pro 2 or not.


The Settings
After unboxing, it took me about ten minutes to get fully adjusted. The camera has many of the same settings as the other Fujifilm cameras but also many new ones, with an updated menu and screen that are much nicer and feel more modern. It might have the best menu system in any camera I’ve ever tested or owned. It’s very well thought out and allows you to customize your tab.
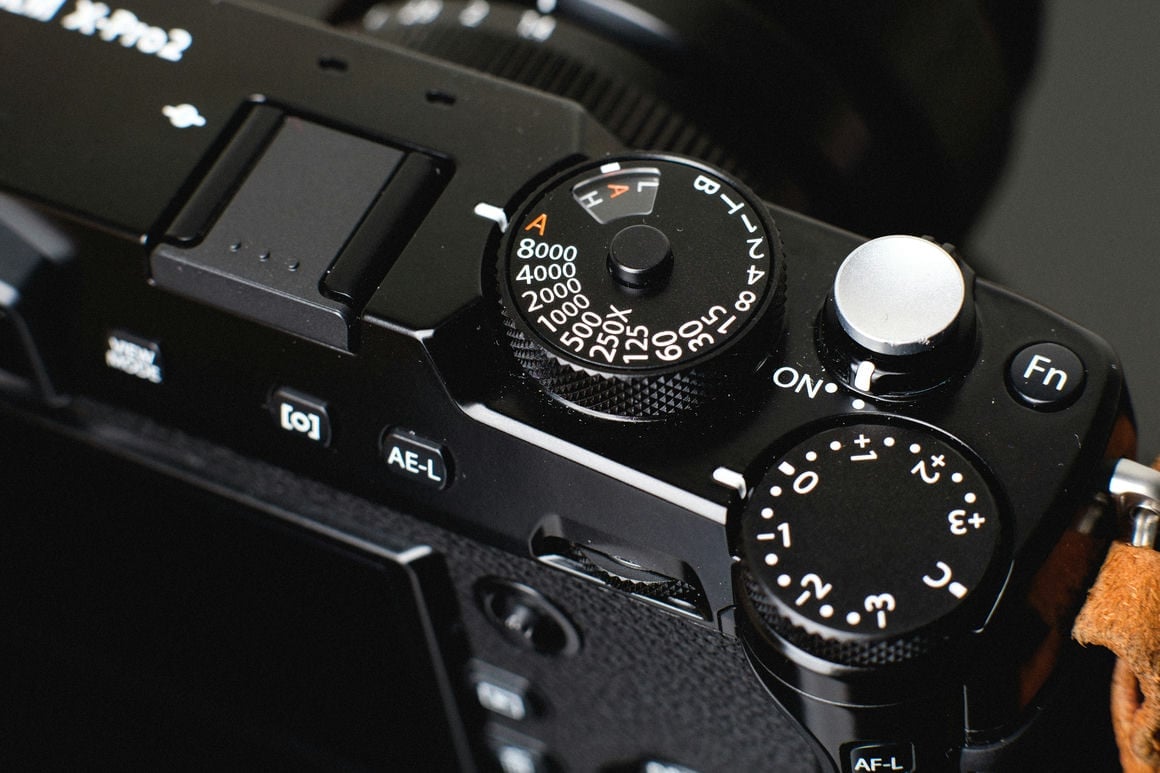
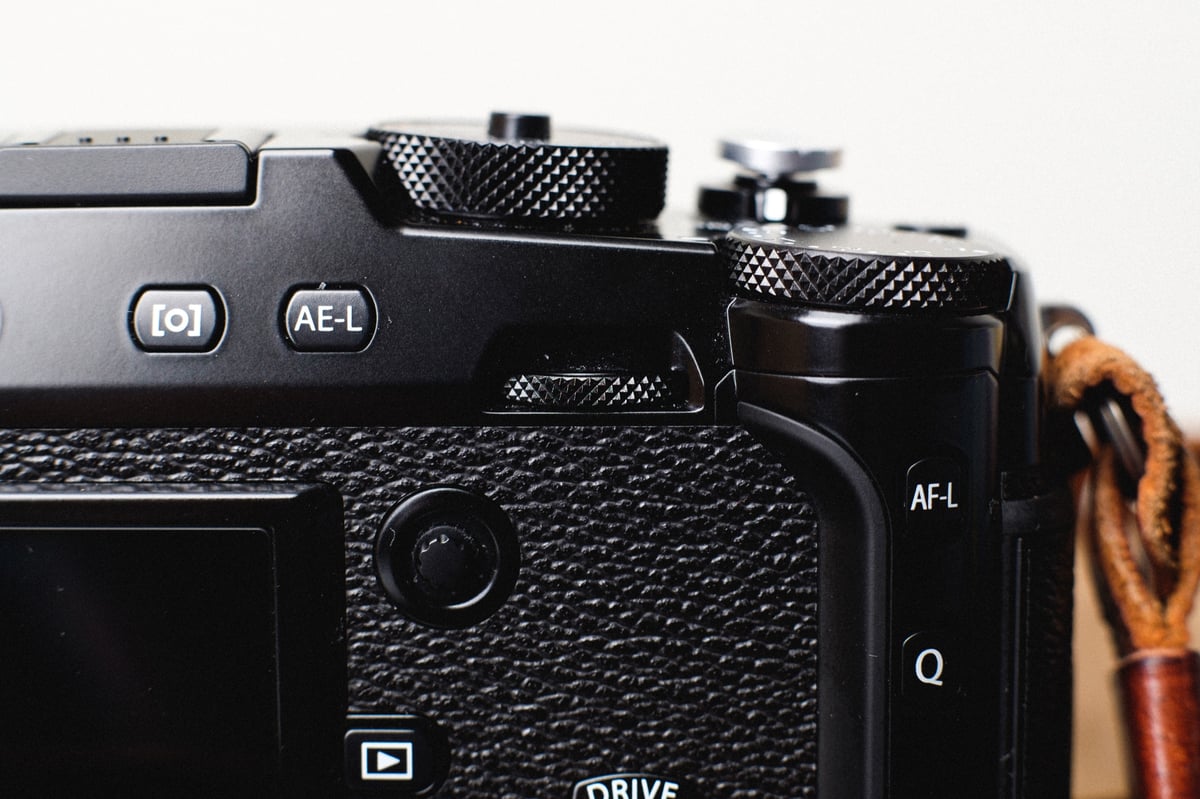
The Controls
On the body, all the important controls are still right there, and I like what they did with the ISO dial after getting used to it. My favorite thing about this camera is you can see all your settings instantly by just glancing down at your camera. You never need to go into a menu to adjust your primary camera functions. Once you get used to this, it’s really hard going back to any other camera that doesn’t have this. Unless you like to shoot everything on full auto with continuous wide autofocus like our friends over at DPreview. 😉
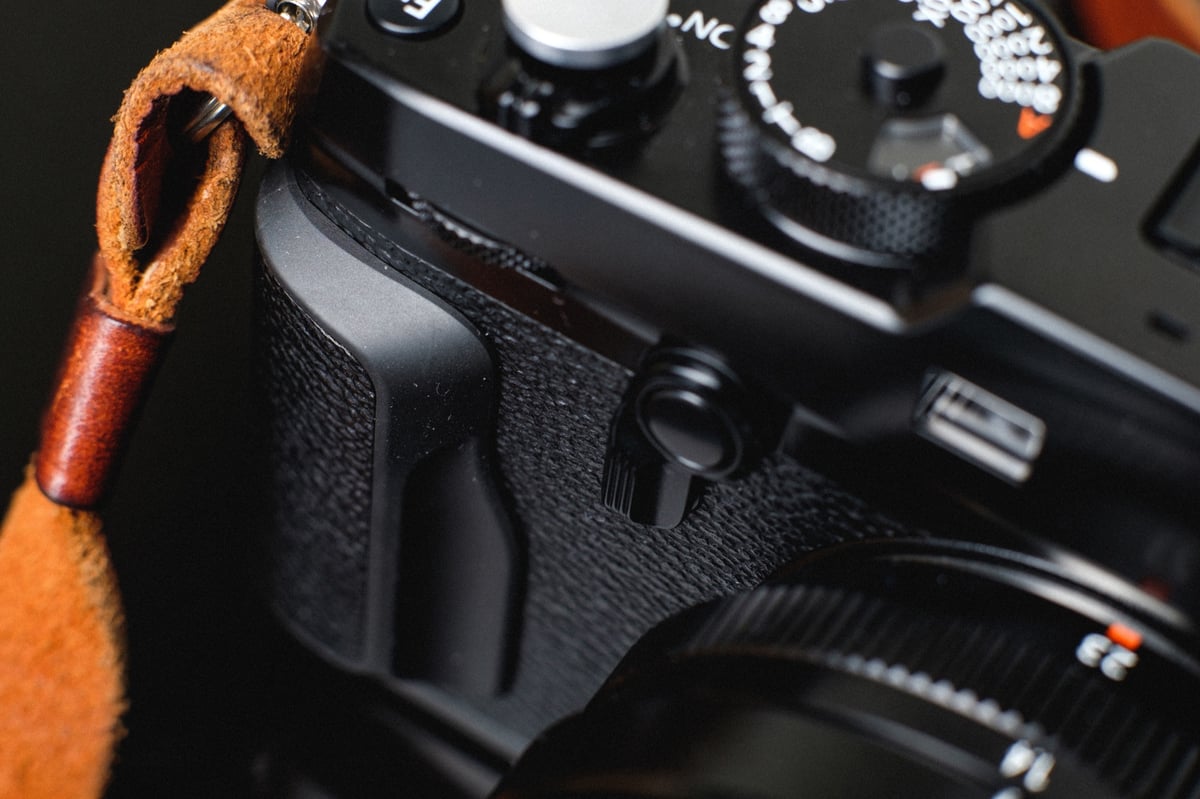
The New Joystick
The joystick for adjusting focus points is amazing once you get into the habit of using it, but I still find it to take too much time when shooting out in the wild. I like to keep my focus somewhat centered where I can focus and then snap back to my framing.
I will most likely use this feature when I’m shooting tabletop or studio work, where it will be invaluable. I’m just thankful they didn’t add a touchscreen for this purpose. Thank you, Fujifilm, for not turning your camera into an iPhone. If you’re shopping for lenses to pair with the X-Pro 2, my Fujifilm X-mount lens list covers every native XF, XC, and third-party option in the system.
I’m not completely opposed to a touchscreen on a camera; they are critical on compacts where real estate for things like extra buttons and thumb sticks are limited.
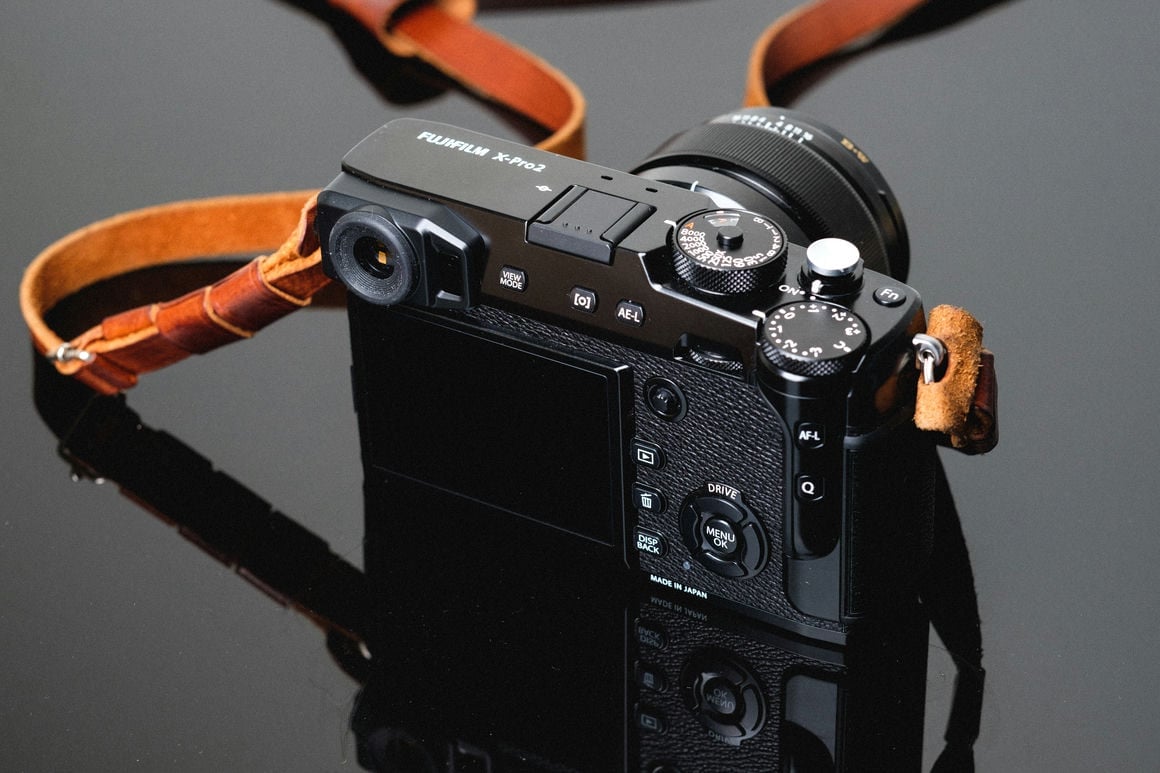
The Sound And Feel
The camera feels expensive, and of course it is. It’s also heavy, but in a good way. However, it does seem a little large for an APS-C camera.
The sound of the mechanical shutter is amazing. It’s a cluck cluck instead of a snap snap; if that makes sense, this is probably due to the added weather sealing.
The front grip and thumb grip are very well designed, with a small bit of rubber inlay that helps with feel and control. The XT1 and X100T sort of missed the mark with the way it feels in your hand, and I always added an extra grip or case. This camera nailed it out of the box. However, I could see some people with bigger hands still wanting a bit more grip, especially when using heavier lenses since they tend to throw the balance off.
The OVF/EVF
If you come from an X100T, the OVF/EVF will all work similarly. The OVF is fun to shoot street photography with if you have shorter prime lenses. It’s also very handy for landscape photographers who like to shoot with heavy ND filters or in the dark.
Although the OVF is great, there are still some issues that the firmware could fix. When you power up the camera and are in OVF mode, you can see the transparent LCD screen light up for a moment; this overlay draws all your controls and frame lines over the OVF image. When using Fujinon lenses, this dims back to being 95% transparent, and everything is good. However, when I use my manual Voigtlander lenses, this screen stays lit and creates a milky haze over my image, making it difficult to see in dark situations. You don’t notice it as much in the daylight.
Also, frame lines are still inaccurate when using manual lenses, even when you tell the camera the correct mm you are set to. The length of my lens may cause this. I use the Voigtlander 35mm Ultron, a long 35mm lens. So, this may never be 100% accurate since the camera can never know the distance and focus you’re shooting at when using manual lenses. I assume it’s unfixable, but something to be aware of when using manual lenses.

The Film Simulators
The Fujifilm film simulators are one of my favorite features of all Fujifilm cameras. When you shoot RAW, you can process it to look however you want, and RAW + Lightroom usually means you’ll be using the Adobe Camera Raw setting if you don’t manually switch it, which I do sometimes. But for casual shooting, like family, friends, work, etc., the film simulators are far more interesting than anything you get with any other camera.
The best part is you can shoot RAW, then use the built-in camera raw converter to make a jpg using all the different film simulators until you find the one you like, then you can send that to your phone and off to social or text to friends. This a ton when I want to send my mom pictures of my daughter. It’s great.
I haven’t felt the difference or made a comparison yet, but they say the Film Simulators do more advanced work in the X-Pro 2 than the other cameras because of the faster processors. So the looks are improved. The new Acros is improved compared to the older black and white setting (I notice it makes softer blacks), and they say they’ve even improved the standard film simulators like Velvia, which I use constantly when I shoot quick Landscapes in JPEG.
Who Is This Camera For?
This camera lacks the competition’s features: a flip screen, 4 K video, USB charging capabilities, and a flash. Some reviewers complain about this, but after using the camera for a while, you can see that Fujifilm has put a strong philosophy behind it.
It’s a camera designed more for the purist; they don’t go as far as Leica, but they managed to pull it off while adding enough tech to attract the mainstream photographer.
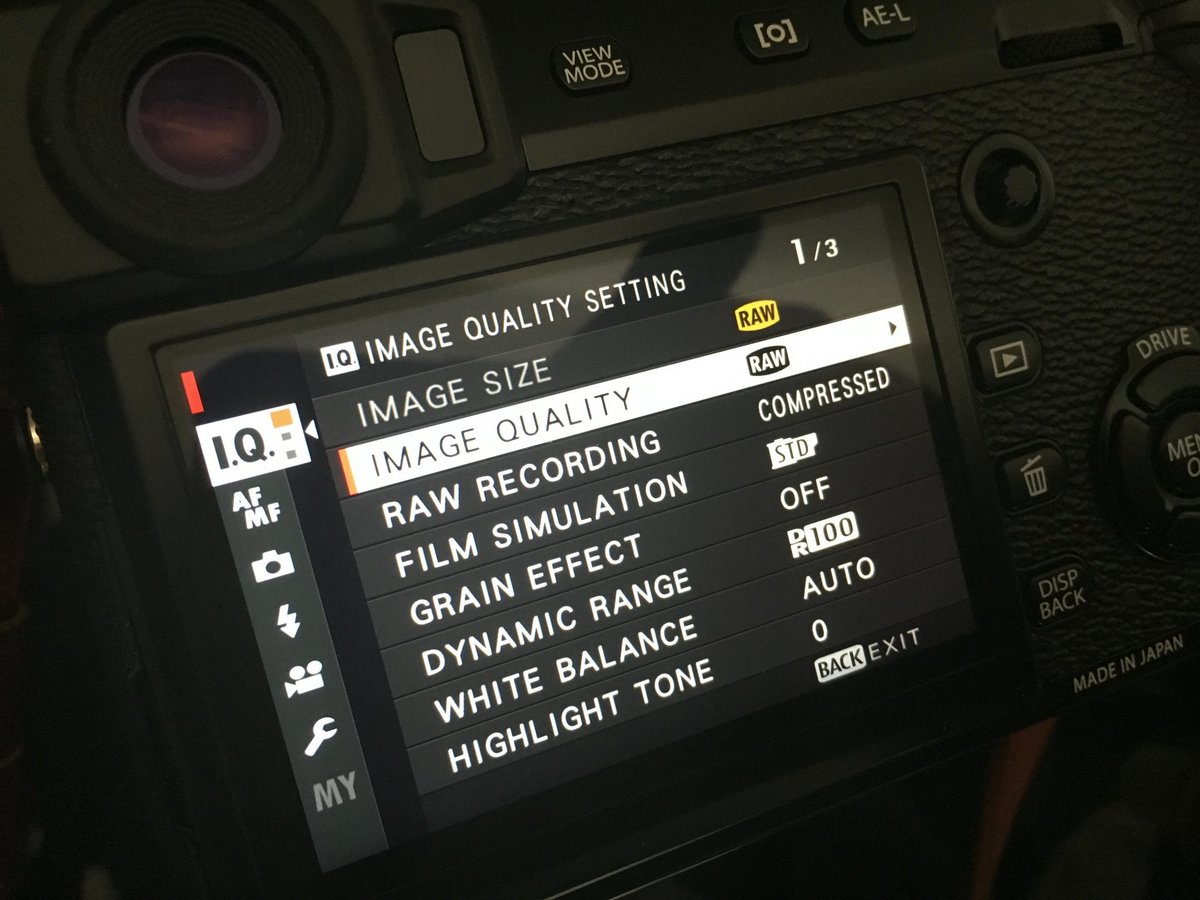
You notice this immediately after unboxing; the camera has several features turned off. Like most cameras, it comes set to shoot JPEG only. The Q menu defaults to all the JPEG image controls, and the camera doesn’t even come set to preview images after taking a shot. It’s fun when shooting street, but I have to turn it back on when shooting with studio lights.
For someone who wants all the bells and whistles of modern technology, this camera has most of it and gets you close enough to everything else. After all, it’s not designed for the technophile but for the photographer.
No 4k, but you’re not buying this camera for video anyway. At least you shouldn’t be. I still wish it did shoot 4k since this camera is my new sidekick, but 1080p is fine for casual shooting since the quality is still great and the file sizes are easier to deal with. Not to mention, 1080p is still totally acceptable in mainstream media today. I also have an A6300, which I almost solely use as my video camera, and I love it. I still prefer the X-Pro 2 for still, and it does make some razor-sharp 1080p video with all the awesome film simulators you can apply. The X-Pro 2 also seems to have better image quality and can focus with the AF Illuminator turned off. But that’s a different topic.


Fujifilm X-Pro 2 Review – Technical Overview
Everything has been improved over the X100T, the XT1, and especially the X-Pro 1. The EVF got faster, the LCD screen got more resolution, the sensor got more megapixels, the processor got more power, and there were two SD card slots, and it’s weather-sealed. All these things together make a camera package that’s a little better than anything Fujifilm has built but a lot better.
Autofocus
This is a complicated topic, and most reviewers get it wrong. But I’ll try to explain what’s going on with this camera as best as possible.
The camera has 91 Phase Detection and 325 Contrast Detection autofocus points. So it would seem like this camera is tuned to be better in low-light situations, and compared to the A6300, it is.
Two types of autofocus can happen depending on your shooting conditions and what lenses you’re using.
Phase Detection Autofocus is used mostly in well-lit areas and when using non-APD lenses. It does not work very well in low-contrast or high-frequency situations.
Contrast Autofocus: In situations where phase detection does not work well (low contrast, such as in poorly lit conditions or high frequency), contrast autofocus helps.
For a good autofocus experience, both phase detection and contrast detection must work together. The X-Trans III sensor has doubled the speed at which the camera can read contrast.
Next, you need lenses with microcomputers fast enough to handle this new readout. Only five lenses with faster microprocessors can now handle this faster autofocus readout: the XF16-55mm, XF50-140mm, XF90mm, XF35mmF2, and the XF100-400mm.
This is why you see mixed results on the Internet about autofocus speed and accuracy. I only own the XF35mm F2, which is much snappier than my XF 23 f1.4. I notice it when shooting my baby girl, who doesn’t have a lot of contrast in her face, especially in dark situations.
Now, if you compare this camera to something like the Sony A6300, the autofocus on that camera is also great. Still, if you’re using big full-frame lenses that block the focus illuminator or turn that off like I do because it’s way too bright, the A6300 completely fails in low-light situations.
X-Pro 2 Autofocus – Real-World Shooting
If you’re just casually shooting, you might not notice a huge jump in autofocus speeds over the X100T or the XT1. Still, in situations where phase detection does not work well, you will notice a jump in autofocus performance on the X-Pro 2 as long as you’re using the new lenses. I feel like it’s a bit snappier than the XT1, even when using older lenses.
Face detection is great when turned on, but I find it to miss focus a lot, so I wouldn’t say it’s 100% reliable.
Every camera I’ve owned since the Canon 5DmkII has had enough autofocus to complete most jobs. But I’m a pretty casual shooting/landscape photographer, so autofocus isn’t that important to me, and half the lenses I use are manual anyway. I’ve also never used continuous autofocus except for once by accident, where I was immediately annoyed and had to turn it off. However, maybe in the future, I could see my wife loving this feature when our daughter starts to play soccer.
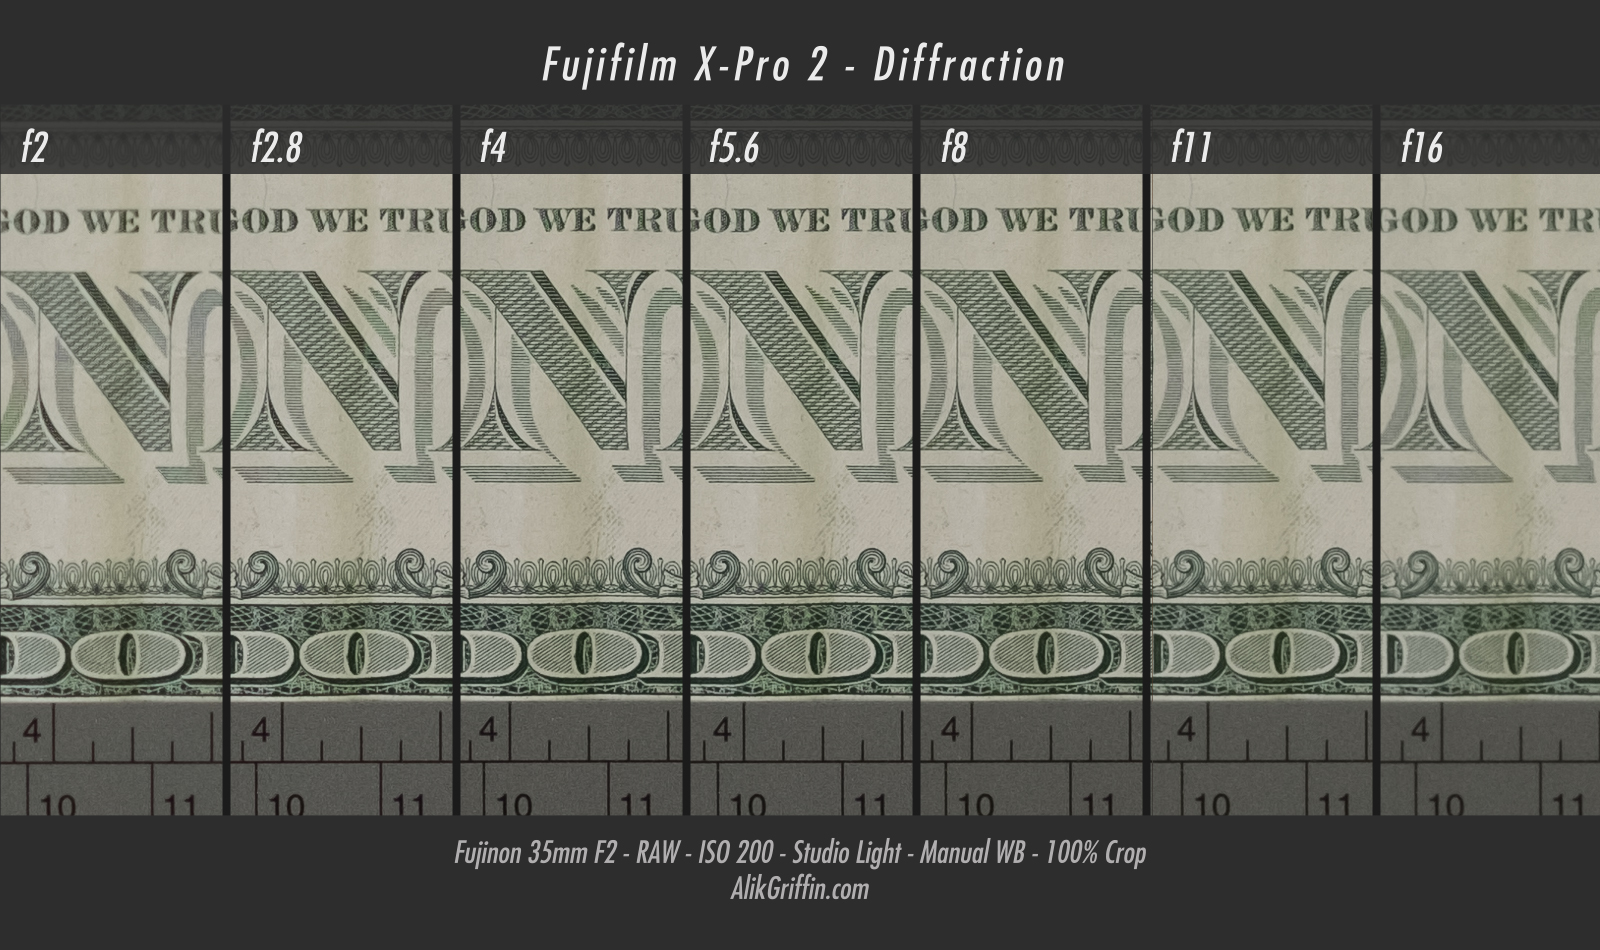
Diffraction
With the megapixel bump, you’ll have to pay more attention to diffraction. At 24 megapixels, the sensor’s pixels should be about 3.93 microns. This causes diffraction to come into play at anything above f4. You probably won’t see it until about f8 in real-world shooting.
With spherical aberrations clearing up at around f4-f5.6 and the diffraction limit of f4, the camera is tuned to have a sweet spot of about f4-f5.6. If you’re a landscape photographer looking to print with as much IQ as possible, you’ll want to keep your aperture between f4 and f8 and maybe focus stack to get back our depth.
I could see going with a little bit more resolution, only because scaling down from more megapixels always helps with certain types of artifacts. However, the bigger file sizes would be more of a burden.
Lens Modulation Optimizer was turned on. I’ve never been able to see a difference with this setting on or off when shooting Raw. I’ve never seen it affect my JPEGs, either. Is it lens-specific? I don’t know, but it’s supposed to help with diffraction. I imagine it adds some sharpness to the image as you close down.
X-Trans CMOS III – Resolution
One of the great features of the X-Trans CMOS III sensor is that it eliminates the need for, or at least reduces, an optical low pass filter by controlling moiré. This is done using a 6×6 color pixel array instead of the standard 4×4 pixel array found in Bayer sensors. This should give the X-Pro2 a slight edge in terms of resolution compared to the competition (such as the A6000 or the A6300) while also cutting down on moiré. However, there are a few other sensors in cameras like the Nikon D7200 that also do not include an OLP filter, but they will likely have more issues with moiré.
Moiré on the X-Pro 2 is very well controlled, showing only in small details above and around the eagle.
The color patterns come from the small details of how the ink is applied to paper—small points that the camera picks up.
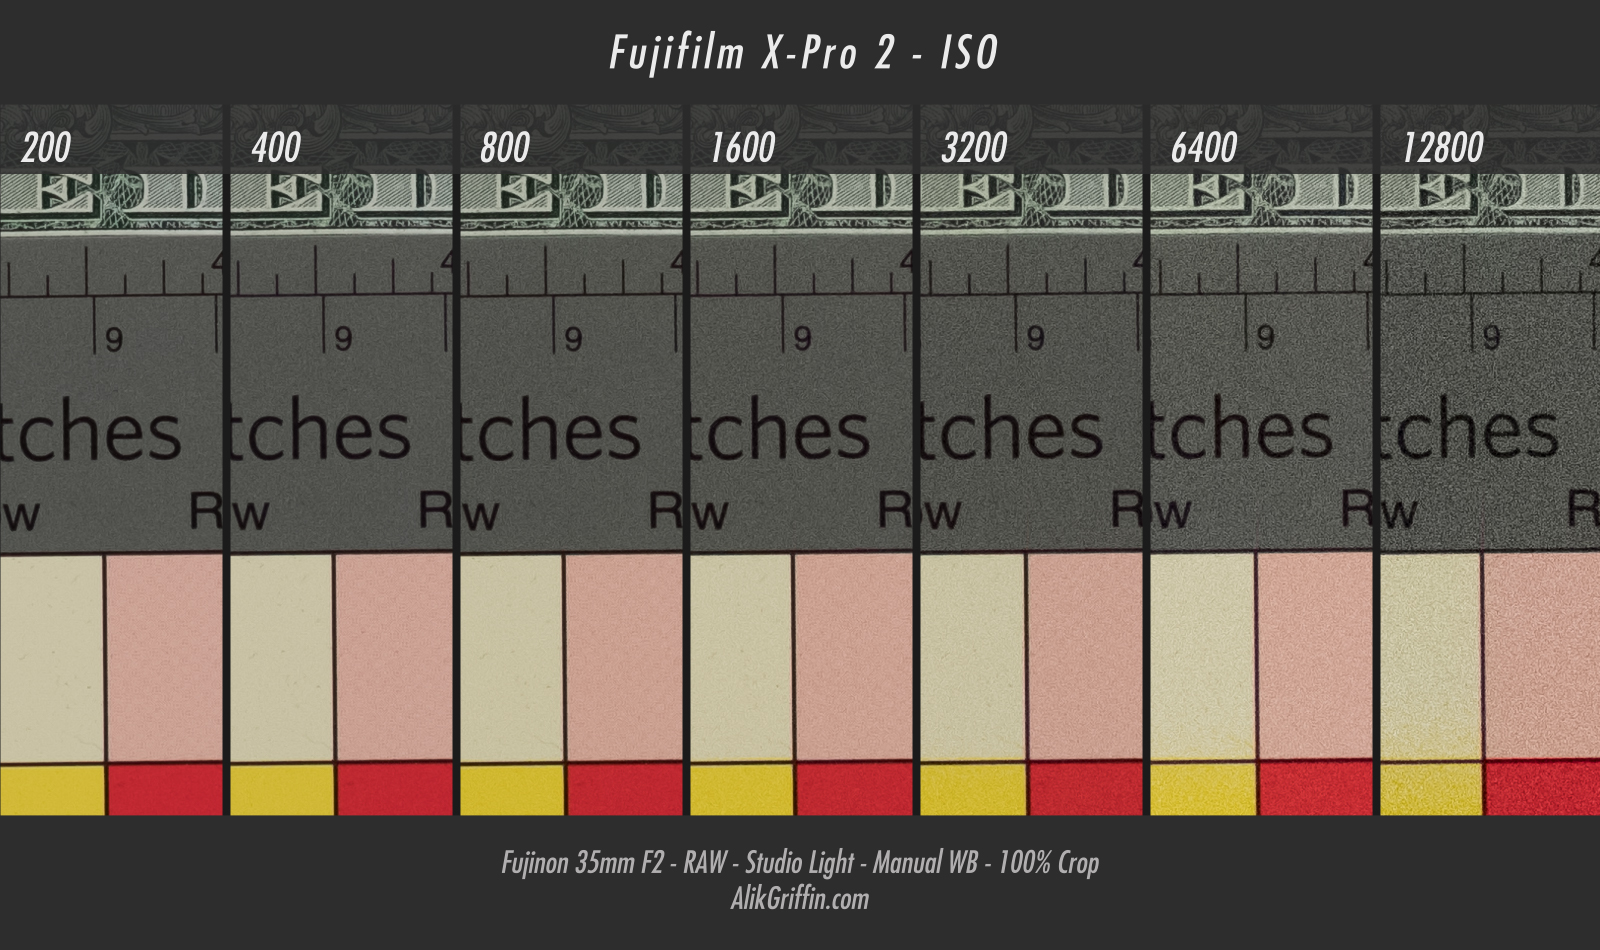
ISO / Noise Control
ISO performance has been improved. The X100T and XT1 did great, even at 6400, while only giving slight color shifts. The X-Pro2 seems to hold up a lot nicer at ISO 6400. Anything above that, and you can start to see some purple bleeding or “amp glow,” especially towards the bottom of the frame at ISO 12800.
EVF/OVF & LCD Screen
The EVF/OVF is very similar to the X100T. The major difference is that it adapts to your different lenses.
With the EVF, the frame rate has been increased to 85fps, making it silky smooth. It also has a 2.36m-dot resolution.
The LCD improvement is very nice now, featuring a 3″ 1.62m-dot display. As a comparison, the XT1 is something like a 1.04m-dot display, the Sony A7rII is about 1.2m-dot, the Sony A6300 is about 0.9m-dot, and the Samsung NX1 is about 1.03m-dot. So, it seems to outperform most of the competition in the mirrorless segment and is now one of the, if not the better, LCD screens I’ve used on a camera to date. I like it!
File Sizes – Uncompressed vs Lossless
The X-Pro 2 follows the trend of allowing us to shoot uncompressed. Sony and Nikon have started doing that.
While shooting uncompressed is nice, it does have some major drawbacks. One is that the file sizes are huge, about twice the size. The other problem is the bigger files will fill your buffer quicker, resulting in a noticeable slowdown when burst shooting. If you do a lot of burst shooting, I could see this becoming a problem, and you might want to get as fast of a memory card as possible to counteract this.
Compared to the competition, I should mention that the memory card writing speed of all Sony cameras tops out at about 34MB/s, while the X-Pro 2 is capable of 80MB/s+. So, for sports or nature photographers who shoot in burst mode a lot, you’ll be clearing your buffer almost three times as quickly. I’m not sure why you would buy a rangefinder to shoot sports or birdies, but rest assured, it will work great.
See the comparison between RAW Compressed and RAW Uncompressed. I made this comparison with the X-T2, but the results on the X-Pro2 were the same.
File Sizes
Approximate file size ranges.
Uncompressed: 50.3 – 50.6MB
Lossless Compressed: 21.4 – 27.9MB
JPEG: 11 – 16.2MB
Memory Card Write Speeds And Configurations
The Fujifilm X-Pro 2 takes dual memory cards, with slot 1 taking UHS-II cards and slot 2 taking UHS-I cards. This is the fastest camera I’ve tested with memory card write speeds, even faster than CF cameras. I’ve yet to test CFast 2.0.
With the Lexar 2000x, you can expect to see write speeds while shooting uncompressed of 108 MB/s.
With a 1GB buffer, 108MB/s write speeds, and an 8fps burst, this is the best-performing APS-C camera for burst photography, whether for sports or nature.
See the Fujifilm X-Pro 2 Memory Card Speed Test for more info.
Battery Life
Does the battery life of the X-Pro 2 suck?
There are many negative reviews about the Fujifilm X-Pro 2’s battery life floating around the Internet, and people email me with concerns about this. So, hopefully, I can clear this up.
Here is what I think is happening: the Fujifilm X-Pro 2 has an internal battery that must charge. Bloggers or photographers get the camera, and for the first day, they notice that the battery sucks. This could be partly because the camera drains some of the battery to charge its internal battery. Or, brand-new batteries must cycle a few times before you can see their actual life. This combo is probably making the camera perform much worse than it does, and people are overreacting.
People also tend to fiddle with the menus a lot more when they first get the camera, and this use will drain the battery quicker than just taking pictures because of the power-hungry screen and EVF.
My experience with the battery on the X-Pro 2
In one day, I took about 700 photos of just daily family life on vacation. By the end of the day, I was at 50% battery life. I continued to use the camera with the same battery for the rest of the week until it finally died, maybe 100-200 photos later. Pretty good, right? And I’m not lying. This is the performance I seem to get regularly. I also use manual lenses if that makes a difference; it probably does.
As a reference, my Fujifilm XT1 and Sony A6300 could also last me an entire day with moderate use. My Sony A7rII would use about two or three batteries in one day, and my Canon 5DII could take about a week of vacationing on one battery.
If the camera was only in OVF mode, I could see it lasting longer, but I’ve yet to test this.
One thing I’ve gotten really good about doing from shooting with Sony for so long is turning off the camera between each use. The reason is the camera will wait two minutes minimum before going into auto power off, and with the insane resolution of the X-Pro 2 rear screen, this can wreak havoc on battery life. Fujifilm really should allow us to set stand-by to 30 seconds—or at least one minute like every other camera on the planet. The Sony A6300 allows for stand-by at as low as 10 seconds.
Regarding a stand-by drain, or when the camera is off, the drain on the battery is not bad at all. Maybe 10% a week when left unused – if that. My Sony A7rII is dead every time I pick it up after a few weeks of leaving it on a full battery. It’s so frustrating. And I’m not trying to trash Sony, I love my Sony cameras, they break the record for having the worst battery performance in any electronic device in the history of mankind, except maybe the Xbox One controller and the first few iterations of the GoPro.
One thing I don’t like about the battery on the X-Pro 2 is that it goes from 20% to off in no time at all. This could be because some of my batteries are still brand new; I’m not sure, but it has been happening on my Wasabi batteries.
I will continue to test and update.
New Features
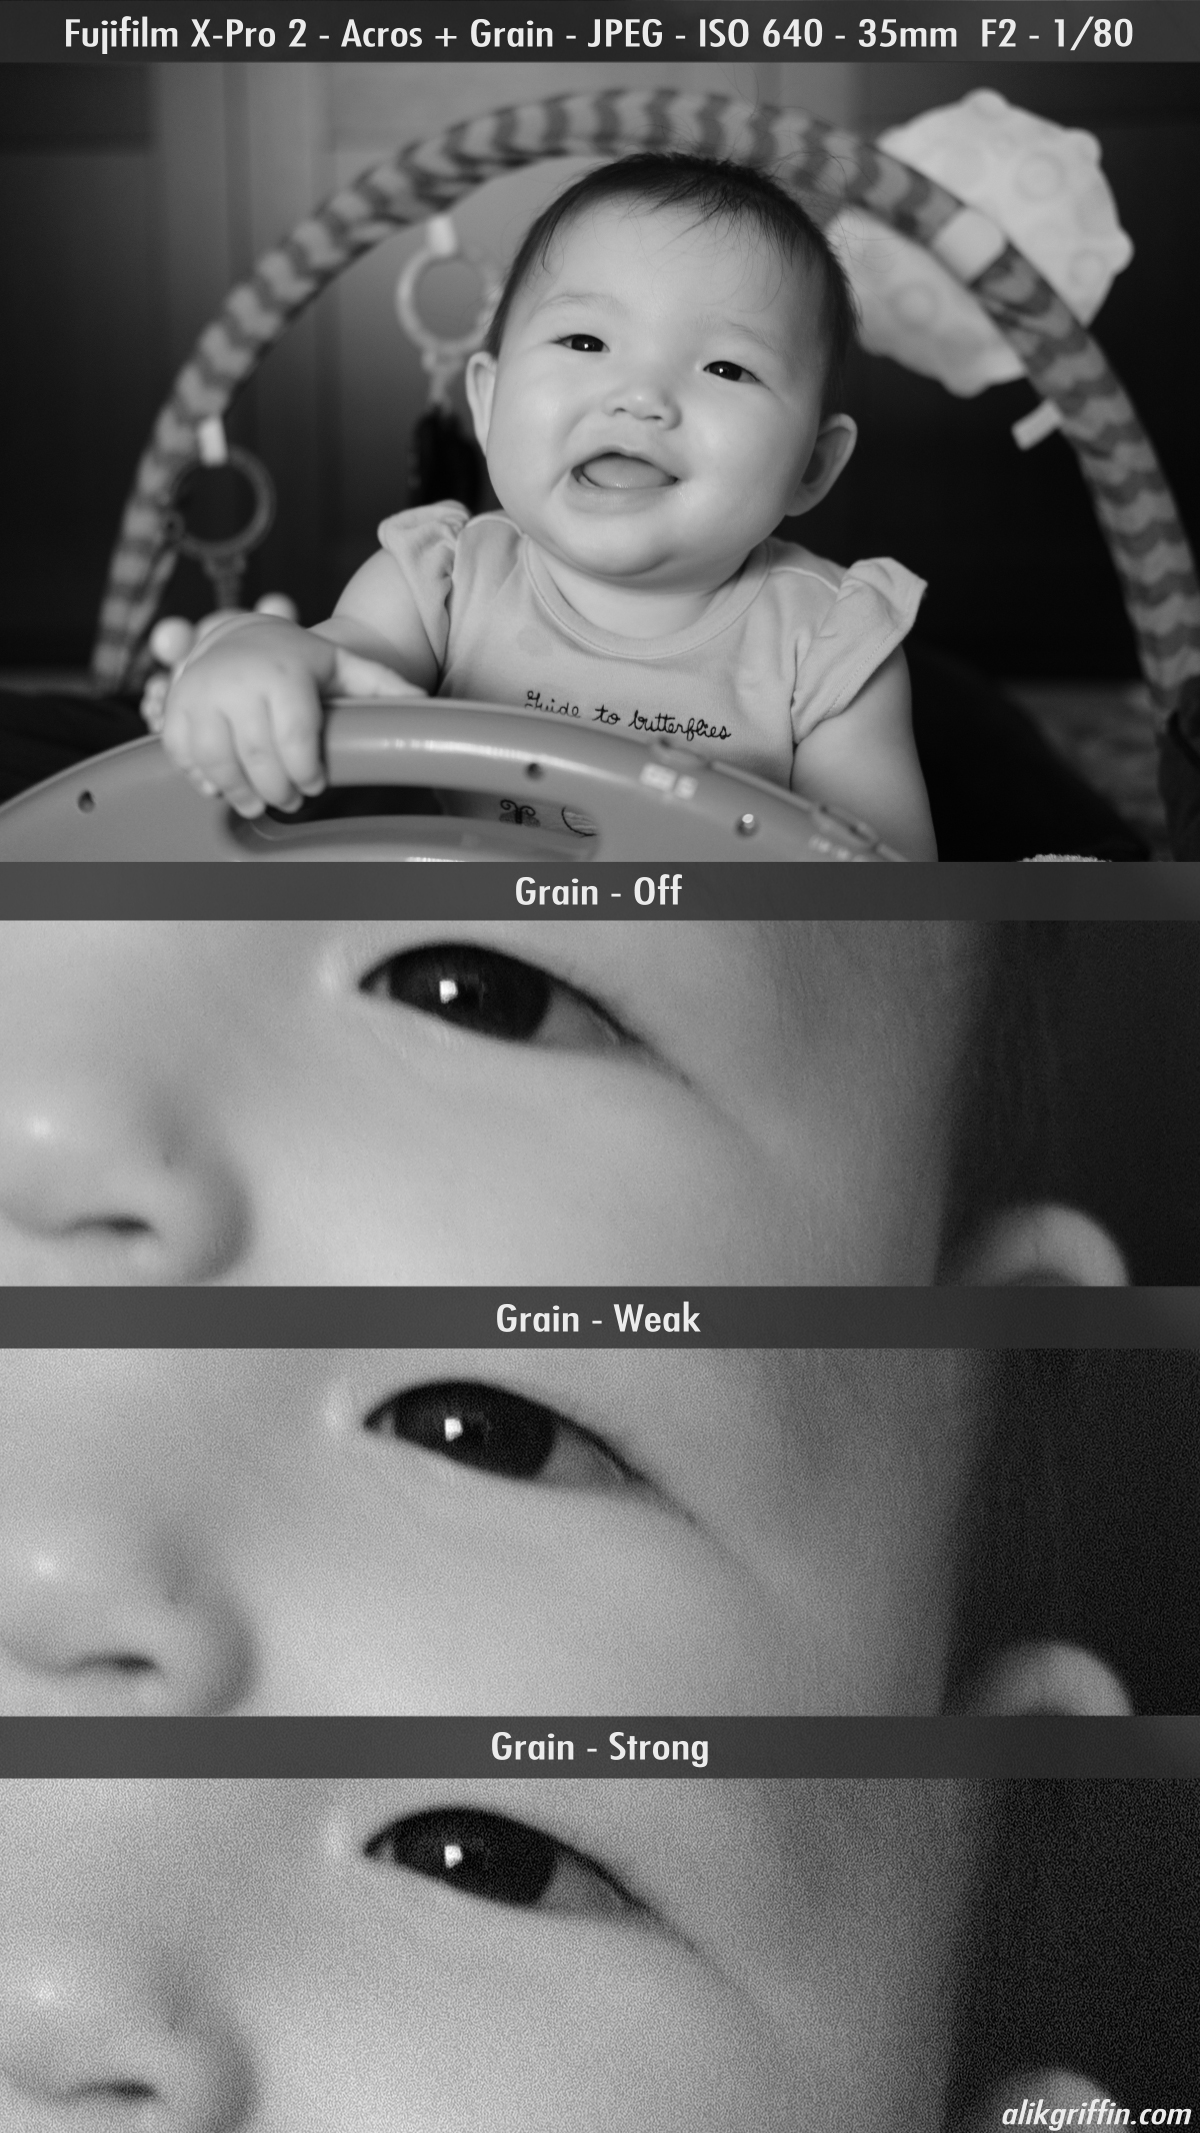
New Acros Film Simulator & Grain Effect
The Fujifilm X-Pro 2 comes with a new film simulator and grain effect. The film look is based on Fujifilm’s film stock Acros, with the option for R, G, and Y. It feels somewhat similar to the standard monochrome effect, but the blacks seem slightly lifted.
We have two options for the Grain effect. Strong and Weak. You can also turn it off.
Here is a sample taken with Acros straight out of the camera with all JPEG settings set to default.
Click to see the full size.
Bracketing / Landscape Photography
Something I’ve wanted from Fujifilm was for them to increase the range when auto-bracketing exposures in drive mode. With the X100T and XT1, you could only shoot at +-1 EV. This didn’t cut it when trying to shoot high-contrast landscape photography, where you need various exposures for exposure blending techniques.
The X-Pro2 has increased the bracketing to +-2 EV, something I’m very happy about. Thank you, Fujifilm!
The Menu
Fujifilm has made an effort to clean up and organize the menu. I’m still learning it, but so far, I like it. It’s one of the best menus you’ll find in a camera.
The only thing that’s weird to me is that they put Format under User Settings. This kind of doesn’t make sense since it’s not a user setting and is something we all use all the time, making it strange to see it buried like this.
They’ve also added a customizable menu called MY, allowing you to program your settings for quicker access. The camera will default to this tab when you first open the menu.
Silent Mode Is Gone
Did they get rid of Silent Mode? I can’t seem to find it anywhere. It’s not a huge deal, but I did use it sometimes on the X100T.
Now, you’ll just have to turn the camera to Electronic Shutter and turn off AF Illumination. Shutter options can be put in the Q menu, but AF Illumination is buried in the menus. This was one of the first things I added to MY menu to quickly put my camera in stealth mode.
Fujifilm X-Pro 2 Review | Bottom Line

So do I like this camera? You bet. I like it a lot more than I thought I would.
This camera has everything I love about the X100T and everything I love about the XT2 plus more, all in one body.
It’s just a pleasure to use, and it seems like it was built to connect the photographer with the camera in a way no other camera does. So far, I can’t find anything significant not to like.
Sure, there are a few things I wish it had, like a few extra Fn buttons on the body, maybe for a Wi-Fi button, but that’s just a matter of personal opinion. Sometimes, I miss the flip screen of the XT1 (I’m still in the habit of trying to flip it out), but at the same time, it would be wrong to put that on a classic rangefinder camera like this, and I don’t think I would ultimately like the camera as much if it had one.
4K video would have been nice, but I understand why it wasn’t included. Video was simply not the focus of this model and will be more suited for the XT2.
The X-Pro 2 in the Used Market Today
The X-Pro 2 has been succeeded by the X-Pro 3 and the X-Pro line’s future is an open question, which has made the used market for this body more interesting than it used to be. If you want an X-Pro rangefinder form factor without the X-Pro 3’s hidden rear screen (which is divisive), the X-Pro 2 is the one to buy.
What still holds up: the 24MP X-Trans III sensor produces the same basic look as the X100F and X-T2 from that era, which plenty of people still prefer to later generations. The OVF/EVF is a genuinely unique feature — no Fuji body outside the X-Pro line has it. Weather sealing, dual SD card slots, the hard shutter speed dial, and the build quality are all on the short list of what makes this body feel different from an X-T or X-H.
What’s aged: autofocus is a generation behind anything current, especially face and eye detection. No IBIS. No USB charging. The rear LCD is fixed. Battery life is average for mirrorless, meaning you’ll want two or three spares.
If you’re choosing between used X-Pro 2 and used X-Pro 3: X-Pro 3 has a better sensor and better AF, but that rear screen design is something you either love or hate. Try it in a store before you commit. If the screen choice makes you uncomfortable, X-Pro 2 is the rangefinder to own.
What Other Reviewers Are Saying
One of the topics I notice that reviewers are overly critical of is autofocus and ISO performance. While both features are important, judging a camera because it’s not good at continuous autofocus (a feature not that commonly used) or giving a camera a bad score because it doesn’t have USB-charging capabilities is not being honest about what a camera can do and is ignoring what a camera is designed for, that is, taking pictures.
I was first drawn to Fujifilm because they prioritized designing cameras for photographers, not technophiles. While some people might love USB-charging capabilities and a touch screen, they are the least important features a camera could have when it comes to taking pictures.
One feature often completely overlooked when reviews compare Sony to Fujifilm is how quickly the camera can clear buffer with memory card write speeds. This feature can impact the camera’s ability to take pictures.

Is This Camera Right For You?
A camera like this takes some getting used to. If you’ve spent your whole life shooting DSLRs, picking up a rangefinder will be awkward at first. This is why I think bloggers are often critical of cameras like this.
However, if you give it time, there are a lot of characteristics you’ll come to love about a mirrorless rangefinder, and you’ll find it harder to go back to any other form factor. Suppose you are the more casual shooter and want all the bells and whistles. In that case, I think the coming XT2 will be the mainstream camera of choice, but only as long as it has USB charging capabilities and a touch screen; otherwise, DPreview might not give it a good rating. 😉
Fuji X-Pro 2 Tips

There are so many options in the menu with no description that it is difficult to understand what does what. I’ll cover a few items and explain their meaning and how they work.
Interlocking Spot AE & Focus Area – This setting will adjust the AE to the same box as your focus area when in spot AE mode. This could be useful if you use your thumbstick to control your focus and exposure point. Alternatively, if you’re using manual lenses or in manual focus mode, you can still use the focused thumb stick to adjust the spot focus point, which only affects the spot AE area.
AF+MF – When in autofocus, you can fine-tune the focus by manually turning the focus wheel on the lens.
Pre-AF – When this is turned on, your camera will always be trying to focus. It’s kind of like continuous focus, but the difference is when you half-press the shutter to focus and continue to stay half-pressed your focus will stay locked at that point.
Corrected AF Frame – Having this setting turned on will adjust the frame lines in the OVF to accurately portray the framing depending on where the focus is set. An example of when this is useful is if you’re shooting an object that’s very close to the lens, you’ll see the frame lines move down and to the right to compensate for how close the lens is to the subject matter, since in this case, the parallax between the OVF, subject and lens is at a much bigger ratio. Note: This does not work with third-party manual lenses, and your frame lines will always be inaccurate when focusing on close objects.
Preview Pic Effect: This will preview the look of the film simulator you have set and its settings in the LCD and EVF. However, the black-and-white film simulators will still appear black and white when the setting is turned off.
How DR Works: You have DR settings between 100% and 400%. This works by limiting your ISO. When it’s set to 100%, your ISO is limited to 200; when it’s set to 400%, it limits your ISO to 800. What this ultimately does is force you to meter your exposure at a higher ISO, which will preserve your highlights by letting in less light and keeping the sensor from clipping.
This is useful if you occasionally miss your exposure or shoot something like a sunset and don’t want your highlights blown out.
When you’re shooting RAW, your true exposure isn’t technically dictated by how your ISO is set since it’s not contributing directly to how much light enters the camera. The ISO is only a tool for metering, and your exposure can be changed in the post as long as highlights aren’t clipped or the shadows don’t have too much noise—the X-Pro 2 sensor shoots close to its full dynamic range with every shot. Shooting underexposed at ISO 200 and lifting it 4 stops in Lightroom will give you similar results as if you were to shoot at ISO 3200 as long as your shutter and aperture were the same. If you’re metering at ISO 800 and are properly exposed at that setting, then you have about 4-5 stops of highlights to work with before they are clipped by what the sensor can do, but also keep in mind that your shadows will have more noise.
The main advantage of setting your DR is preserving your highlights. This is especially important when shooting JPEGs in high-contrast areas. I use this often when I’m shooting landscapes and want my JPEGs to hold their highlight details without clipping.
AF Illuminator: This is the light that blasts in people’s faces so the camera can find its focus. I find the contrast autofocus on the X-Pro 2 to be so good that this isn’t needed.

Fujifilm X-Pro 2 – ISO 1250 – f5.6 – 1/60
Weird Things The Camera Does
My X100T review was almost famous for its weird things the camera does section, so I thought I would also add this to my X-Pro 2 review since I’m already noticing a lot of weird things this camera does.
AE-L and Photometry Not Working: When the camera is set to AF-S of AF-C and any Smile / Face Detection settings are turned on, AE-L does not work, and the photometry buttons do not work. Photometry settings are disabled. However, they resume working when the camera is in manual focus mode.
I assume the camera wants to set the exposure and focus to any face it finds. However, if you turn on smile/face detection and shoot scenes without people, then your AE-L and Photometry settings are still disabled. I don’t like it like this. You should always have control of your photometry and AE-L, and smile/face detection should only take priority and be overridden when there is a face in the scene.
AF-L Not Working: AF-L, like AE-L, also does not work when smile and face detection are on. This should be overridden since you have to manually push the button to gain the effect.
OVF Overlay Too Bright With Manual Lenses: When I use manual lenses, the pale rectangle that’s usually almost completely transparent is too bright, making it difficult to see in dark situations. This uses Leica Mount lenses with the official Fujifilm Leica M to X-Mount adapter.
I think there should be an OVF brightness setting in the controls so we can turn it down to save power or make night shooting easier.
Instant AF setting AF-C or AF-S: This option is only relevant when the camera is in manual focus mode. When in AF-S or AF-C, the Instant AF button or AF-L always works as AF-S or AF-C, depending on your mode. This doesn’t make sense to me since it’s now causing the button to mirror the shutter button, which is redundant. Please set Instant AF mode; it always works with how you set it.
No Sound & Flash Off Mode: It was originally called Silent Mode, then they changed it to Sound & Flash Off, which was weird because when you turned the Sound & Flash Off Setting On, it meant the sound and flash would be off. They should have called it Sound & Flash, and you could toggle on or off to eliminate the confusion. I’m not sure why Fujifilm is having such a hard time with this terminology, and maybe this is why they got rid of it on the X-Pro 2. Just call it stealth mode, incognito mode, sneaky mode, creeper mode, stalker mode . . . ok, maybe I shouldn’t name it. But you get the point. At any rate, it was useful on the XT1 and X100T.
Correct AF Frame Does Not Work With Manual Lenses: I’m not sure if it would ever be possible to fix this since the manual lenses don’t send any electrical signal telling the camera what focal distance it’s set to, but it would be cool if this could work. As I mentioned, it only doesn’t work when the subject is close to the camera, so if you’re street shooting, you’ll be fine most of the time. This setting should probably be grayed out when a manual lens is put onto the camera to eliminate confusion.
Fujifilm X-Pro 2 Review & Sample Images
Sample images were taken with the Fujifilm X-Pro 2 and processed in Lightroom. Some images are straight out of the cam (SOOC). I haven’t done too much with Iridient Developer yet, but so far, the images are insanely sharp.


Leave a Reply