With the introduction of Aurora HDR into my workflow, editing has become significantly more efficient and quicker. However, it now requires the use of three different programs (Lightroom, Photoshop, and Aurora HDR) to achieve all the desired results. I could probably get everything I needed done in just Photoshop and Aurora, or just Lighroom and Aurora, but Lightroom makes it much easier to adjust gradients, colors, curves, brushes et,c and each program still does have some limitations.
Lately, I’ve been trying to keep the work done in Photoshop to a minimum, because if you start adding too much to a Photoshop file, it quickly balloons to being 2GB+. In Photoshop, I typically combine exposures, perform some basic cleanup, and add a sunlight glow. Once things feel good, I can flatten the layer so it reduces to a more manageable 200MB file.
This is why Lightroom is great. You can make all these adjustments without increasing the file size, as they are all done through metadata. Aurora I think does a little bit of both because the Aurora files do get pretty big. Nowhere near 2GB though.
My New Workflow
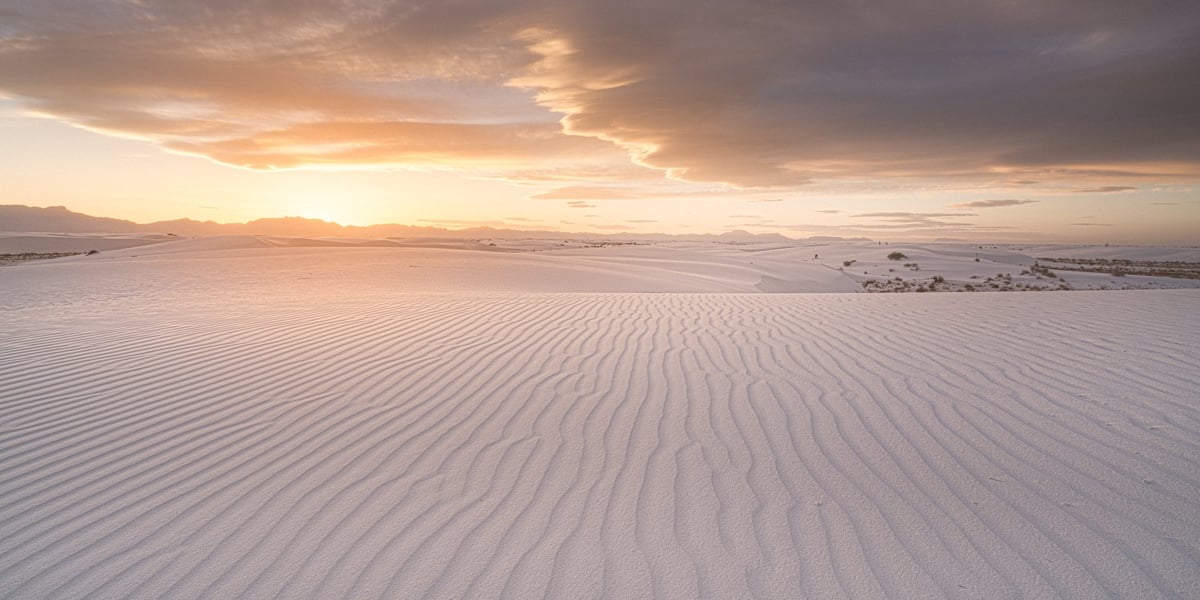
Depending on the shot, I’ll combine my bracketed shots in Photoshop or Aurora HDR. I’ll use Aurora if there’s just too much dynamic range for me to handle easily in Photoshop. However, if the scene is relatively simple, I can combine my shots in Photoshop using a cool trick that I rarely see people use. It goes like this.
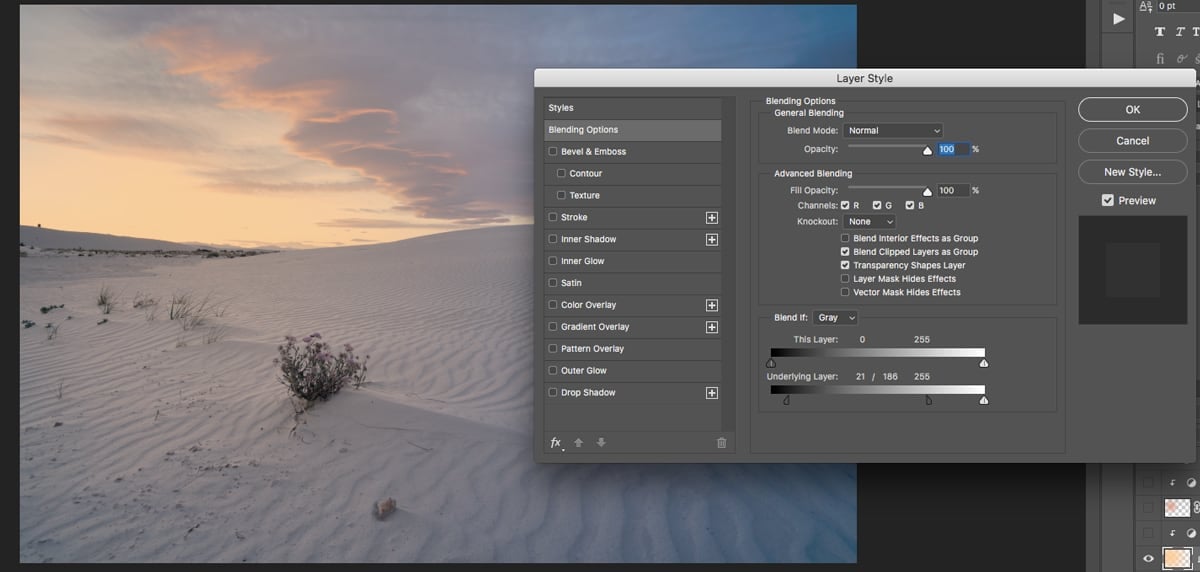
Combining Exposures In Photoshop Using Layer Style | Underlying Layer
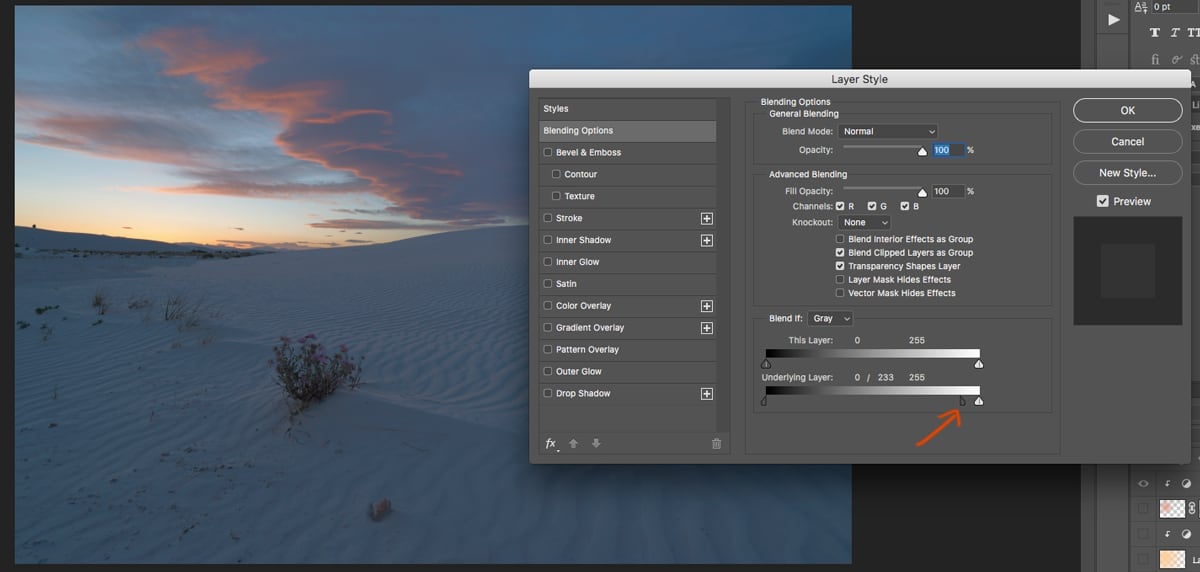
When you stack your photos in Photoshop, you can place your darkest exposures on top. Then, double-click that layer to open the Layer Style window. Notice at the bottom, there is this setting called Underlying Layer. This is essentially a Luminosity Mask, but way more powerful.
Using this trick is usually better than using Apply Image in a layer mask, and it’s way better than the 1990s technique of creating luminosity masks that many Landscape photographers still use.
The advantage of using Apply Image on a layer mask is that you can add a subtle blur to smooth out the image further.
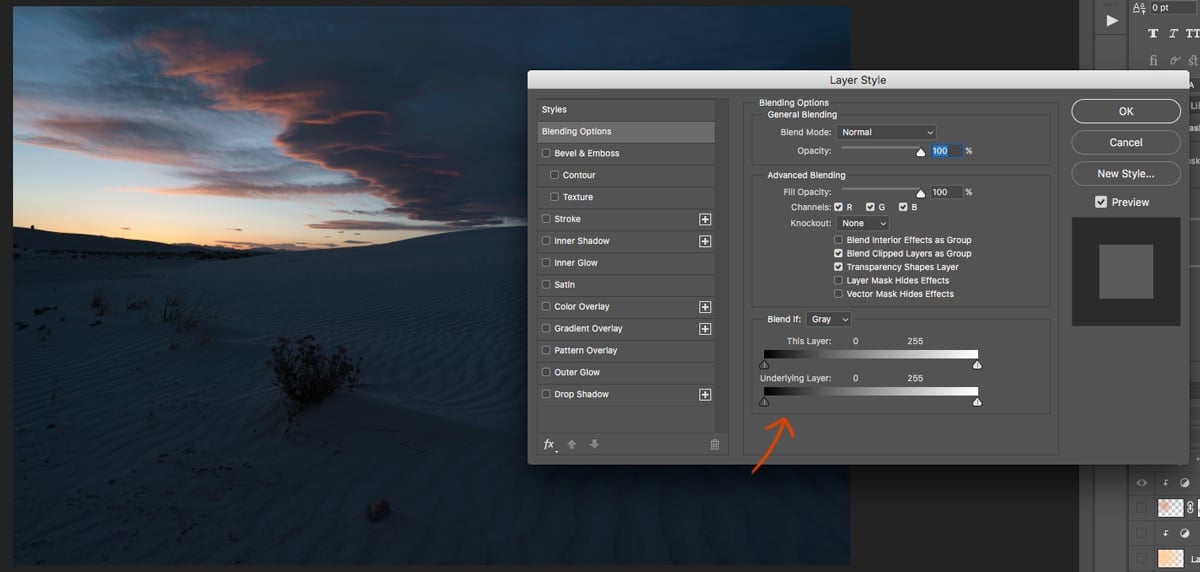
Once Layer Style is open, on the left of the Layer settings, you have the shadows, and on the right, you have the highlights.
The trick here is to hold down the Option or Alt key to break apart and drag out the control handles.
What this does is mask out the shadows, allowing you to adjust the mask with a gradient-like effect. You can even grab the far left control handle if you want less of the blacks or shadows to be affected.
I do the same thing with the highlights when I’m enhancing some color on sun stars and don’t want the color enhancements to affect the extreme highlights.
This is actually how I think Aurora HDR should implement its luminosity masks, since they still seem to use the old-school method.
Next, I can paint in some of the other exposures that I need using the Layer Masks and using the Underlying Layer trick when needed.
Photoshop Enhancements
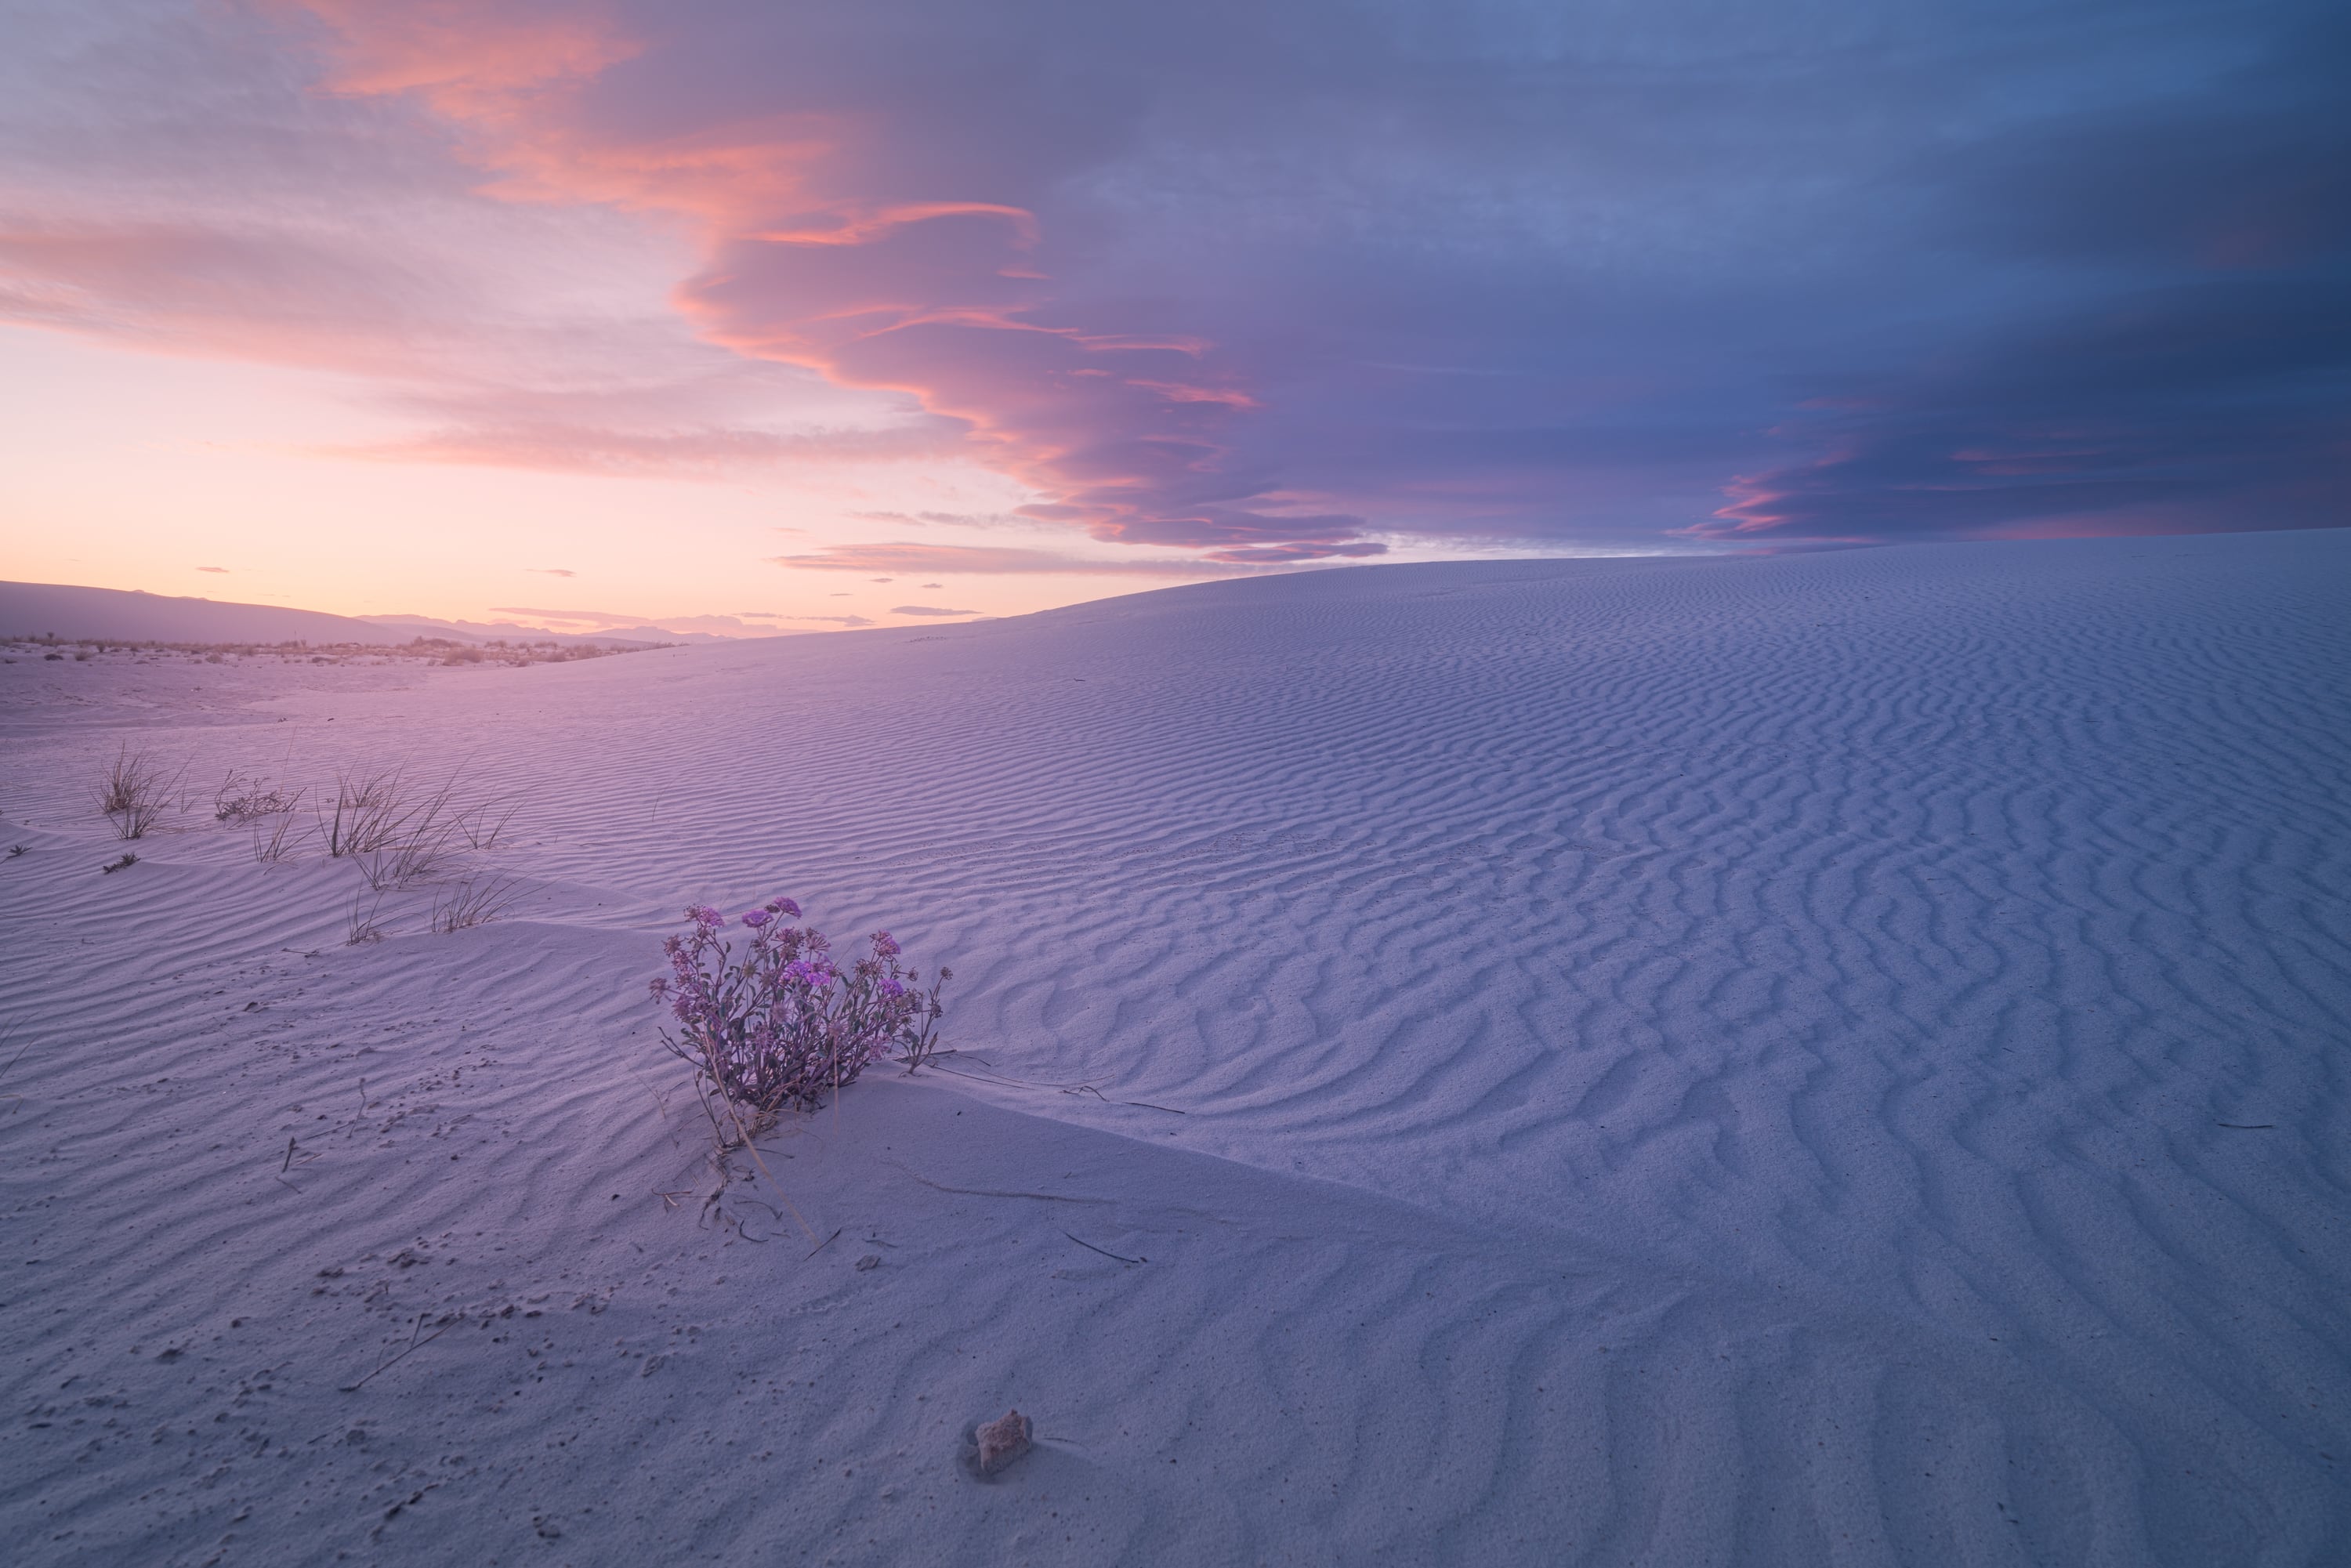
Finally, I like to add some color to the sunlight. I also do this using the Underlying Layer.
I like to do this by painting on some color using the Radial Gradient tool around where the sun would be and use the underlying layer to keep it out of the shadows.
Sometimes, here, I’ll pull the far left control handle out a little bit just to ensure the blacks are not affected by the light. It creates a very cool, crispy shadow look.
Then adjust the opacity slightly so it’s not too intense.
I usually do this trick at least twice.
Once like what you see here, and again with a slightly redder color, with a much smaller Radial Gradient around the sun.
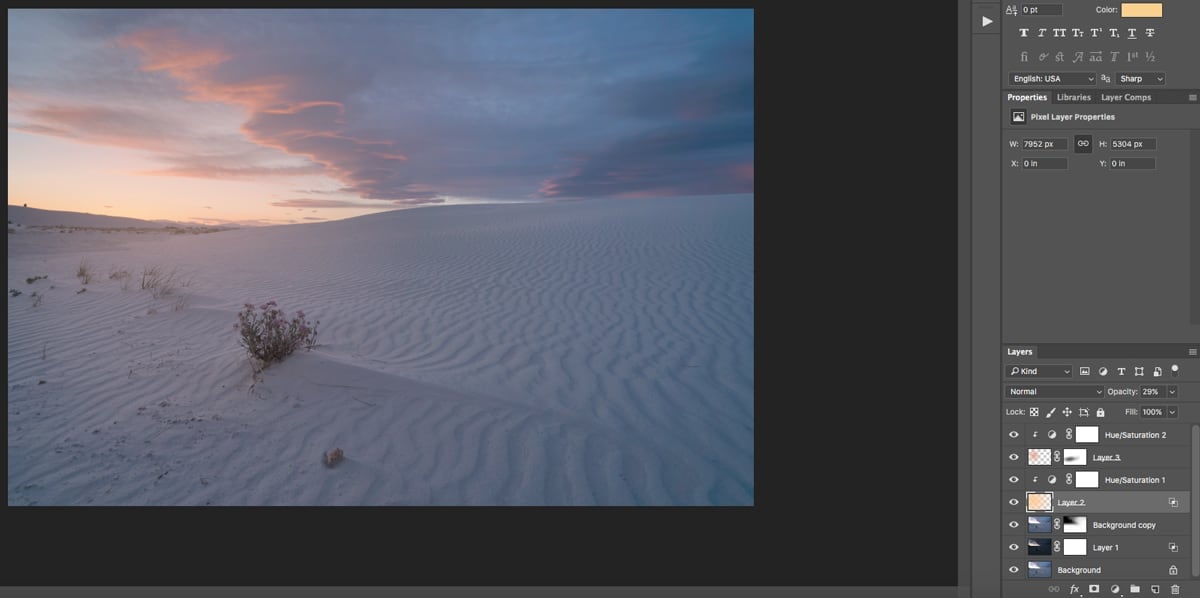
Note that you can use the Hue/Saturation tool on your layers to adjust the lighting. You just have to ensure they are applied only to the layer below and not to the entire composition.
I used to do a lot more work in Photoshop, but this looks pretty good, and it’s time for Aurora HDR.
Into Aurora
In Aurora, I get a little crazy. I’ve been using the software in a way that differs slightly from how I think it was intended.
Instead of just using presets, I’ve been stacking up the Adjustment Layers and working with each effect on each layer, so I can quickly adjust them if I go too far.
I didn’t save the above photo, but I have another photo as an example.
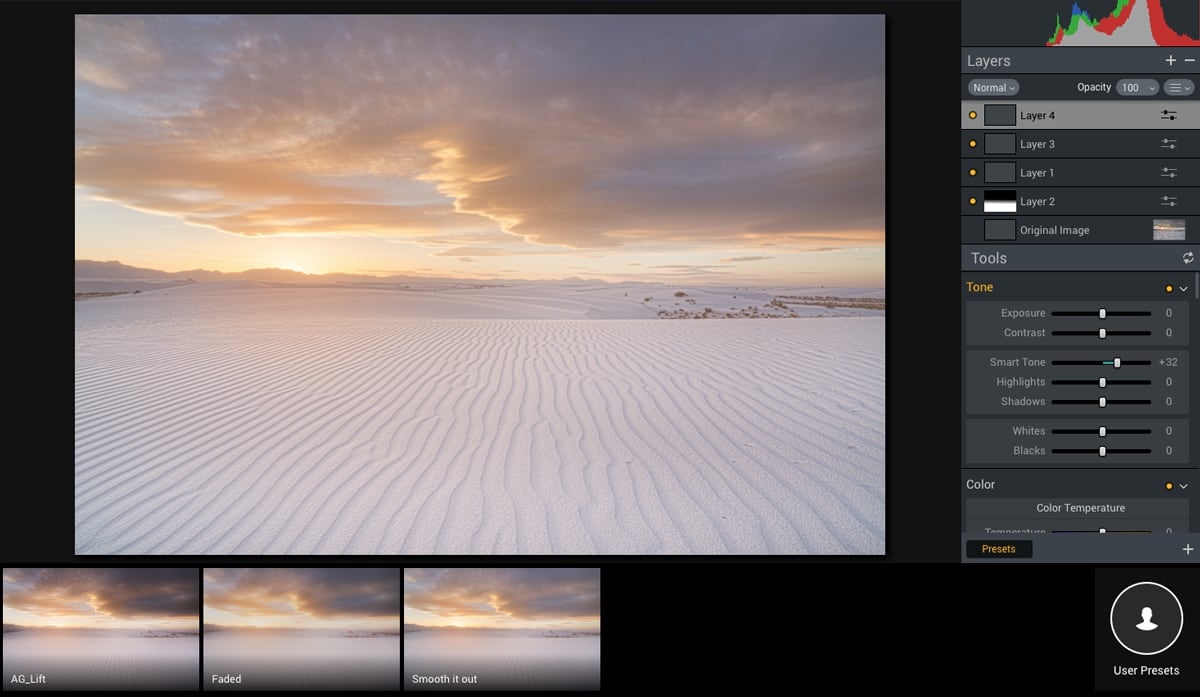
In this shot, I used the technique shown above in Photoshop, but I’ve now added several layers.
Here’s a little of what each one does.
Layer 1 – I first laid this layer but then moved it over layer 2. Layer 1 was just Radiance. Not a lot.
Layer 2 – Here, I added a gradient so the layer would only affect the sand. The tool I used on this layer was the HDR Structure with the Amount set to 32 and the Softness set to 0. This gives that crispy sand look.
Layer 3 – Just some Glow with some color added.
Layer 4 – The final layer here was a mix of everything. Some Smart Tone, some Radiance, Tone adjustments, Color adjustments etc. I have all these adjustments baked into a preset. In this case, it was “Smooth it out.” However, there are a number of small adjustments. Nothing drastic.
What’s cool about making a series of small adjustments in different layers is that you can quickly adjust the opacity of each layer to increase or decrease it. This makes tuning the look much easier.
I then Export to Lightroom.
Finishing In Lightroom
Lightroom is where I make all my fine adjustments. Noise Reduction, Sharpness, Grain, Crop, and some color and tonal tuning, vignetting etc. This is sort of where I decided the final look of the image,e so I can easily and quickly come back and tweak things.
I usually have a rule where I don’t publish anything unless I’ve sat with it for a few days.
Sometimes I’ll think a photo looks great, only to come back to it the next day and immediately see everything wrong with it. This is why Lightroom is nice. It’s all right there and easy to tweak.

New Workflow Final Thoughts
If you’ve seen my AuroraHDR review you can now see why I was so excited about this software based on how I’m using it. I still get to use all the power of the Layers like in Photoshop but with a much easier to use interface that is designed for the landscape photographer.
This new workflow also saves me a ton of time. Shots like the ones shown here used to take me at least an hour or two to get right. I think I did each of these in about thirty minutes.
Let me know if you like these little tips, and I’ll try to sprinkle some in between all my memory card speed tests.


Leave a Reply